

It's been about two weeks since the sheet piling finished. Feels longer, honestly. We've been keeping busy with a mix of site housekeeping, fence building, and some decisions about what comes next.
If you've been following along, you know this block has its quirks (as every site does). Ground water, boundary wall demolition, and ground that's been thoroughly disturbed by all that piling work. Fun times.
Let me walk you through where we're at.
First Job: Make It Safe
Before we could even think about excavation, we needed a temporary fence. Can't have anyone accidentally wandering into a hole that isn't there yet, right? So we built a basic timber fence—rough sawn pine (green)—bolted it through the sheet piling, and battened screwed together.
Nothing fancy, but it does the job.
Taking Down the Old Boundary Fence
The existing fence between us and the neighbour was about 40 years old. Time for it to go. So first, we installed a temporary fence over their side with two layers of shade cloth for privacy. Not perfect, but better than one layer.
Then came the fun but dangerous part. We got the excavator in, broke the first section, grabbed the rest with the bucket, and the whole thing just came down in one go. Exactly what we'd hoped would happen, but weren't really sure it would work out until we tried.
The Engineered Footing
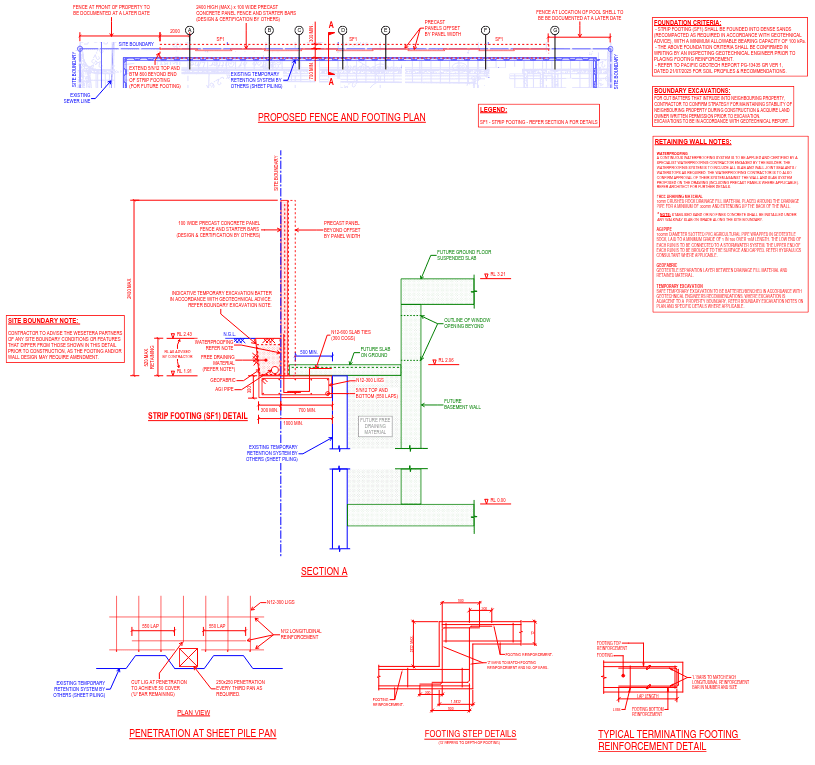
We're installing tilt panels between the two properties. The company that makes them wanted to use their standard footing detail. We said no.
Why? Because the ground around here isn't standard anymore. Pre-drilling for the sheet piles disturbed the soil in about a 1.5 to 2-meter radius, which changes the soil density.
Here's the thing with tilt panel fencing companies—they usually have one "standard engineering detail" they designed once and then reuse for every job. Sounds efficient, right? But every site is different. Soil composition varies, groundwater levels vary, and what works on one block won't necessarily work on yours. That standard detail? It only really suits certain soil conditions. Not all of them.
My advice? Ask the tilt panel company for their panel engineering upfront. Take that to your structural engineer and have them design a footing or pier specifically for your geotech report. That way, you know your foundation is actually built for your site—not for someone else's.
So we went to our engineer and got a custom design:
- 1 meter wide, 300mm thick. That's a decent size for a fence.
- Steel reinforcement: five bars top, five bars bottom, with ligatures every 300mm.
- It extends slightly under the boundary line to give us enough weight to resist wind load.
We made the steel cages on-site and hand-dug the trench. Why so over-the-top? Because these panels are heavy, and if a big wind loading from the side, that footing needs to hold.
Levelling the Path and Fixing the Details
Once the engineer site inspects and signs off, we'll pour the concrete. We're reversing the trucks right up to the edge and pouring straight from the chutes—saving on pump hire, which is always nice.
But there's another issue. The sheet piling has caused the path alongside the house to drop 55 to 75 millimetres. So we're going to underpin off this new footing, jack it back up to level, and pack it with high-strength concrete every 1.8 metres or so.
We'll also need to sort out the tile line along the boundary. It's an overlap panel system, so there'll be a gap on one side. We'll sit down with the neighbours and figure out whether we cut a straight line through the tiles, replace them, or put in a drainage grate. Whatever looks best and works practically.
And we can't forget the trees. While we were digging, we undermined a couple of the neighbour's trees. We lifted them out carefully with the excavator and replanted them further back. We engaged an Arborist to inspect the tree and provde a nutrient program. Hopefully the they will settle in okay. If not, we'll have to replace them/make good back to what they had.
Dewatering
You might have noticed those formatubes we've placed in the footing. Those are 300mm voids that will let us install spear points for dewatering. The system will suck moisture out of the ground so we can safely excavate the basement.
We had a conversation with our structural engineer yesterday that changed our timeline.
We can't pull the dewatering system out until the ground floor slab is poured.
Why? Because the basement slab and walls aren't heavy enough on their own. If we pulled the dewatering too early and we got a big downpour, the groundwater pressure could literally pop the slab up off the ground. That's not an exaggeration—it's a real risk.
So we need that ground floor slab in place to give us 22 kPa of downward force. Only then is it safe to switch off the dewatering.
Dewatering runs at about $7,700 a week, and with the system running an extra 10 to 12 weeks, we're looking at another $70,000 to $80,000. We'd budgeted for some of it, but it still stings. Still, it's a whole lot cheaper than fixing a popped slab.
Once the system's installed, it gets primed and flushed. Then comes the water testing. That's when we find out two crucial things: the size of the filtration plant we'll need, and how much flocculant (the chemical that treats the water) we'll be using.
If iron shows up in the water, we'll need additional filtration equipment on top of everything else (see the article below). Plus, we'll have to bring in a vacuum truck weekly to remove sediment from the filtration tanks. It all adds up.
 Danielle Mahe
Iron and Acid Sulfate = red staining. Note: the fine is $17,000/day until remedied.
What Else Is Happening in the Background?
While all this fence and footing work has been going on, we haven't been ignoring the paperwork side of things:
- The building over sewer application is in—we just need to update a few plans for council (Quality B Survey required).
- Plumbing and drainage approval has come through.
- Civil engineering documents are with council for operational works approval.
- We're waiting on the structural engineer to finish their design. They've told us two weeks.
Once we get those Form 15s for the basement slab, walls, and excavation, we'll bundle everything up and send it to the certifier for building approval.
We'll also need to make some minor changes based on feedback from the interior designer and the client, but we're not interrupting the engineer's process right now. They're slow enough as it is.
What's Coming Up Next?
We've got new materials delivered to continue the safety fence down the side of the property. That'll let the owner get to the back and the boat without any risk once the excavation starts.
We'll pour the footing, fix the path, and keep plugging away at the approvals.
It's a beautiful afternoon here, and while there's always more to do than time in the day, it feels good to be making progress.
Thanks for sticking with us—I'll keep you posted on what comes next.


