

Painting Inspection: what to check from paint choice to the final coat
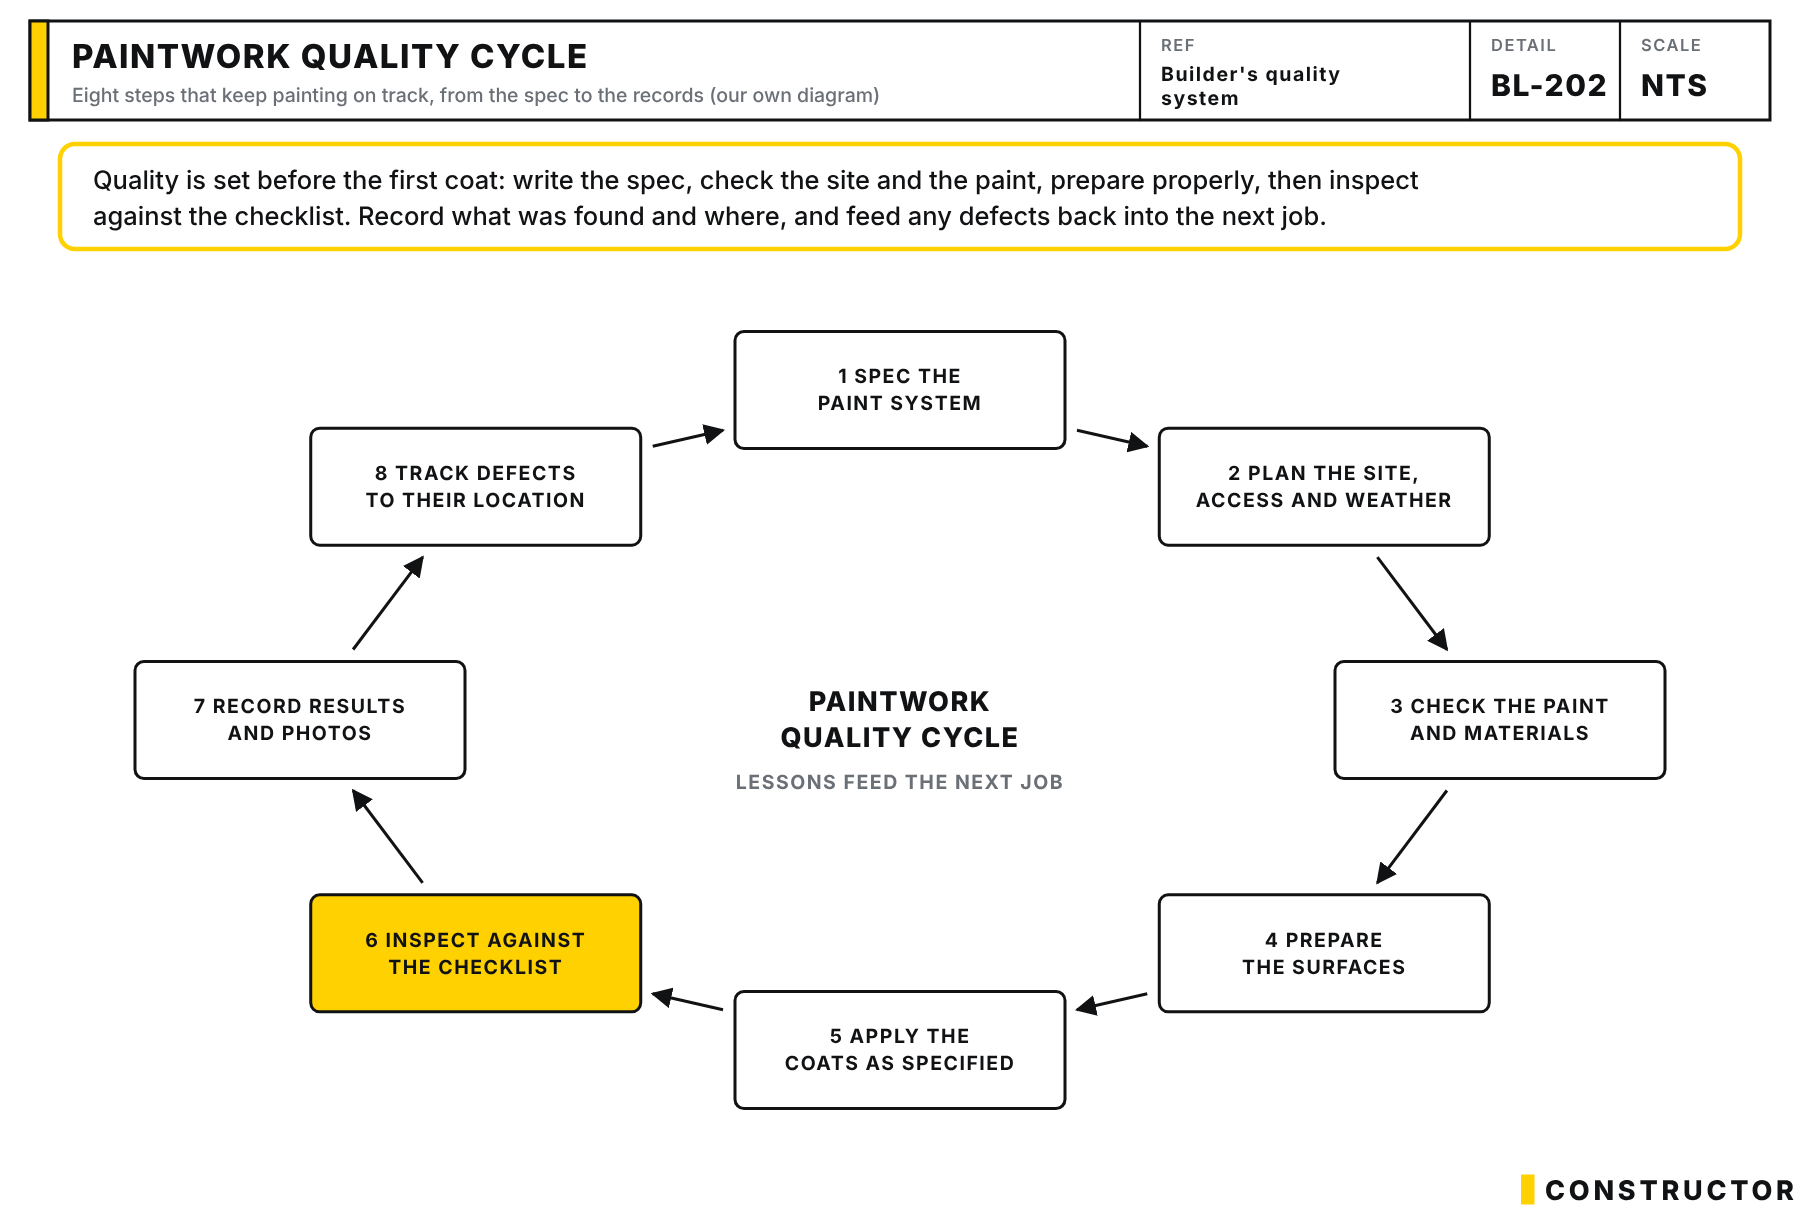
Before painting (S1 and S2). Your colour schedule and paint system, then a walk to check the plaster and preparation.
After the sealer coat (S3). Mark plaster faults while they are cheap to fix. Tick Fine, Later (not yet) or Issue.
The finished paint (S4 to S8). Room by room, then outside and the clean-up. S8 lists what your builder should be doing: ask to see the records.
The 8 sections
- S1Before painting startsColour schedule with sheen, paint system per surface, washable wet areas, Level 5 for gloss or dark, low-VOC, sample patches9
- S2Before the first coatPlaster list fixed, tins match the schedule, prep and gap filling, masking, 10–35 °C weather, timber primed, render cure time8
- S3After the sealer coatSealer undercoat on all new plasterboard, joints, screw heads, dents and scratches marked by torch while cheap to fix2
- S4Walls and ceilingsJudged from 1.5 m in daylight, clean cutting-in, solid colour, even sheen, no visible joints, no paint on tiles or fittings9
- S5Doors, trims and joineryDoors on all six faces, even gloss, filled gaps and nail holes, undercoats, paint-free hardware, sills and reveals, handrails9
- S6OutsideEven walls and render, eaves, sealed timber end grain, cladding finish, exterior doors, primed steel, no overspray, deck coatings9
- S7Clean-up and touch-upsNo paint on finishes, labelled touch-up tins, touch-ups that blend, waste and masking gone, your list sent, data sheets, cure time7
- S8What your builder should be doingSediment control, signs and toilet, services undamaged, site drainage, pre-paint plaster inspection, wash-out, coat records10
Introduction
Building a home is a massive investment, and watching it go up is quite the experience. Wow, it looks huge once the site is cut. Then the slab goes down: "now it looks small again." Then the frame goes up, and suddenly you can picture the rooms and where the furniture will go.
When it comes to painting, there are things you can do at design stage, before painting starts, and during the work that make all the difference to the final finish.
You might wonder: "How do I know the paintwork is being done right? What should I be looking for at each stage?" The answer is simpler than you might think.
So we've created a detailed checklist. It's not a guide on how to paint; it's a tool for overseeing the painting process.
Below I walk through each section of the PDF: what to check, when to check it, and why it matters.
A note on this Checklist
This checklist is for you. Not your builder, not the site supervisor: you. It's your quality assurance tool, from design stage right through to how the choices you and your builder make affect the paintwork.
The purpose here is simple: give you the confidence to ask smart questions without sounding like a pain in the arse.
Using this checklist doesn't make you "that client." It makes you an informed one. Good builders appreciate a constructive conversation. They'd rather you raise a question early than deal with a problem later.
Communication is, I reckon, the single biggest problem in residential construction. Not tools, not materials, not weather: communication failure.
And it usually shows up in one of two ways: positional, or a lack of detail.
Builders often use their knowledge as leverage. It's a tool to "win" a conversation, to maintain flexibility, to keep things in the grey so they can shift position depending on the outcome they want.
My issue with how houses are being built is that the detail in the Australian Standards isn't being applied or carried into the contract documents. Whether you're a builder or a trade, the Standards set out a prescribed "best way" we must or should build.
Builders often say: "They're only for the bigger companies, the ones with more staff."
I don't accept that.
Anyone with eyes can read a Standard and build a checklist for a critical stage or witness hold point. It's not complicated.
Most builders and trades haven't read them. Or they're "too busy doing" to know what the Standards actually say. The result is work that may look fine but hasn't been checked against the Standard you're paying for.
C15 - Painting Inspection Checklist
$59.00 AUD
Last updated 21 Oct 2026 · Revision 3 · Free updates for life
Checklist Type: Minor
Form Factor: Fillable, print-ready PDF (A4, 54 pages)
When to use: Painting stage: from specification through to the final finish inspection
A 309-point painting checklist. Verify the paint specification, surface preparation, application and finished work in line with AS/NZS 2311, from colour choice to final inspection.
✓ Authorship verified on the blockchain · View certificate
So how does this get better? How do we actually lift quality in the construction industry?
In my opinion the only way is through Client/customer education.
Regulation and self-regulation clearly aren't working. Builders are only "penalised" after clients pursue them through state regulatory bodies, and the compensation at the end of that arduous process is often capped and doesn't cover the problem or your time. Legal action is slow and expensive, and the costs can outweigh what you recover. Prevention is cheaper than a dispute.
And getting the right information isn't easy. Free access to Australian Standards through public libraries has ended, so most homeowners (and plenty of builders) now have to pay to read them.
 Anthony Painter
We can't change every builder or trade overnight. But we can educate clients like you, and create market forces that lift construction quality, instead of accepting the old "we've always done it this way and never had a problem" line.
Because let's be honest: "never had a problem" usually means "nobody ever called us on it."
That's the end of my rant about the construction industry. Now let's get into the sections of our paint inspection checklist, so you know what it can do for you.
Section S1: Site Management Items
When to Use It: During the project, yes, even at the pre-paint and painting stages.
What You're Checking: That erosion and sediment controls (ESC), like the sediment fence, are working and that the site is safe and tidy. It's a reminder to stay on top of site management for compliance and out of respect for your neighbours.
Why It Matters: A well-managed site is the foundation of a good build. Mud tracked onto the road or sediment washing off site can cause problems with your council and your neighbours.
Here's what most people don't realise: trades take their cue from the site they walk onto. If it's already messy, they feel like they've got a hall pass. If there's rubbish on the ground, that's where theirs will go too. No dedicated bin or rubbish enclosure? Zero care factor.
Why bother cleaning up if nobody else does? The thinking goes: "I won't be here long, not my problem. I'll do my bit, get paid, and someone else can pick up my rubbish."
Stay on top of it early and it's easy to see who's creating the mess, so you can deal with it before it snowballs.
Items Explained:
- S1.01 asks you to check the sediment fence. This is for preventing soil erosion and keeping the site clean.
- S1.05 asks if the Erosion and Sediment Control (ESC) plan is displayed. This shows the builder is following best practices for site management.
- How to approach the builder: "I'm keen to make sure the site is well maintained. Are the sediment fence and ESC measures in place and working?"
Sections S2 to S9: Design and Specification
When to Use It: During the design and planning phase, before any paint is applied.
What You're Checking: The key decisions that shape the final result: the house design, the paint system, the influence of climate, colour selection and gloss levels.
Why It Matters: These choices directly affect how durable your paintwork is and how it looks. For example, choosing the wrong gloss level can make walls harder to clean or make touch-ups stand out.
The higher the gloss, the better the substrate preparation has to be, because gloss highlights every flaw. The standard plasterboard finish in residential construction is Level 4. High-gloss walls really need a Level 5 finish, which is fully skim-coated for a consistent surface.
 Anthony Painter
 Anthony Painter
Does AS/NZS 2311 apply to new residential houses?
Yes! Most standard residential building contracts require all work to comply with relevant Australian Standards. For painting, this is AS/NZS 2311. When the builder signs the contract, they're agreeing to follow it.
Tribunals use AS/NZS 2311 as the benchmark for deciding whether painting work is acceptable. For example, paint defects have been judged by whether they're visible from the viewing distance (typically 1.5 to 2 metres) the Standard uses to define a defect.
To be clear, the Standard describes itself as "a guide to products and procedures for the painting of buildings for general domestic, commercial and industrial use". It sets the baseline. Builders can go above it, but they shouldn't go below it.
Checklist Items Explained:
- S2.01 sets out the scope of the painting work, and notes that the manufacturer's recommendations apply where the Standard (AS/NZS 2311) doesn't give a clear answer for a specific situation.
- S4.08-S4.13 from the "Influence of Climate" section are important, particularly for exterior paint. They cover how moisture, condensation and environmental conditions degrade paint and how to reduce the effects. This is where you ask your builder about the paint system they're using for your site's location.
- S5: "Internal Environments of Buildings" covers areas like kitchens and bathrooms. Flat finishes aren't recommended there because of steam, grease and the need to wash surfaces. The materials used in each area matter as much as the paint on them.
- How to approach the builder: "The checklist recommends considering the climate and room use when choosing paint. Can we review the selected products and sheen levels and finishes (roller/spray/brush) together?"
- S7: Selection of Colour: Consider how light (or the lack of it) affects plasterboard and paint in each area. Running plasterboard sheets parallel to the main light source improves the finish. Dark colours need more substrate preparation and primer coats to finish well, and they absorb heat, which can shorten the life of the coating and mean more maintenance.
Sections S10, S11, S12: Surface Preparation for Substrates
When to Use It: Once the substrate (timber, gyprock, metal, etc.) is installed and ready for preparation.
What You're Checking: This is arguably the most important stage: preparing every surface so the paint adheres properly. Check that timber is properly primed, that plasterboard joints are smooth and set to the specified finish level, and that all surfaces are clean and free of contaminants.
Why It Matters: Poor preparation is the main cause of premature paint failure. Get it wrong and adhesion and finish suffer. Prevention is better than cure.
Key Items Explained:
- S10 for timber: Timber must be at the right moisture content before painting, and dark colours increase heat absorption. Primer should be applied to all faces, including end grain, to reduce moisture getting in. Sharp edges should be rounded to help the paint hold.
- S11 painting plasterboard: Covers "glancing light", where light skimming across a wall highlights every imperfection in the plasterboard finish. It's one of the biggest problems with paint finishes, and it's mostly caused by design: the position and choice of light fittings next to or shining across painted surfaces. That's why a Level 5 finish is best for areas with strong, angled light.
- S12 preparation of surfaces: General surface preparation is covered here, including cleaning and the importance of checking for moisture. For example, the checklist includes the note: "Inadequate preparation is the primary cause of premature paint failure and can expose the painter to liability, as applying paint may be interpreted as acceptance of the substrate's suitability for painting".
- How to approach the builder: "The checklist puts a big focus on surface preparation. How do you make sure the timber and plasterboard are ready for painting, and can we check the moisture levels together? What do you use to check moisture content?" (A moisture meter is the correct answer here. 😄)
Sections S13, S14, S15, S16: Paint Application and Sequence
When to Use It: During the active painting phase.
What You're Checking: This is where you oversee the actual application. You’ll be checking the correct use of materials, sealers, and undercoats, as well as the climatic conditions during painting.
Why It Matters: Even with perfect preparation, poor application technique or incorrect conditions can ruin the paintwork. The temperature, humidity, and application method all play a vital role.
Key Items Explained:
- S14: Paint Application. The checklist sets out ideal temperature ranges (15°C to 30°C) and warns against painting in high humidity or direct sunlight. It's a good time to ask your builder about the program.
- S15: Methods of Application. The checklist notes the importance of "back rolling" a sprayed-on coat to create a uniform finish, as it's "strongly recommended".
- S16: Sequence of Paint Application. For plasterboard, AS/NZS 2311 recommends a three-coat system: sealer undercoat plus two topcoats. If your contract requires work to the Standards, treat this as the baseline. If your builder tries to skip the sealer, you'll know exactly what's being left out.
- How to approach the builder: "The checklist says temperature and humidity matter during painting. Can you talk me through how you monitor them? Are the painters keeping a paint application and quality log?"
 Anthony Painter
Section S17: Execution and Final Inspection
When to Use It: At the end of the job, during the final walkthrough.
What You're Checking: This is your final quality control. You’ll be checking labels against contracts, reviewing quality assurance records, and looking for any defects.
Why It Matters: This is your chance to make sure everything matches the specification before you make your final progress payment.
Key Items Explained:
- S17 covers the final review, including checking paint labels against the contract and ensuring quality assurance records are complete.
- The final part of the section also includes advice on "Touch Up," noting that achieving an invisible repair is difficult, especially on high-gloss or sprayed finishes.
- How to approach the builder: "I'd like to go through the final inspection checklist with you to ensure everything meets the specification. Can we review the quality assurance records together?"
Painting is a journey
This checklist is your painting roadmap. It makes you an informed observer, not a bystander on the sidelines.
Painting isn't just about the labour and the liquid coating. It's not even just about the painter. It starts way before the first tin gets opened.
Good paintwork depends on how your house was designed, where the light sources are, how the plasterboard was aligned to them, what the paint is going onto, how surfaces were prepared, the conditions during application (temperature, humidity, ventilation), and the sequence of priming, cleaning and top coating.
Design choices and the painting schedule affect the final outcome just as much as the paint itself.
This checklist covers all of that, from design to handover, so you can ask the right questions at the right time. Quality paintwork isn't just about finding a good painter. It's planning, preparation, and holding people to the Australian Standard (AS/NZS 2311).
How many standards are there?
Great question. A metric boatload.
We've embedded the NATSPEC reference document below, which lists the Standards with their titles and a short description of each. Take a scroll. It's a lot, I know.
Here's why we feel so strongly about it: construction quality could improve almost overnight if each trade and supplier used simple processes and checklists to apply the Standards for their product or service. If simple checklists are good enough for airline pilots and surgeons, why isn't this required in residential construction?
We're not saying they need ISO9001 compliance. That's overkill for most companies unless they want or need it for marketing or to win tenders. We're talking about basic alignment to the standards they're being paid to follow.
Quality management shouldn't be dumped on one person. It's unfair to expect a single building supervisor to catch every issue, on every trade, on every site. That's the Sauron approach (one ring to rule them all), and it's almost impossible to pull off. Everyone knows it, yet the industry keeps pretending things will magically improve without any method to make them.
Just keep shouting "deregulation" and "remove red tape" so the builders and trades can self-assess with little to no oversight. That should fix our already broken industry.
Wait, perhaps we should import a few hundred thousand skilled workers from overseas. Workers who are technically qualified but who have a different value system or moral or ethical code to our own. What could go wrong with that and no oversight? Let the companies sort this out. I'm sure, because they already do such a good job at this, because our industry is defect-free, that pouring fuel on the fire in terms of additional labour will clearly amplify their already sound quality management processes and practices. /S
Look, I get it. The problems feel massive and the industry is complex.
Like most overwhelming goals, when you break it down into smaller chunks and delegate authority and responsibility, suddenly the big task becomes achievable.
And that's exactly what this checklist is. A small chunk. A practical tool. A way to start.
Test yourself
Five quick questions on this topic. Click a question to see the answer.
What is one of the primary purposes of painting quality assurance (QA)?
To ensure the paintwork is durable, aesthetically pleasing, and fit for purpose.
What can result from improper surface preparation before painting?
Peeling or bubbling paint.
What is the significance of verifying surface cleanliness before painting?
It ensures proper paint adhesion.
What is the purpose of measuring wet and dry film thickness during the coating application?
To ensure the coating meets specifications.
What is one of the key reasons for conducting post-application inspections?
To identify potential issues before project completion and allow for immediate corrections.
Additional Reading
 Understanding Nominative and Informative Building StandardsDo you truly understand nominative and informative standards? Present in many sectors, these standards play a significant role in construction. Understanding these distinctions can affect numerous decisions, from choosing materials to planning methods.
 Why Don’t Builders Follow Australian Standards?The National Construction Code and Australian Standards should guarantee quality homes. But in reality, many builders ignore them. Why does this happen, and how can we fix it?
 Why Australian Standards Are Mandatory for TradesmenIf you’re a tradesperson in Australia, the Australian Standards are essential—it’s the law. Ensure safety and quality in every project. Discover why these standards matter.
 A Crash Course in Australian Standards for New HomeownersCongrats on your new home! Understand Australian Standards for safety and compliance - they’re the law. Get a crash course to ensure your investment’s security.
 The Unspoken Reality: Why Contractors Don’t Follow StandardsReady to hire a contractor? Think again. Many contractors use methods that don’t align with regulations or Australian standards. This article reveals why you might hear, “We don’t do it that way here,” and how such shortcuts can risk your home’s quality and safety. Learn to protect your investment.

