

A concrete driveway looks simple. A few trucks of concrete, a day of work, and a flat grey surface across the front of your new home. Yet driveways and paths are one of the most common sources of complaints after handover, and in 26 years in building I've seen why. Once the concrete is poured, everything that decides whether it lasts (the base, the mesh, the joints, the falls) is hidden for good.
C23 is the Concrete Driveways and Paths Checklist. It walks you through a driveway from the first quote to the end of the defects period, so you know what a good job looks like and can see it being done right.
What the checklist is
C23 is a 50 page fillable PDF with 140 checks across 15 sections, plus 19 sketches drawn in our own style. Each check has a short question, a plain English hint, a tag telling you whether to look on site, check the paperwork or ask your concreter, and tick boxes you can fill in on a tablet or print and carry on site. Where a check is backed by an Australian Standard, the National Construction Code, a council standard drawing or a Cement Concrete & Aggregates Australia data sheet, a small numbered badge points you to the reference list at the back.
It sits alongside C22 Colour Selections. C22 helps you choose the colour and finish of your driveway. C23 helps you make sure it's built properly.
Why driveways go wrong
Your house slab is designed by an engineer and inspected by a certifier before the pour. Your driveway usually isn't. In most places no one is required to check the base, the mesh or the joints of a private driveway before the concrete covers them, so the quality depends on the crew on the day.
That isn't a criticism of concreters. Most do good work. But driveways are often priced per square metre, left to the end of the build when time and money are short, or done by a separate contractor after handover. Under that pressure the steps that cost time and can't be seen afterwards are the first to slip: a thinner base, mesh walked down to the bottom of the slab, saw cuts made a day late, curing skipped on a hot afternoon. None of it shows on the day. It shows a year later as cracks, sunken panels and a surface that dusts or flakes.
The answer isn't to distrust your builder. It's to know what to check and to ask why when something looks different. C23 gives you the questions.
When to use it
Start before you sign a quote. Sections 1 to 5 help you agree the specification in writing: who is doing the work, what soil you're building on, the levels and falls, the council crossover, and the concrete grade and thickness. A quote that says only "supply and lay driveway" is not a specification, and the checklist shows you what it should say.
Then use it on site. The checklist sets six hold points, where you (or your inspector) look before work carries on:
- H1 Base ready: sub-base compacted, levels set, wet or soft spots dug out.
- H2 Forms, mesh and joints: forms straight and level, mesh on chairs at the right cover, joint layout marked.
- H3 Pour day: right concrete on the docket, no water added at the truck, proper finishing.
- H4 Next morning: saw cuts made in time, curing started and kept going.
- H5 Before sealing: the slab has cured and dried out.
- H6 Handover: flatness, falls, cracks and clean-up checked, with photos and dates.
Afterwards, Sections 14 and 15 stay useful for the life of the driveway.
What's inside
The 15 sections follow the order of the work:
| Section | What it covers |
|---|---|
| S1 Before you start | Who is building it, permits, a written specification, comparing quotes |
| S2 Ground and soil | Site classes, reactive clay, fill, trees, acid sulfate and saline soils |
| S3 Design, levels and drainage | Falls, transitions, paving against the house, slab edge and weep holes |
| S4 The council crossover | Permit, width, profile and the council inspection before the pour |
| S5 Concrete specification | Strength grade, thickness, mesh, slump and slip rating |
| S6 Base preparation (H1) | Topsoil removed, road base compacted, sand layer, trenches backfilled |
| S7 Formwork and levels (H2) | Forms, depth, falls and levels at the house and garage |
| S8 Reinforcement (H2) | Mesh type, chairs, cover, laps and trimmer bars at pits |
| S9 Joints | Where control, isolation and expansion joints go and how they should look |
| S10 Pour day (H3) | Weather, dockets, added water, placing and compaction |
| S11 Finishing (H3) | Bleed water, edges, broom and exposed finishes |
| S12 Curing and protection (H4) | Curing methods and how long, and keeping traffic off |
| S13 Handover and defects (H5, H6) | Flatness and level tests, crack widths, records |
| S14 Problems and how to fix them | 15 common problems, each with what you see, the cause, prevention and the fix |
| S15 Cleaning, sealing and looking after it | Safe cleaning, acid washing, sealers, stain removal and yearly care |
The sketches
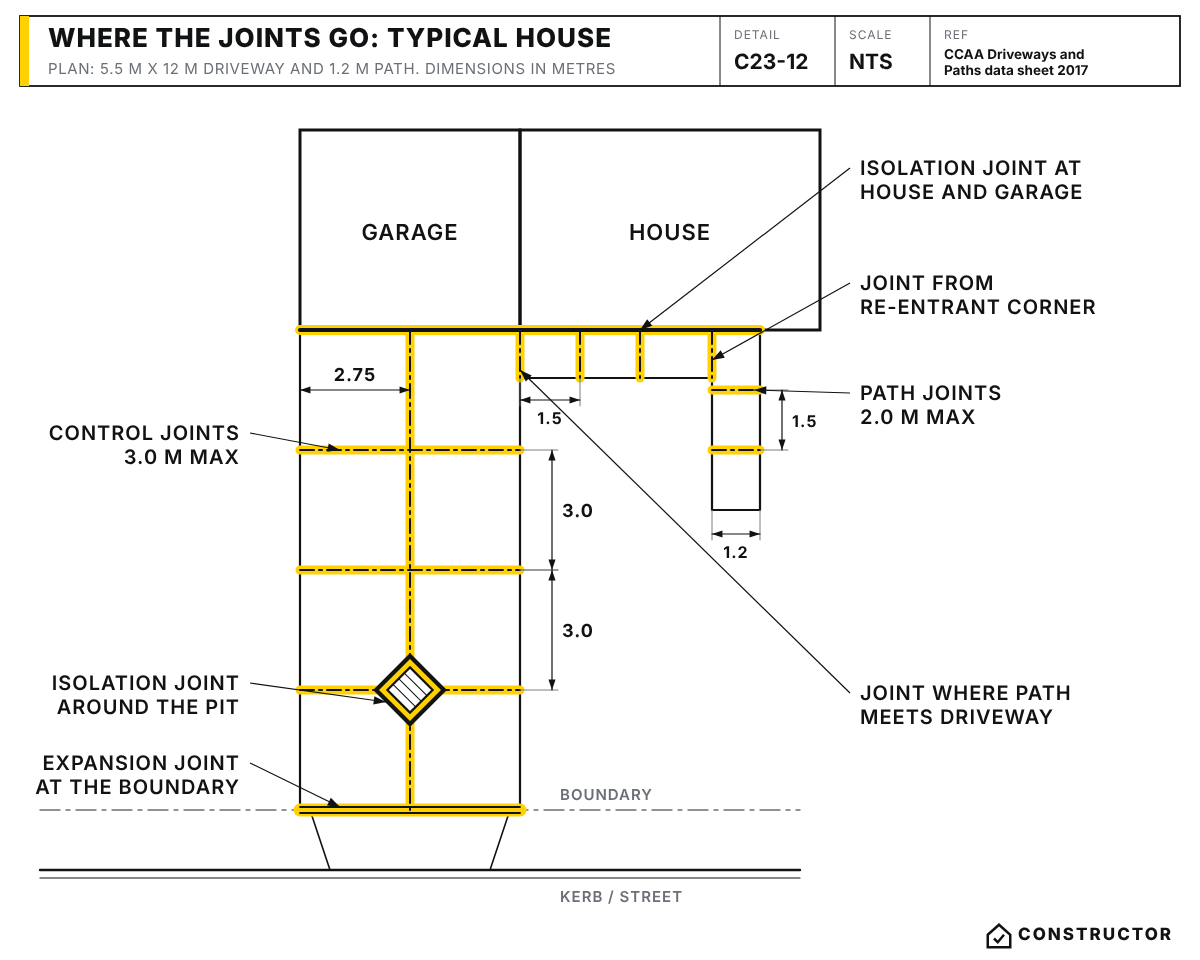
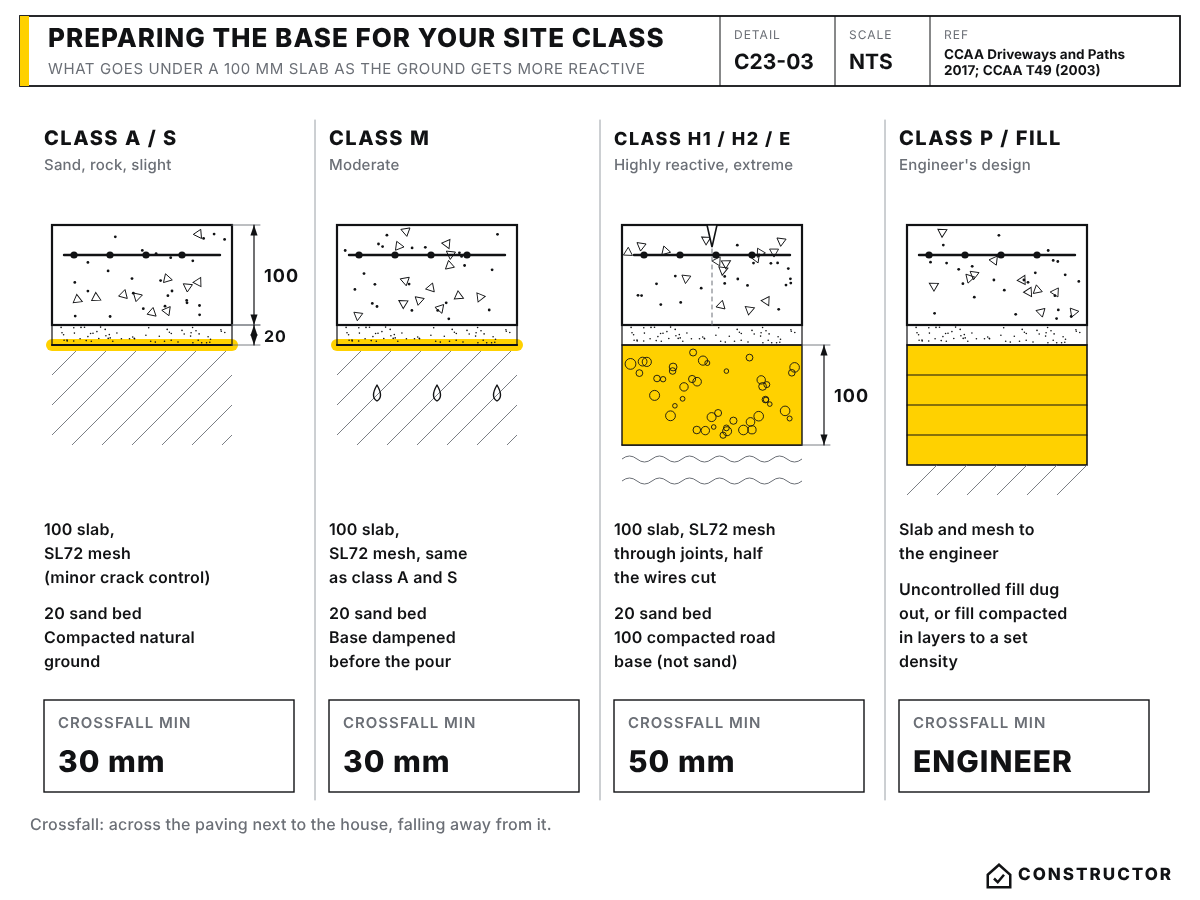
Our readers tell us they understand a detail much faster from a drawing, so C23 has 19 of them. They show where joints go and what good and bad joints look like, how base preparation and mesh change with your soil class, mesh sitting properly on chairs versus walked down to the base, how mesh is handled at pits and joints, a section through a council crossover, and which finish suits which slope. There's also a crack width card you can print at full size and hold against a crack to see whether it's within the normal range.
Efflorescence, laitance and other problems
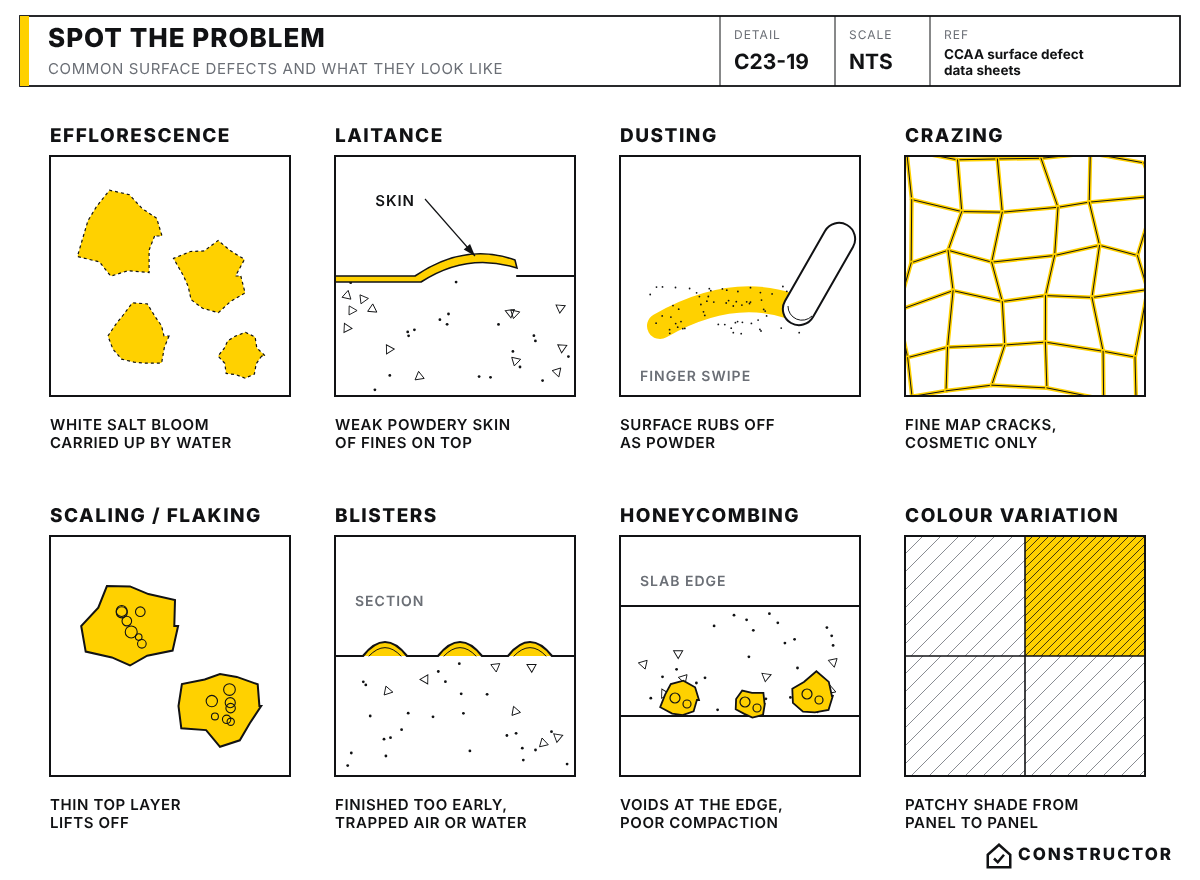
White powder on a new driveway, a surface that dusts when you sweep it, fine crazing like a cracked plate: most homeowners have no name for these, so it's hard to raise them with the builder. Section 14 covers 15 common problems, including efflorescence, laitance, dusting, crazing, plastic shrinkage and drying shrinkage cracks, sunken panels, honeycombing, colour variation, rust stains and sealer problems. Each one explains what you see, what causes it, how it should have been prevented, and how it can be fixed.
Section 15 covers cleaning without damaging the surface, when acid washing is and isn't appropriate, choosing a penetrating or film-forming sealer, and a stain table for oil, tyre marks, leaves, rust, mould and paint.
Who it's for
C23 is for owners building a new home, whether the driveway is in the builder's contract or you're hiring a concreter yourself after handover. It's a primer, written to be used alongside your builder and an independent inspector, not instead of them. It gives you enough knowledge to ask the right questions at the right time, and a record of what was checked.
Get the checklist
C23 Concrete Driveways and Paths is A$59. You can flick through a preview before you buy.
C23 - Concrete Driveways and Paths Checklist
$59.00 AUD
Last updated 12 Oct 2026 · Revision 1 · Free updates for life
Last updated 12 Oct 2026 · Revision 1 · Free updates for life
Checklist Type: Minor
Form Factor: Fillable, print-ready PDF (A4, 50 pages)
When to use: Before you sign a driveway quote, at each hold point on site, and through the defects period
A 140-check guide to a concrete driveway and paths, from the first quote to the end of the defects period, with six hold points and 19 sketches.
✓ Authorship verified on the blockchain · View certificate
Building a driveway as part of a full build? C22 Colour Selections covers choosing the colour and finish, and our other checklists cover every stage from land to handover.


