


Introduction: Why Waterproofing Is the #1 Defect—and What You Can Do About It
If there’s one thing that’s almost guaranteed to go wrong in new home construction, it’s the waterproofing.
In fact, waterproofing is the most common defect found in Australian homes, and often the most expensive to fix. A single mistake—say, missing a bond breaker, using the wrong primer, or applying the membrane too thin—can cause thousands of dollars’ worth of water damage, not to mention the stress of delays, disputes, and rectification work.
And the worst part? It’s all avoidable.
That’s why we created the C13B Waterproofing Inspection Checklist—a detailed checklist for homeowners, site supervisors, and anyone involved in the construction of a new house to inspect the work before it gets covered up. You don’t need to be a licensed builder to use it. You just need to have eyeballs and know what to look for—and that’s exactly what this blog post will help you understand.
In this article, we’re going to walk you through:
- What the C13B checklist is (and what it isn’t),
- Why waterproofing tends to fail (especially on project homes),
- How to use this checklist to protect yourself from dodgy work,
- What the key terms mean in plain English,
- And how to raise the red flag before something leaks.
You might think your builder has it under control. Maybe they do. Maybe they don’t. Many people say....But look, I’ve seen it. Everybody says they’re the best, they’ve got the best team, the best trades—you've never seen a team like this before. Our big beautiful loyal building team. The best team money can buy. The best ever. (editorial note: yes this was an attempt at humour).
But if you're trusting that a quick splash of blue goo, neat roller applied liquid membrane across the concrete to "colour it in with a heavy stipple," and a "tick and flick" sign-off is enough, you're setting yourself up for a slow leak—a drip, even, on silent night when you're tired, and just want to rest.
Drip… drip… drip…
At first, it’s nothing. A sound behind the plaster. A shadow on the cornice. But in time it grows. Drip… drip…—like the beat of a watch buried beneath your floorboards, steady as guilt, cold as the grave. It seeps not just through ceilings, but into thought. Into sleep. Into sanity.
It does not rush. It waits.
A slow betrayal, inching through membrane and masonry, until the silence of your home is broken by a whispering wetness—familiar, insistent, eternal.
Waterproofing is a system, and like any system, it’s only as good as the weakest link—or the weakest trade on site —or the most ignorant of attitudes (she'll be right doesn't cut it).
So you might be building your forever home, your first home, or just managing a build as an owner-builder or site supervisor, in this post will show you how to take back control and avoid the pain of expensive rework, rot, and regret.
Cement your Waterproofing Knowledge With Flashcards and a Quiz
🧾 Section 1: What Is the C13B Waterproofing Inspection Checklist?
The C13B Waterproofing Inspection Checklist is your step-by-step guide to checking the actual installation of waterproofing systems during the construction of a new house.
It’s not about design decisions or waterproofing products on paper—that’s what the C13A checklist is for. C13B is boots-on-the-ground, bums on seats, onsite quality assurance ITC (a very detailed one at that) that helps you verify if the work meets basic standards before it gets covered up.
Here’s the reason why: once a waterproofing membrane is buried under screeds, tiles, or decking, it’s invisible—and if it was done poorly, you won’t know until it leaks. That’s usually months (or years) later, long after the trade has disappeared and your warranty might be up.
C13B helps you inspect:
- The substrate condition before waterproofing starts,
- Whether the primer is applied correctly and compatible,
- That the membrane has the right thickness (called DFT),
- That junctions, penetrations and corners are sealed properly,
- And that follow-on trades (like tilers or plumbers) haven’t accidentally compromised the system.
The checklist is written for clarity. You don’t need to be a licensed waterproofing contractor to use it. We’ve built it based on actual installation problems we’ve seen firsthand—so you can spot them, raise them, and get them fixed while the job is still in progress.
If you’re a homeowner, it gives you a method to ask the right questions and request the right evidence. If you’re supervising a build, it gives you structure and accountability to run through with your trades. And if you’re the builder—well, it helps you avoid callbacks, disputes, and costly defects.
🚱 Section 2: Why Waterproofing Fails (and Why You Should Care)
You’d think waterproofing would be simple—after all, it’s just keeping water where it’s supposed to be, right?
Unfortunately, what seems simple on the surface is often stuffed up because of poor sequencing, bad habits, and communication failures between trades. In the real world, it’s not unusual for the waterproofer to show up to a site with a damaged substrate, incompatible materials, or a tiler on their heels ready to start the next day.
Here’s why waterproofing usually fails:
- Poor substrate preparation – Membranes don’t stick to dust, oil, or moisture-saturated screeds.
- Wrong primers or incompatible materials – Using the wrong type of primer or sealant breaks the “compatibility chain,” leading to delamination.
- Skipping or poor installation of bond breakers – These flexible joints prevent membrane tearing at movement points like wall-floor junctions.
- Incorrect membrane thickness – Too thin, and it cracks or fails. Too thick in a single coat, and it can blister or not cure properly.
- Lack of curing time – Follow-on trades damage membranes that haven’t had time to set.
- No supervision or inspection – Without a checklist or someone checking, mistakes go unnoticed until it’s too late.
What makes it worse is that most homeowners never see the waterproofing before it’s covered. A membrane might look fine in a quick site walkthrough, but unless you’ve confirmed product compatibility, thickness, and correct detailing around penetrations, you just don't know for sure.
It’s not about catching trades out—it’s about making sure the system performs as it should. Because when waterproofing fails, it’s not just a stain on the ceiling—it’s rot, mould, damaged finishes and fixtures, disputes, finger pointing, ghosted calls and sometimes litigation.
And all of it costs you: time, money, and peace of mind.
🧩 Section 3: How the Checklist Works – A Section-by-Section Guide
The C13B Checklist is structured to follow the logical sequence of how waterproofing is actually installed onsite—from the condition of the surface to the final detailing and protection. Each section gives you a list of things to check, and while some items may seem technical, many are just about observation, logic, and asking the right questions.
Even if you’ve never picked up a trowel in your life, this checklist can guide you through what to look for before, during, and after waterproofing works are done.
Let’s walk through each part so you know what it’s asking—and more importantly, why it matters.
🔍 3.1 – General Checks Before Waterproofing Begins
Before a membrane goes anywhere near a wall or floor, the surface it’s applied to—the substrate—needs to be in good condition. This is the foundation of any waterproofing system, and if it’s wrong, everything else layered on top becomes risky.
Here’s what this part of the checklist focuses on:
- Is the substrate clean and sound? No oil, dust, laitance (a weak, powdery surface layer on concrete - see further reading section below), or residual water.
- Has the moisture level been checked? Some membranes can’t go on if the substrate is too wet. Others need special primers if they are.
- Are the joints, corners, and terminations prepared? Bond breakers or movement joints need to be planned before you start.
- Are the right materials on hand? You’d be surprised how often the wrong primer, incompatible sealant, or old expired product gets used.
This is the point where your waterproofer should have read the product’s Technical Data Sheet (TDS)—a document that outlines how to use the product properly, including surface prep, compatible primers, and required drying times.
And yet, on many residential builds, this crucial prep phase gets rushed or skipped altogether. Why? Because the job is behind schedule. Because the builder assumes the waterproofer knows better. Or because no one checks.

🧴 3.2 – Pre-Application of Waterproofing Membrane
Once the substrate is clean and ready, we enter the priming and preparation stage—the bridge between raw surfaces and waterproofing membrane.
This stage is about making sure the products stick, flex (high flexibility, low modulus), and last, and it’s also the part that often gets butchered when everyone’s rushing to get tiling started. The checklist here makes you slow down and verify that the right processes are followed before the first coat goes on.
Elastic modulus measures the resistance of the sealant being deformed elastically when a force is applied to it. Put simply; a low modulus (LM) silicone sealant offers less resistance to being stretched than a high modulus (HM) silicone sealant.
In general, low modulus sealants are preferred, especially in high moving joints such as window frames or expansion joints.
When a low modulus silicone sealant is extended, it puts less stress on the substrate and on the adhesion bond line than a high modulus sealant.
Here’s what you’re looking for:
- Correct primer used for the substrate
Not all primers work with all membranes. For example, a damp substrate needs a primer rated for moisture. Using a dry-only primer on a damp slab will kill adhesion. - Curing time of the primer observed
Every primer needs a minimum drying time before the membrane can be applied. Applying membrane too soon can cause bubbling, incomplete bonding, or outright failure. - Membrane and primer compatibility confirmed
Sealants and membranes are part of a compatibility chain. Using a generic brand primer or silicone just because it’s cheaper can void the system warranty or lead to chemical breakdown. - Bond breakers planned and installed
Bond breakers are flexible elements (usually tape or sealant) used at wall-to-floor junctions and movement joints. Membranes are not designed to stretch across right-angle corners. No bond breaker? You’ve got a tear point waiting to happen. - Manufacturer’s TDS followed
The technical data sheet outlines exactly how to apply, cure, and combine products. If your waterproofer says, “I’ve done it this way for years,” ask if they’ve read the current instructions. Systems, products and techniques change.
This phase might seem boring, but it’s the heart of good waterproofing—doing the right things before the membrane even touches the wall or floor.
🧱 3.3 – Application – Walls and Horizontal Surfaces
This is the part where waterproofing finally hits the wall—literally. But it’s also the stage where visual inspection gets tricky, because you might see a membrane applied, but that doesn’t tell you if it’s been done properly.
This section of the checklist is focused on:
- Coverage – Has the membrane been applied to the correct extent (e.g., 1800 mm up walls in showers)?
- Dry Film Thickness (DFT) – Has it been applied thick enough to actually work?
- No missed areas or pinholes – Particularly in corners, behind pipes, or around floor wastes.
- Proper sequencing – Has the first coat dried before the second was applied?
Let’s unpack the important bits:
✅ Coverage and Location
AS 3740 requires certain minimum heights and areas to be waterproofed. For example:
- 1800 mm vertically above the shower floor
- At least 150 mm up walls in other wet areas
- 25 mm over hobs and shower thresholds
But builders often try to shortcut this—especially around niche recesses, short returns, or behind pipes.
📏 DFT: Dry Film Thickness
This is one of the most critical quality items in the entire checklist. Membranes are usually applied in two or more coats, and they must dry to a minimum dry film thickness—usually 1.2 mm to 1.5 mm depending on the product.
A quick splash with a roller won't cut it. If the film is too thin, it can crack under movement or foot traffic. Too thick in one go? It won’t cure properly and may blister or bubble.
The only real way to confirm this is:
- Use a wet film gauge during application
- Follow the TDS-specified coverage rate (e.g., X m² per litre per coat)
🕳️ No Missed Areas, No Pinholes
Corners, edges, and penetrations are prone to missed coverage. A rushed install can leave micro gaps that won’t show up until after tiling—at which point the damage is done.
🕒 Cure Times and Sequencing
Each coat of membrane must cure before the next is applied. That’s not negotiable. Applying membrane too soon, or letting trades in too early, leads to membrane failure.
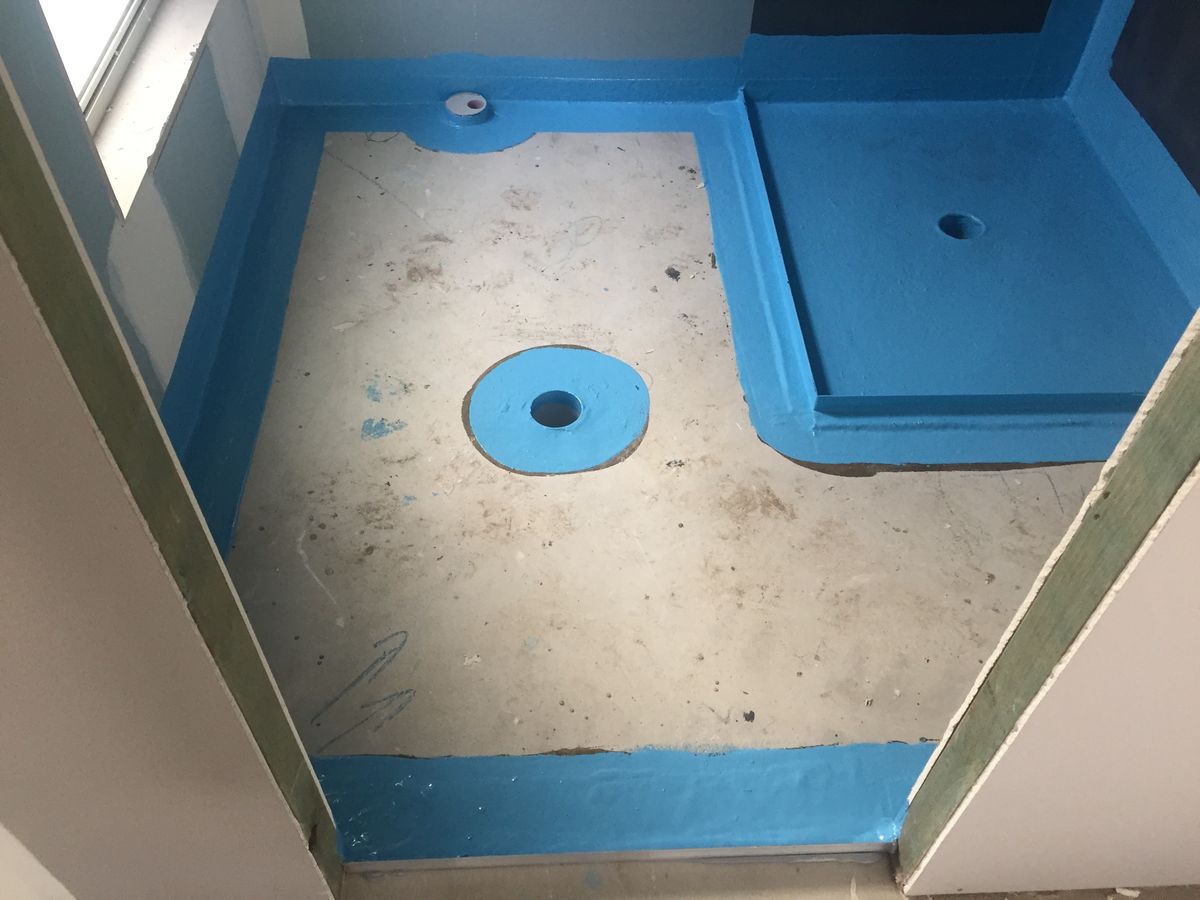
🕳️ 3.4 – Penetrations and Junctions
If waterproofing has a weak point, this is it. The most common leak paths in bathrooms and wet areas are around floor wastes, tap penetrations, wall junctions, and fixtures—because these areas move, flex, and are tricky to seal properly.
This section of the C13B checklist drills into these known failure points and asks:
- Are bond breakers correctly installed at wall-to-floor junctions and movement areas?
- Are floor wastes and puddle flanges integrated with the membrane system?
- Have pipes, tap penetrations, and mixer penetrations been sealed using compatible sealant?
- Has the membrane been dressed into penetrations and junctions (not just slapped over them)?
Let’s break that down:
🌀 Floor Wastes and Puddle Flanges
A puddle flange is a fitting designed to lock into the floor and allow membrane to be terminated around a floor waste without leaking. But it only works if:
- The membrane is fully sealed into the flange
- The tiler doesn’t butcher it while fitting the grate
- It’s the right type for the membrane used (some are PVC, others stainless)
Miss this detail, and water travels under the screed—causing hidden damage for years.
💧 Tap and Mixer Penetrations
These wall penetrations are typically sealed after the fact with a bit of silicone—but if the sealant isn’t compatible with the membrane, or if it’s done before the membrane cures, it can fail.
Worse, some plumbers cut the membrane to “fiddle with” tap combinations and reseal with roofing silicone. That’s a disaster waiting to happen. Unless they’ve coordinated the sealant choice with the waterproofer, you’ve broken the compatibility chain.
📐 Corners and Junctions
Every corner and joint is a movement point. That’s why bond breakers are mandatory—they stop the membrane from cracking as materials shift.
If your waterproofer skimps on this, or if there’s no evidence of bond breaker tape or sealant fillet behind the membrane, the system is already compromised.
🌧️ 3.5 – External Areas (Balconies, Terraces, and Planter Boxes)
When it comes to waterproofing, external areas like balconies and terraces are in a league of their own. These areas are fully exposed to weather, UV, wind, and thermal movement, and yet in many project homes, they’re treated with the same mindset as a bathroom—“just slap on a membrane and move on.”
That can be an expensive mistake.
The C13B checklist includes this section to ensure these high-risk, high-exposure areas are properly detailed. Here's what it prompts you to inspect:
- Has the correct membrane system been selected for UV and external use?
- Are drainage points clear and protected (not covered or blocked)?
- Are edges and terminations sealed and detailed properly?
- Has the membrane been returned into the outlet or drainage system (e.g. scupper or strip drain)?
- Has allowance been made for movement and expansion?
- Is the membrane protected before tiling or further works?
Let’s consider this a bit more:
☀️ UV-Resistant Membranes Only
Some membranes are not rated for UV exposure. If used outside, they’ll break down, peel, or lose elasticity. If it’s exposed to daylight, it needs a UV-stable membrane system. Always check the product TDS for external suitability.
💨 Wind and Bushfire Zone Detailing
In BAL-rated areas (Bushfire Attack Level), certain products or detailing methods might not be compliant. Plastic grates, exposed edges, or flammable materials may need alternatives. It’s not just waterproofing at stake—it’s compliance and insurance.
💧 Drainage and Detailing
External membranes must be integrated into drainage systems like strip drains, scuppers, or puddle flanges. If not, water will pond on the surface, break down joints, and eventually enter wall cavities or ceilings below.
And yes, we’ve seen planter boxes waterproofed with internal-only bathroom membranes. That’s as useful as a paper raincoat.
📘 Section 4: Key Terms Explained
Construction is full of jargon—and waterproofing is no different. If you’ve read a waterproofing report or spoken to a contractor and come away confused, you’re not alone. This section breaks down the most common terms from the checklist and the trade in plain English, so you can follow along without needing a Cert III.
🧱 Substrate
What it means: The surface that waterproofing is applied to—usually concrete, fibre cement sheeting, or render.
Why it matters: If it’s not clean, dry, and stable, nothing will stick properly.
🧴 Primer
What it means: A preparatory coating applied to the substrate before the membrane.
Why it matters: It ensures the membrane adheres properly and works as a system. The wrong primer (or no primer) means failure from day one.
🧫 Bond Breaker
What it means: A flexible strip or bead of sealant placed at wall-to-floor junctions or movement joints before the membrane is applied.
Why it matters: It prevents the membrane from tearing when the building moves or settles. No bond breaker = cracked membrane = leaks.
🎨 DFT (Dry Film Thickness)
What it means: The final thickness of the membrane once it’s dried or cured.
Why it matters: If the membrane is too thin, it won’t perform. Every product has a minimum DFT—usually measured in millimetres or via litre-per-square-metre coverage rates.
🧪 TDS (Technical Data Sheet)
What it means: A document provided by the manufacturer that outlines how to correctly apply their product.
Why it matters: It’s not optional reading. It includes crucial info like curing times, compatible primers, and application techniques. Ignoring it is like building IKEA furniture without the instructions—only wetter.
⚠️ Compatibility Chain
What it means: A system where each product—primer, membrane, sealant, and adhesive—is designed to work together.
Why it matters: Mixing brands or using generic sealants can cause chemical reactions, adhesion loss, or warranty voids.
💨 Puddle Flange
What it means: A plumbing fitting that integrates with the waterproofing system to seal around floor wastes.
Why it matters: It’s the only way to ensure a watertight transition from the membrane to your drainage. Without it, water gets under your screed and causes damage out of sight.
🧯 BAL Rating (Bushfire Attack Level)
What it means: A classification of your home’s exposure to bushfire risk under the Australian Standard AS 3959.
Why it matters: Some waterproofing and drainage products aren’t compliant in BAL-rated zones. You must use bushfire-safe alternatives.
✅ Section 5: Using the Checklist – Best Practice Tips
Now that you understand what each part of the C13B Checklist covers, the question is: how do you actually use it? In this section we'll walk you through when to use the checklist, how to do it properly, and what to do if something doesn’t pass.
🗓️ When to Use the Checklist
Timing is everything. You should use the C13B checklist:
- Before waterproofing starts – to inspect the substrate and confirm all products are on-site and appropriate.
- During each stage of application – after priming, after each membrane coat, and once penetrations are sealed.
- Before tiling or screeding – to confirm the membrane has cured properly and wasn’t damaged by follow-on trades.
Never assume “the waterproofer said it’s fine” is enough. Check it yourself or ask the builder to walk through it with you. Trust no one
🕵️♂️ How to Use the Checklist
- Print it out or bring it onsite on your phone or tablet.
- Work through each section in order, checking what applies to your house.
- For each item, mark Yes, No, or N/A (not applicable).
- If something isn’t done or isn’t clear—ask for evidence: photos, product data sheets, or a walk-through with the waterproofer or supervisor.
- Note anything you’re unsure about, and don’t be afraid to ask questions.
🚩 What to Do if Something Fails
If something doesn’t meet the requirements:
- Pause—don’t let the job proceed until it's resolved.
- Notify the builder or supervisor in writing.
- Request rectification according to the product TDS or applicable standards (like AS 3740).
- If there’s pushback, ask for a manufacturer rep to confirm compliance—most will do this for free.
You’re not being difficult—you’re protecting your asset. Once it’s tiled, it’s too late.
👥 Coordinating With Trades
Many waterproofing failures happen because no one tells the plumber, tiler, or carpenter how to work around the system. You can help by:
- Asking the builder if follow-on trades have been briefed.
- Requesting that the waterproofing system is marked or flagged (especially over floor wastes or terminations).
- Making sure no one walks over or drills into waterproofed areas until fully cured.
🧾 Section 6: Why Two Checklists? (C13A vs C13B)
If you’ve come across both the C13A and C13B checklists, you might be wondering: why are there two, and do I need both? The short answer is yes—because waterproofing isn’t just a single task; it’s a system that needs to be both designed right and installed right.
Each checklist has its own job to do.
🧠 C13A – The Design and Planning Checklist
This checklist is all about system selection and setup before any waterproofing begins. It helps you check that:
- The right products have been specified (sheet vs liquid, internal vs external).
- The correct areas are being waterproofed, to the right extent (e.g. walls, hob returns, balcony terminations).
- The design complies with relevant standards (like AS 3740, AS 4654.2).
- Trade coordination has been considered (e.g. will plumbers cut the membrane? Is the tiler aware of what to avoid?).
Think of it as your pre-flight safety check. If the wrong system is specified, or key details are missed at this stage, even perfect application later on won’t save the result.
🛠️ C13B – The Installation Inspection Checklist
This is where the rubber meets the road. C13B is all about:
- Verifying on-site conditions before and during installation.
- Checking for common application errors (missed corners, wrong thickness, no bond breaker).
- Making sure each stage is visually and technically correct before it’s covered over.
Together, C13A and C13B form a comprehensive quality assurance loop. One ensures the job is designed properly. The other ensures it’s built properly.
If you’re building a new home with a project builder, C13B is essential to keep on hand during site inspections. If you're managing your own build or working with consultants, using both checklists together will give you full visibility from start to finish.
🏁 Conclusion: Check It Before You Tile It
By now, it should be clear—waterproofing isn’t just one step in the build, it’s a system made up of products, preparation, sequencing, and supervision. And like any system, every link in the chain matters.
The C13B Waterproofing Inspection Checklist gives you something most homeowners don’t have: a practical, structured way to check that your waterproofing is actually done right—before it’s too late.
Because once those tiles are down, once the screed is poured or the planter box is filled, it’s game over. If something wasn’t done right underneath, you’ll only find out after water starts to cause damage—and by then, you’re staring down costly repairs, delays, and disputes.
You don’t need to be a tradie or certifier to use this checklist. You just need to be someone who cares enough to ask questions, who wants their new home to perform like it should. Even if you only use the checklist to guide a conversation with your builder or supervisor, that’s a win.
And remember: waterproofing is a trade that still suffers from poor oversight, inconsistent training, and rushed handovers. But with a checklist in hand, you’re no longer relying on crossed fingers and vague promises. You’re managing risk, protecting your investment, and holding everyone to account.
Frequently Asked Questions (FAQs)
1. Why is waterproofing the number one defect in Australian homes?
Because it’s often rushed, poorly supervised, or left to underqualified trades. Waterproofing is one of the first things covered up, so it rarely gets checked properly—and small mistakes lead to big, expensive problems.
2. When should I use the C13B checklist during my build?
Use it at three key points:
- Before waterproofing starts (to check substrate and materials),
- During each application stage (to ensure correct practices),
- And before tiling or screeding (to make sure the membrane is intact and cured).
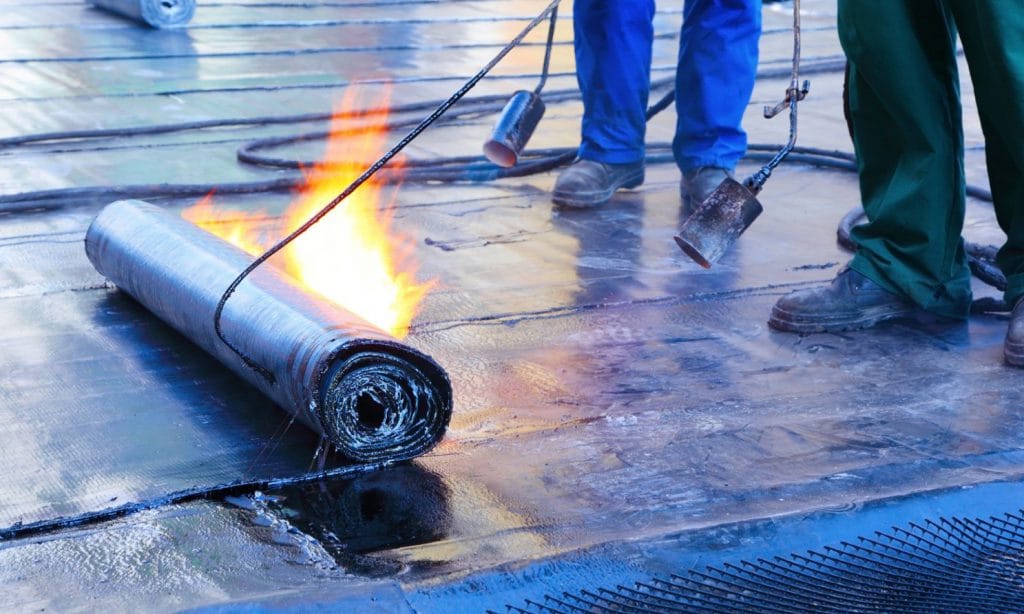
3. What’s the difference between sheet and liquid membranes?
Sheet membranes are rolled out like a mat and bonded to surfaces. They offer guaranteed thickness and built-in bond breakers, are faster - but cost more. Liquid membranes are brushed or rolled on—they’re easier to apply but prone to being applied too thin unless carefully measured during application (WFT gauge).
4. Do I need to be a builder to use this checklist?
Not at all. The checklist is designed for homeowners, site supervisors, and even careful clients who want to ensure things are done properly. You don’t need trade qualifications—just a willingness to check.
5. What happens if something fails the checklist?
You should stop work and raise it with your builder or site supervisor. Most issues can be fixed if caught early. Don’t accept “that’s how we always do it” as an answer—ask to see the TDS or talk to the manufacturer if needed.
6. Is this checklist suitable for renovations too?
It can be helpful, but the C13B checklist is written specifically for new builds, especially project homes. Renovation sites often have different constraints, but the same quality principles apply.
7. Can I ask my builder or waterproofer to walk through the checklist with me?
Absolutely. In fact, we encourage it. It shows you’re engaged and serious about quality—and if they push back, that’s a red flag. Good trades should be happy to explain what they’ve done.
8. What’s a bond breaker, and why is it so important?
A bond breaker is a flexible joint installed where surfaces move—usually at corners or junctions. Membranes can’t stretch across these areas without cracking. No bond breaker = inevitable failure.
9. Will a private certifier check my waterproofing?
Usually, no. Certifiers check compliance with codes like AS 3740, but rarely inspect membrane application in detail. That’s why using this checklist—or hiring an independent inspector—is so valuable.
10. How do I know if the membrane is thick enough?
You can ask for:
- The product TDS showing required DFT (Dry Film Thickness),
- The spread rate used (litres per m²),
- Or photos of wet film gauge readings taken during installation.
If none of that is available, you’ve got a documentation gap worth chasing.
Further Reading


Member discussion