

Take The Quiz On This Topic
Test your knowledge of waterproofing (don't stress if you don't know much - its a deep topic).
Introduction
Waterproofing areas like bathrooms, laundries and balconies is essential in Australia’s climate to prevent damage from excess moisture. The good news is, with some basic skills and the right products, waterproofing your home’s wet areas is totally doable as a DIY job.
In this guide, we’ll walk you through everything you need to know to waterproof like a pro. We’ll cover how to prepare the area, what materials and tools to use, how to apply waterproofing products correctly and tips for getting a seamless finish. By the end of this, you’ll be armed with the knowledge to waterproof any wet area in your home with confidence. So grab your toolbox, crank up some tunes and let’s get started. The leaks stop here!
What Are Wet Areas and Why Waterproof Them?
Wet areas are spaces in homes where water exposure is high, like bathrooms, laundries, and kitchens. Waterproofing these areas is critical to prevent damage from moisture and leaks.
Water damage can lead to mould, rot, and expensive structural issues if left unaddressed. The National Construction Code (NCC) mandates waterproofing standards for residential builds to safeguard homes. Following the NCC’s requirements for water-resistance and using waterproof materials in wet areas is key.
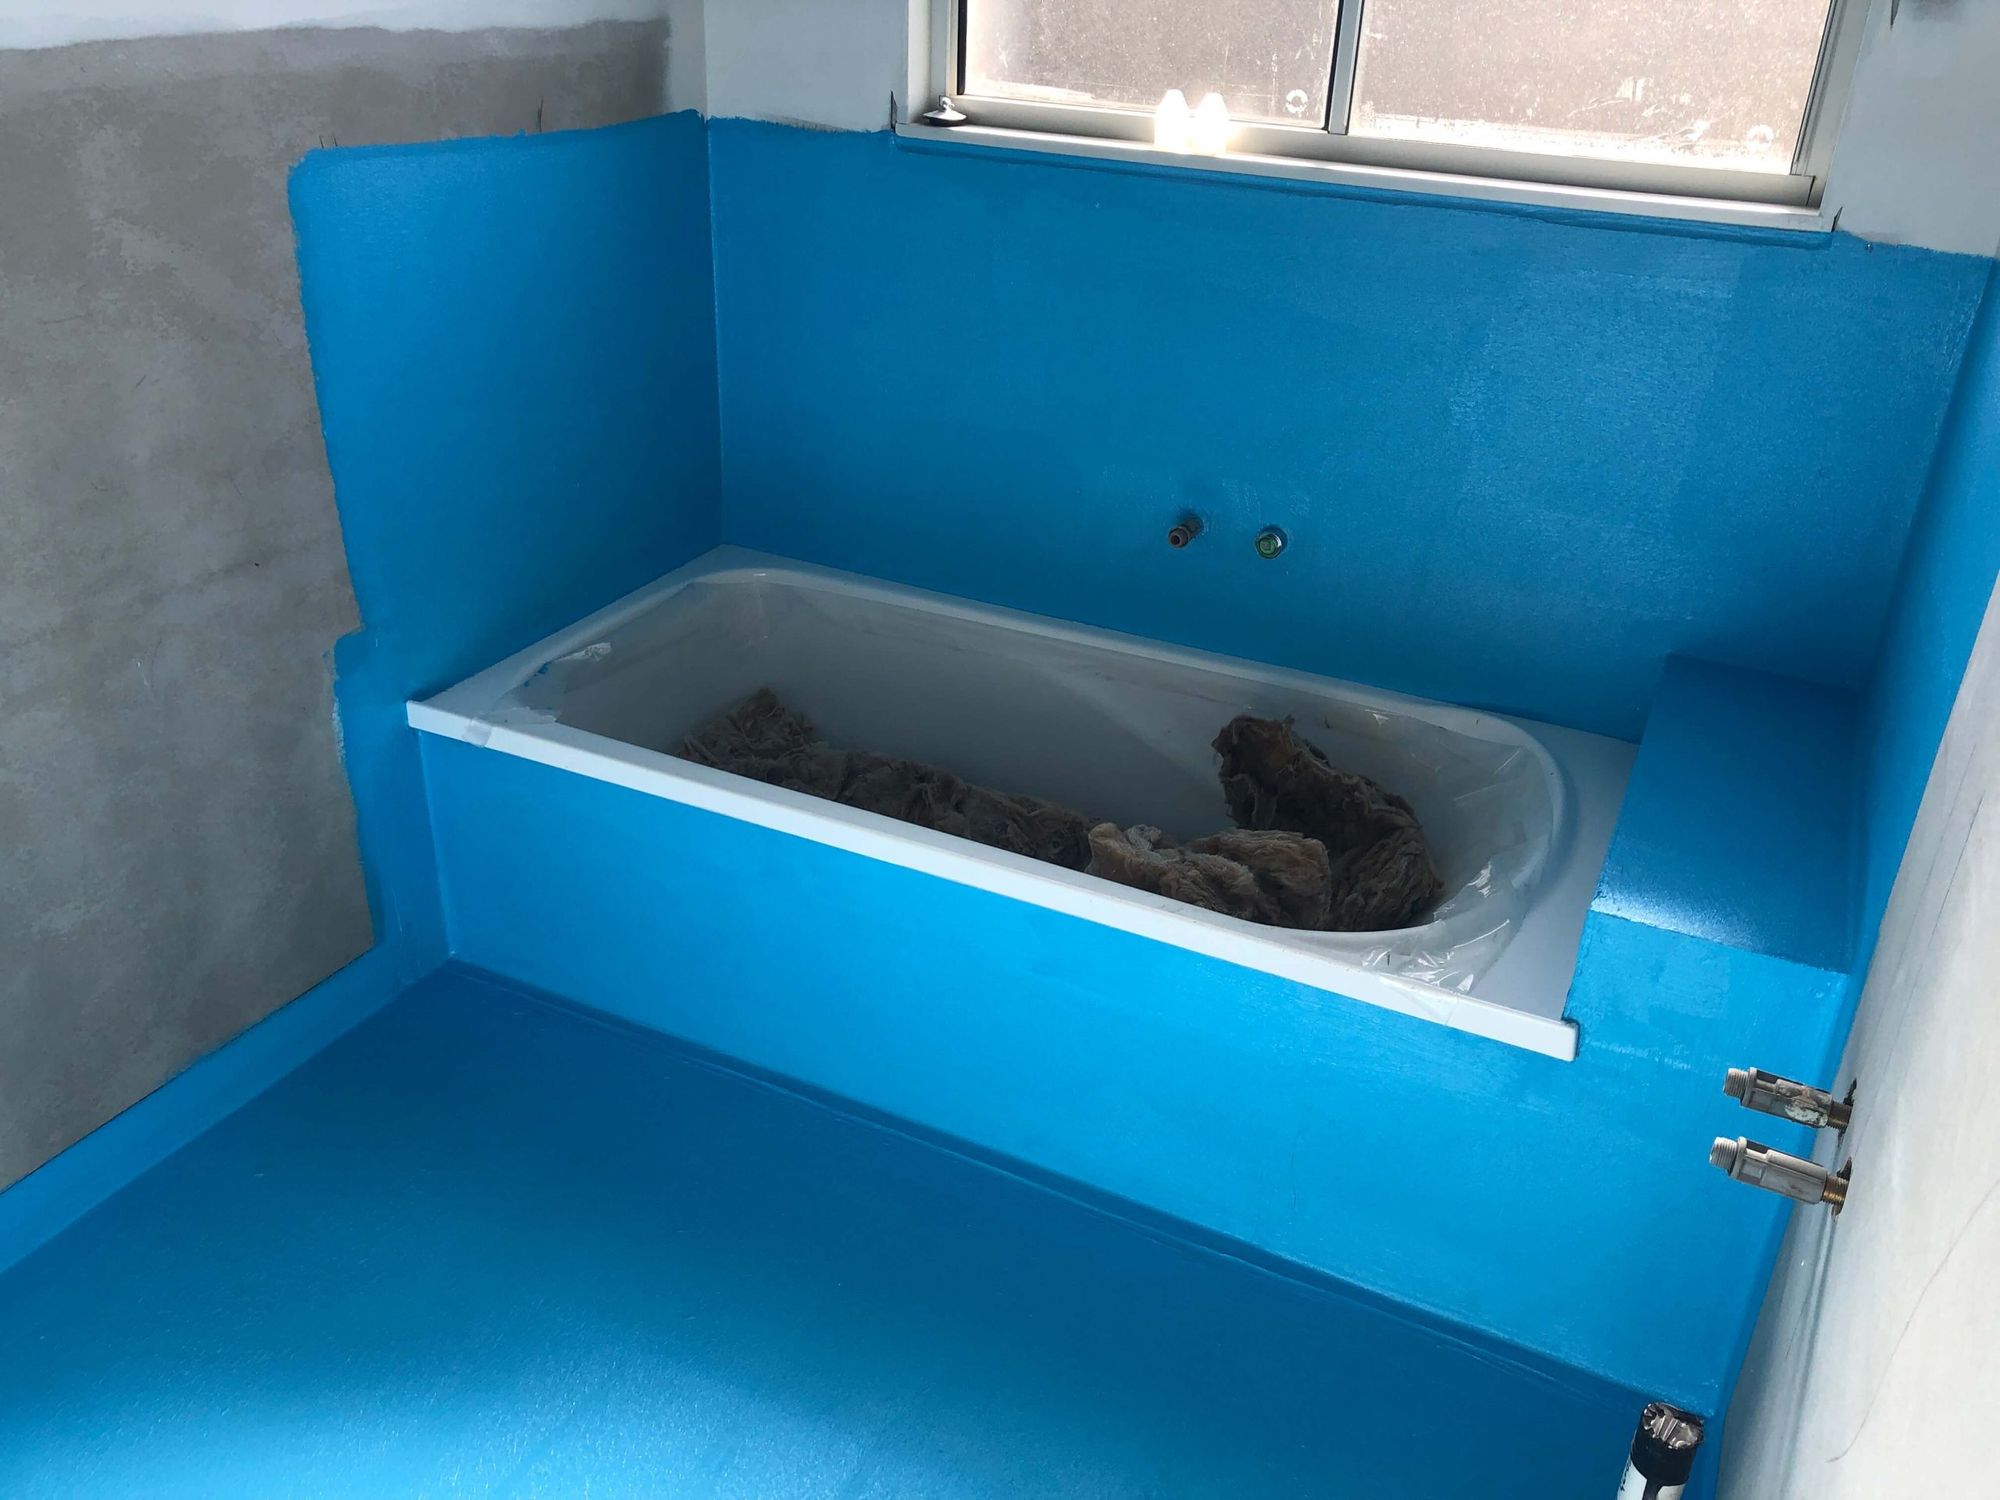
Waterproofing typically means installing waterproof membranes beneath tiles on floors and walls for bathrooms and laundries. These membranes block water from seeping into the substrate. Grout, sealants, and waterproof coatings provide additional protection, but membranes are the first line of defence.
In kitchens, waterproof or water-resistant materials are needed behind sinks, splashbacks, and benchtops. Waterproof cabinetry, stone or engineered stone benchtops, and water-resistant paints or wall panels help guard against damage in these high-use spaces.
Proper waterproofing gives homeowners peace of mind and helps ensure the structural integrity of the home. Though an upfront investment, waterproofing wet areas is worth the cost to avoid expensive repairs down the line. By following standards and using suitable water-resistant and waterproof products, wet areas can remain low-maintenance, high-function spaces for years to come.

Waterproofing Standards in Australia: NCC and AS3740 Explained
If you’re building or renovating in Australia, you’ll need to make sure your wet areas like bathrooms, laundries and kitchens, meet the minimum waterproofing standards. There are two main standards to be aware of:
The National Construction Code
The NCC outlines exactly what needs to be waterproof or water-resistant in wet areas. This includes things like:
- Floors
- Walls
- Junctions (where walls meet floors)
- Penetrations (holes for taps, drains, etc.)
To meet the NCC, you’ll need to follow the requirements in AS 3740.
AIW = Australian Institute of Waterproofing
Australian Standard 3740
AS 3740 provides specific details on how to properly waterproof wet areas. This covers:
- Choosing suitable waterproofing materials based on location
- Ensuring proper floor grading and installing the right drains
- Installing waterproof membranes on floors and walls
- Connecting drains, penetrations and junctions
- Step-downs and doorways
Following AS 3740 will satisfy the NCC and ensure your wet areas are adequately waterproofed. Some states and councils may have additional requirements, so check with your local regulations as well.
While waterproofing can seem complex, understanding these two standards will set you on the right path. If you have any questions about proper waterproofing methods or materials, be sure to contact building experts. It’s worth investing in quality waterproofing to avoid expensive damage down the road!

Key Waterproofing Requirements for Floors, Walls and Junctions
To properly waterproof wet areas in your home, several requirements need to be met for floors, walls and junctions.
Floors
Floors in wet areas like bathrooms, laundries and kitchens need to be waterproofed to at least 150mm up the wall. For tiled floors, a liquid-applied membrane should be used under tiles. Make sure any pipes or drains penetrating the floor are also sealed.
For concrete floors, a cementitious or epoxy membrane can be applied. Seal any cracks before applying the membrane. Membranes also allow for movement and provide a smooth base for tiles.
Walls
Waterproof wall membranes should extend at least 150mm onto floors and 50mm up adjacent walls. Seal around any pipes, taps or other fixtures penetrating walls.
For rendered masonry walls, a reinforced liquid membrane should be applied. Scratch the surface before application for maximum adhesion.
Junctions
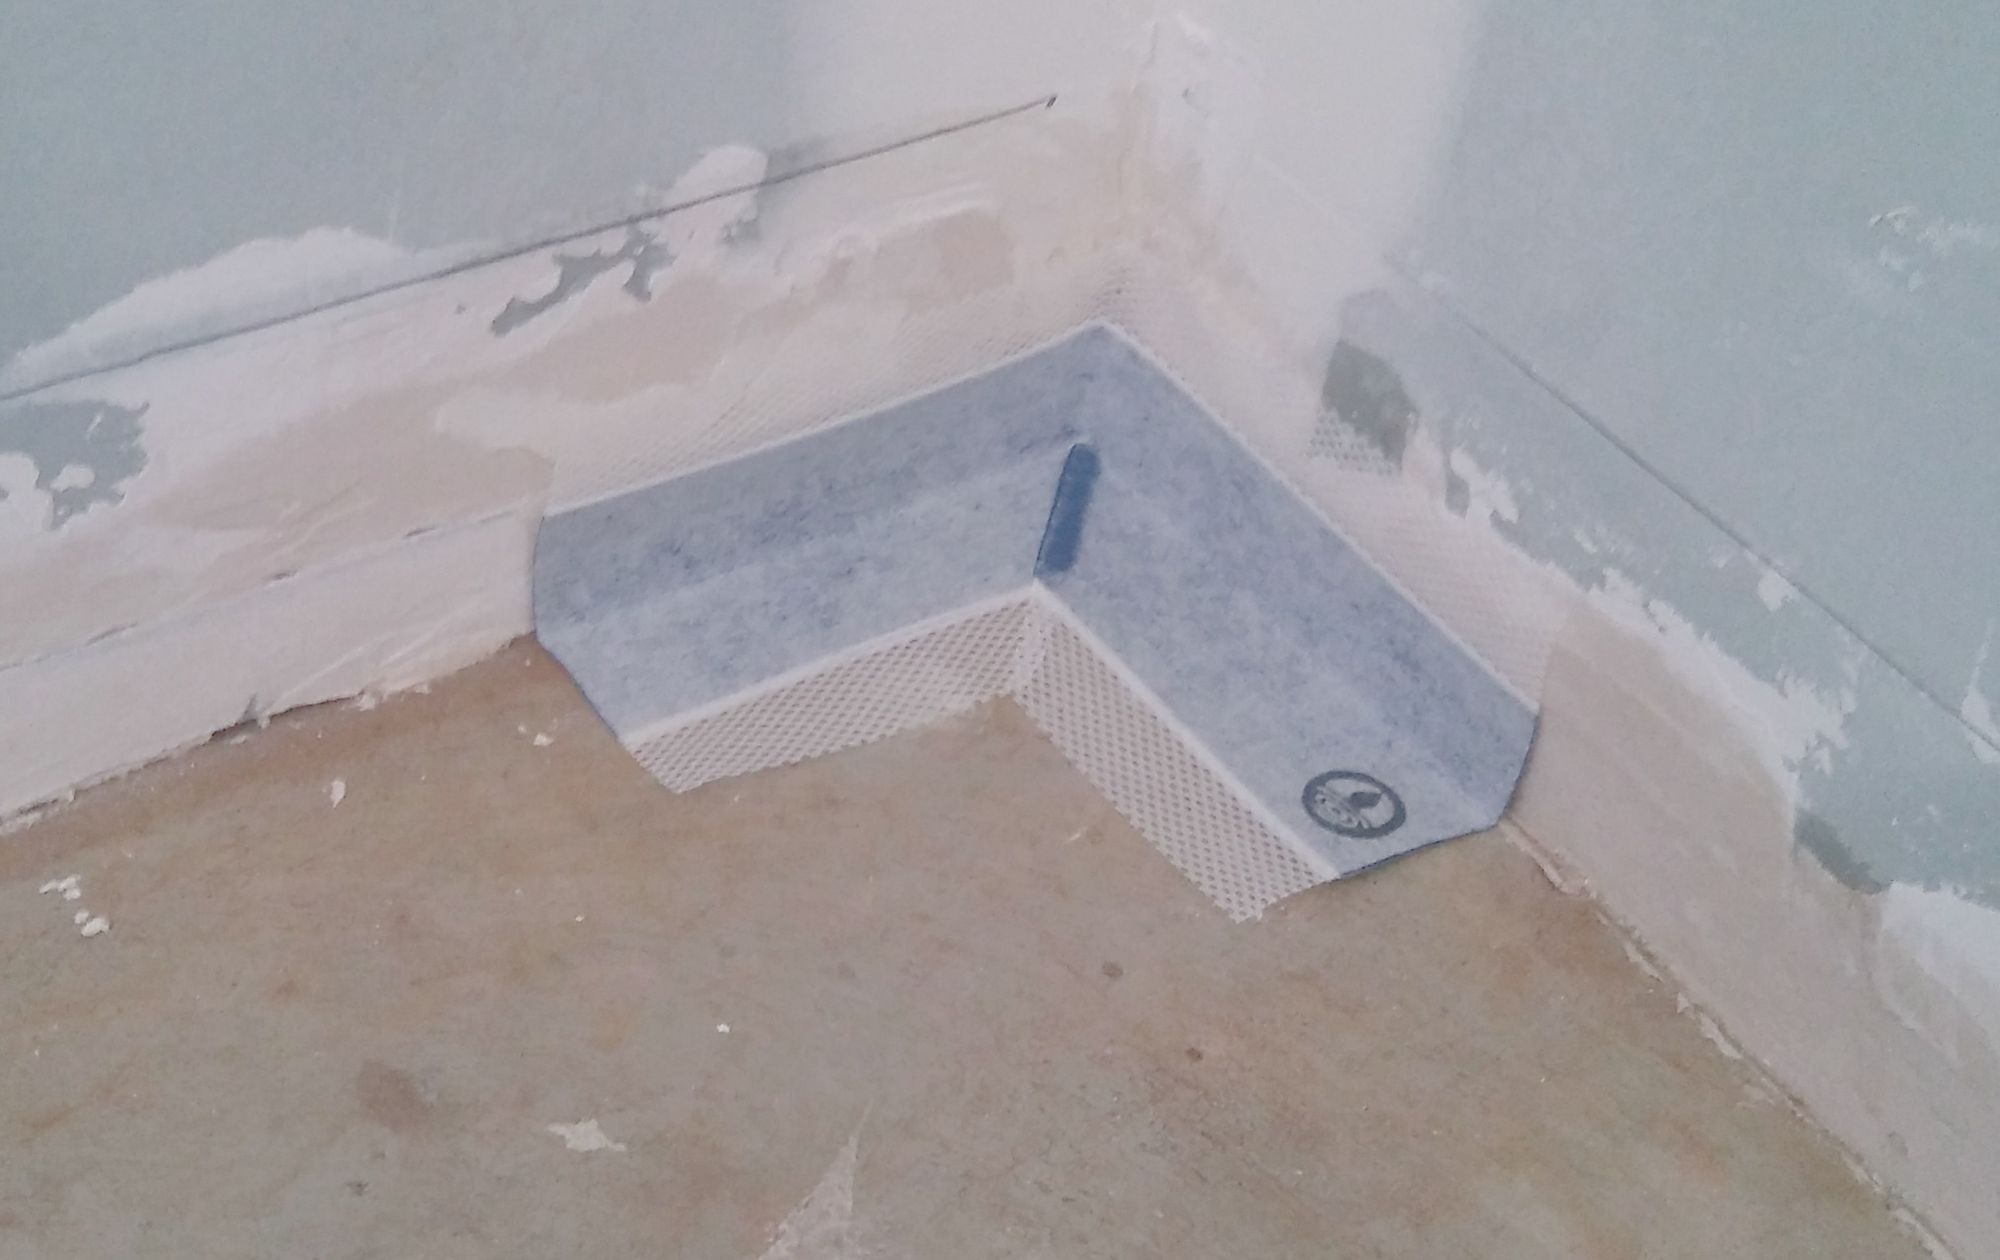
Where floors meet walls, sealant or a waterproof tape should be used to join the floor and wall membranes. At wall corners, use a waterproof mesh tape under the membranes for reinforcement.
Around windows, a flexible sealant should be used to seal between the window frame and wall membrane. The sealant allows for expansion and contraction.
Where walls change direction or meet, a waterproof tape helps join the membranes for a seamless finish. The tape should have a minimum width of 150mm.
Following these key requirements and properly sealing all joints and penetrations will ensure your wet areas stay leak-free and prevent damage to surrounding areas. Take the time to do it right the first time.
Common Waterproofing Methods and Materials
When it comes to waterproofing wet areas in your home, there are a few common methods and materials used. The method you choose depends on the area you need to waterproof and your budget.
Sheet membranes
Sheet membranes, like PVC or TPO, are commonly used in bathrooms and laundries. They’re laid over the substrate, like concrete or timber, and sealed at joints and edges to form a waterproof barrier. Sheet membranes tend to be more expensive but also very effective and long-lasting.
Liquid membranes
Liquid-applied membranes, such as acrylic sealants or epoxy coatings, are rolled or brushed on. They’re a good DIY option for small areas like a shower recess. Make sure you apply at least two coats to get an effective waterproof seal. Liquid membranes may have a strong smell, so ventilation is important.
Cementitious membranes
Cementitious waterproofing, like hydrostatic cement, is trowelled onto concrete substrates. It reacts with moisture to form an impermeable crystalline structure. Cementitious waterproofing is best for basements, retaining walls and foundations. It can last up to 50 years but may be difficult for DIYers to apply.
Remedial membranes
For existing leaks or water damage, remedial membranes can be used. Flexible sheet membranes are fitted to the surface, with an adhesive to seal and waterproof the area. Remedial epoxy injection, where epoxy is injected into cracks, can also be used to seal and strengthen the substrate. Remedial options are more expensive, especially if areas need to be hacked back to apply the membrane.
In summary, the most common methods for waterproofing residential wet areas are sheet membranes, liquid membranes and cementitious membranes. Remedial membranes are options if waterproofing needs to be retrofitted. Regardless of your chosen method, follow the product instructions carefully to ensure an effective, long-lasting waterproof seal.
Inspections and Warranties - Ensuring Quality Waterproofing
Once the waterproofing installation is complete, it’s crucial to arrange professional inspections to ensure it meets the required standards. Inspections should be carried out at key stages, including before the waterproofing membrane is covered up, to check for any faults or defects. It’s much easier to fix issues when the membrane is still exposed!
Inspections
Most waterproofing installers will carry out their own inspections during the installation process. However, for peace of mind, arranging for an independent building inspector to assess the waterproofing is a good idea. They can spot any faults the installer may have missed. It’s best to arrange inspections at the following key stages:
- After the substrate has been prepared, the inspector will check the substrate is sound, clean and suitably prepared to receive the waterproofing membrane.
- Once the membrane has been installed but before wall linings like tiles have been installed. This allows the inspector to fully see the membrane and check for tears, air bubbles or incorrect installation.
- When wall linings like tiles have been installed but before the area is put into service. A final inspection ensures the waterproofing is compliant and the area is safe to use.
Warranties
Reputable waterproofing installers should provide a warranty on their workmanship and the materials used. Check what’s covered by the warranty and for how long. Longer warranties, e.g. 10-15 years, provide more peace of mind. Some product manufacturers may also provide a warranty on their waterproofing membranes and sealants.
It’s important to understand that improper maintenance or unauthorised modifications to the waterproofing system may void the warranty. Follow the installer’s recommendations for looking after your waterproofing to ensure it remains compliant and any warranties remain valid.
With professional inspections at the right stages and suitable warranties in place, you can feel confident your new waterproofing installation will stand the test of time. Regular maintenance and servicing will also help minimise the risk of future water damage in wet areas.
Conclusion
So there you have it, a beginner's guide to waterproofing the wet areas in your home. While it can seem like a daunting task, with some careful planning and the right products, you'll be well on your way to preventing leaks and damage. Pick a weekend, grab your supplies, turn up the tunes and dive in - your future dry home will thank you! Waterproofing may not be the most glamorous of jobs but the peace of mind and improved comfort levels make all the effort worthwhile. If all else fails, don't be afraid to call in a professional to assess any tricky spots. Every home is different so find what works for you. Most of all, take your time and do it right the first time.
A dry house is a happy house!


