

Introduction: Why Waterproofing Design Matters More Than You Think
If you’ve ever spoken to someone who's had a leaking bathroom, you’ve probably heard words like “nightmare,” “expensive,” or “builder wouldn't return my calls.” And they’re not exaggerating.
Waterproofing defects are among the most common — and costly — issues found in new residential construction. What’s worse is that these problems usually don’t show up until months or even years after the build is finished, when fixing them means ripping apart perfectly good tiles, cabinetry, and walls.
Here’s the kicker: most of these issues were entirely preventable.
That’s why we created the C13A Waterproofing Design Checklist. It’s a simple but powerful tool designed to help homeowners, builders, and waterproofers make the right choices before a single drop of waterproofing product is applied.
In this post, I’ll walk you through exactly what this checklist does, how it works, and — most importantly — why using it could save you thousands of dollars, months of stress, and a whole lot of finger-pointing down the track.
Whether you're building your dream home or just trying to understand what your builder should be doing, this post will show you how proper waterproofing design can protect your investment — and your sanity.
Take the quiz
Want to test your self on your waterproofing knowledge? Try the flashcards and then take the quiz.
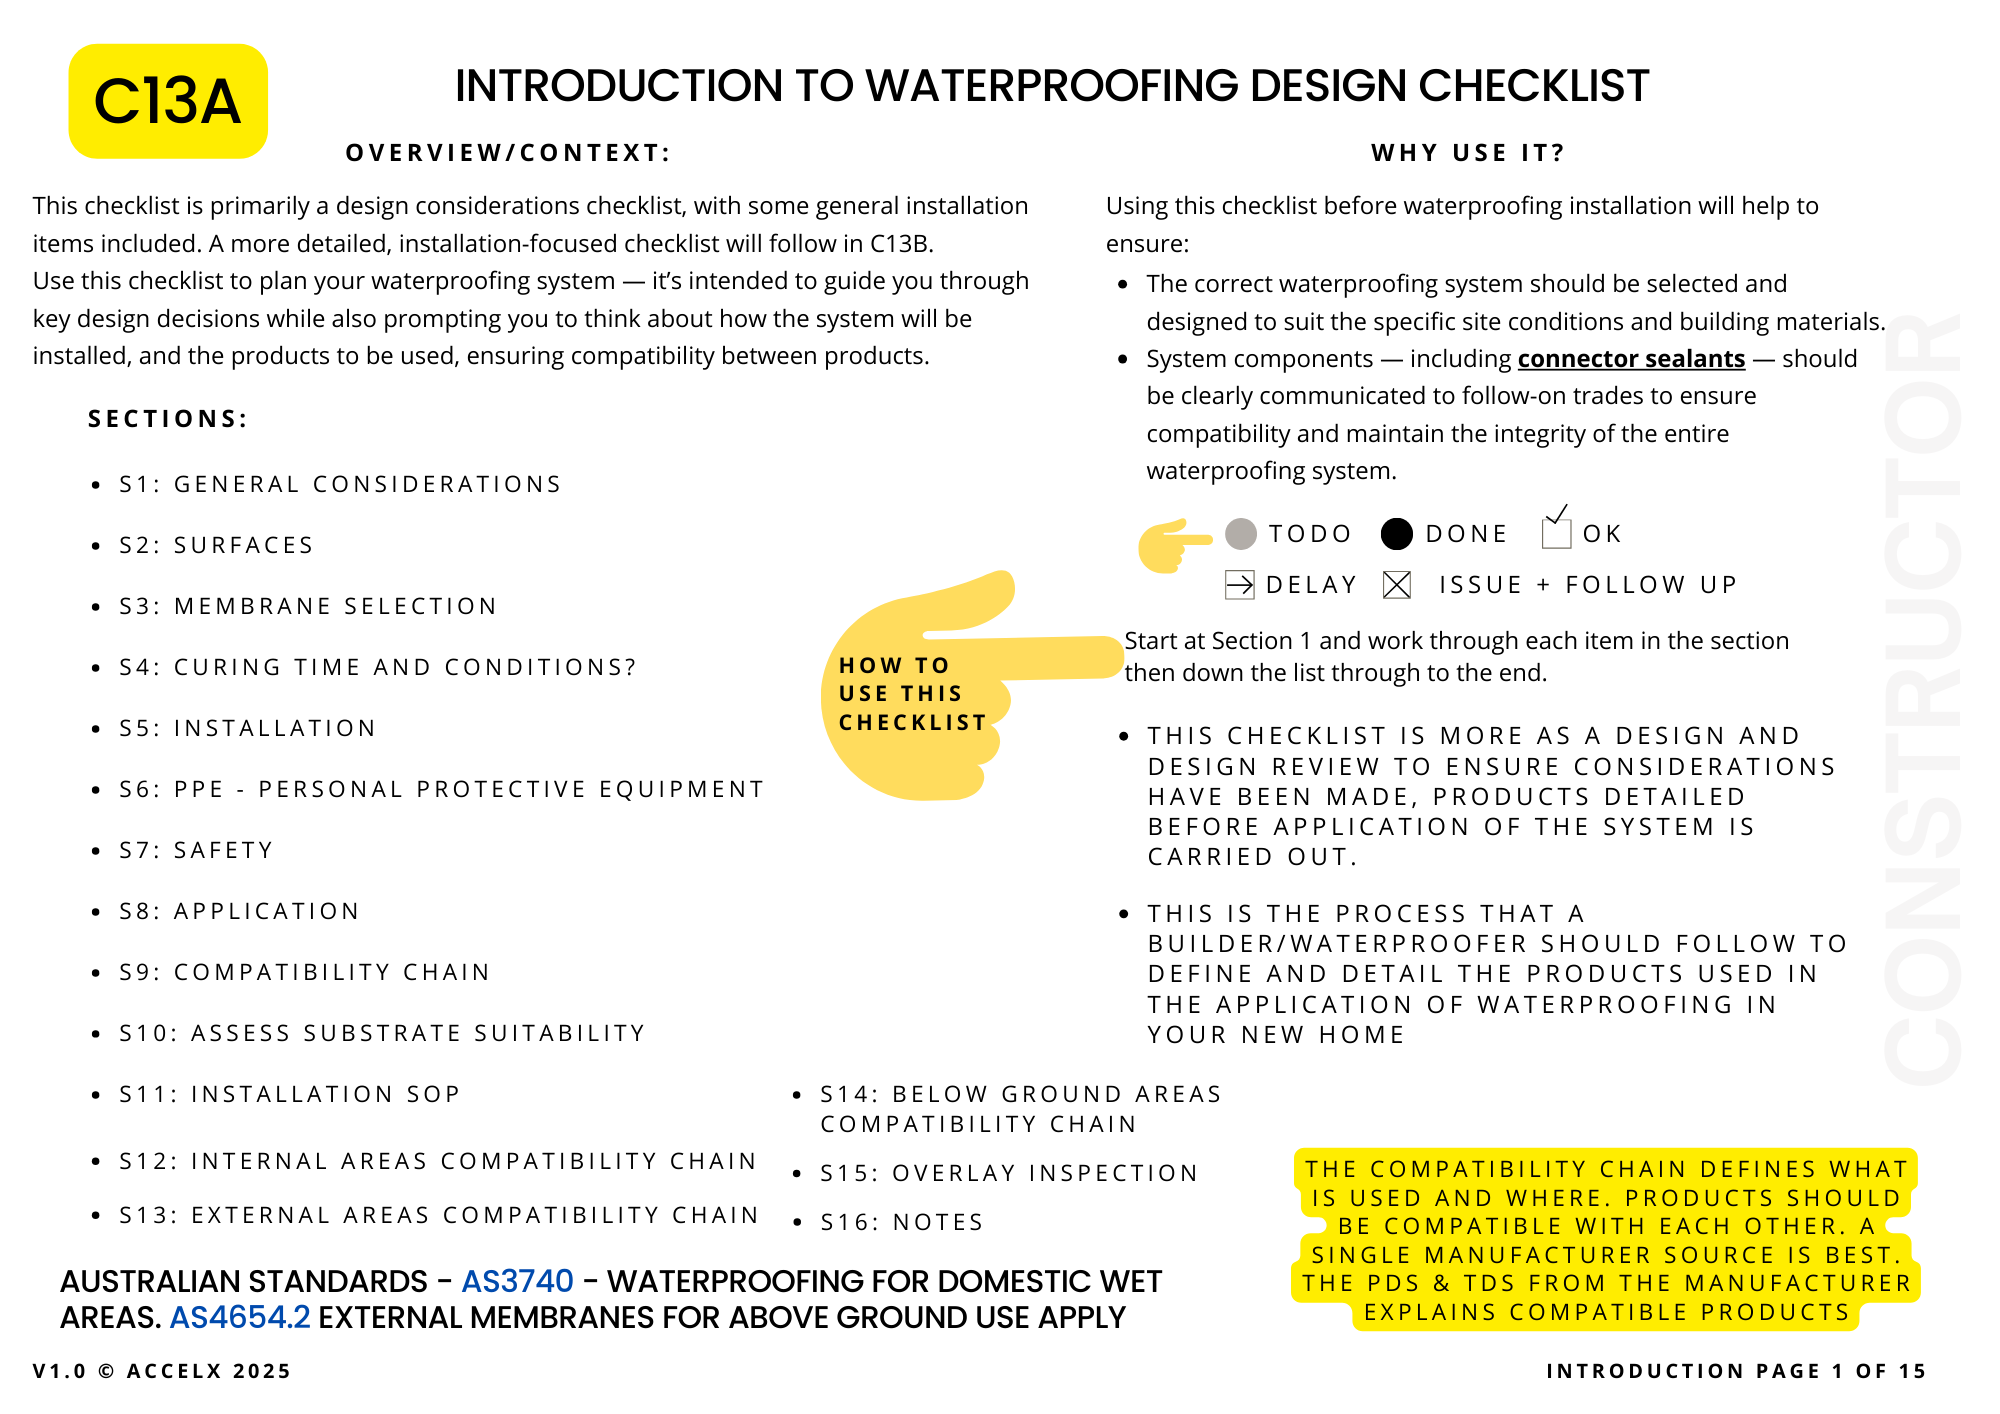
What is the C13A Waterproofing Design Checklist?
The C13A Waterproofing Design Checklist is a structured guide used to plan and document the waterproofing system for a new residential home — before the work begins.
It’s not just a checklist for installers; it’s a design tool that ensures the right products are selected, the surfaces are properly prepared, and all the pieces of the waterproofing system are compatible with each other.
Let me say that again: it’s a design checklist, not an installation checklist. That distinction matters.
Here’s why: too often in residential construction — particularly in volume builder homes — waterproofing is treated like a box-ticking exercise. A bond breaker is installed, maybe and two coats of membrane rolled on like its paint, and everyone assumes the job’s done.
But if the substrate wasn't dry enough, or too hot or the relative humidity was outside the product design requirements? Or the primer wasn't compatible, the connector sealant was the wrong brand? Or the membrane chosen can’t handle the movement in the floor, cracks weren't prepped? You’ve just installed a potential water problem.
That’s where the C13A checklist helps.
It helps you ask the right questions before waterproofing starts:
- What are the site conditions like? Is the substrate porous? Damp? Flexible?
- Have we chosen a membrane that suits those conditions?
- Are the connector sealants compatible with the membrane?
- Have we communicated the system properly to follow-on trades like tilers or cabinet installers?
In short, the checklist exists to make sure waterproofing is designed properly — with forethought, not guesswork. It gives builders and homeowners a consistent, repeatable process to follow that reduces risk and improves outcomes.
You wouldn’t bake a cake without checking the ingredients — so why risk your home’s waterproofing by winging it?
📝 This checklist helps you get the right products, in the right order, applied the right way — before the work even starts. It’s not just paperwork — it’s peace of mind in checklist form.
Why Design Matters Before You Waterproof
When most people think about waterproofing, they imagine the stuff you roll or paint on just before the tiles go down. And sure, that’s one part of it — but waterproofing is actually a system, not just a product. And like any good system, it needs to be designed properly to work properly.
Let’s look at this in more detail.
A typical waterproofing setup might include:
- A prepared substrate (like fibre cement sheeting or concrete),
- A compatible primer,
- A bond breaker at movement joints,
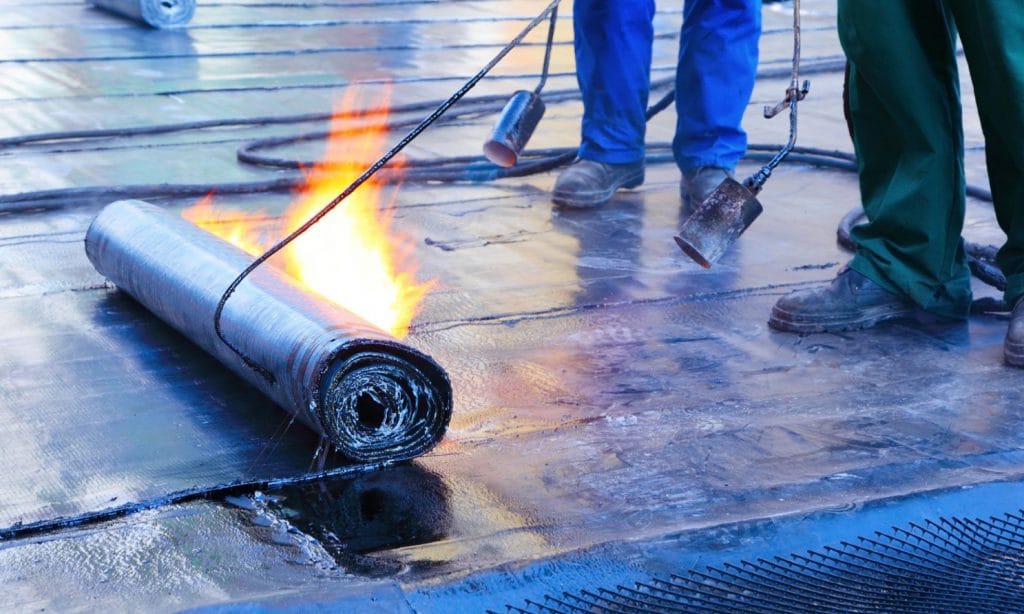
- A membrane (liquid or sheet),
- A compatible sealant at penetrations and junctions,
- And a finish, like tiling, laid with a flexible adhesive.
If even one of these components is incompatible with the others, or not suited to the site conditions — you’ve got a failure waiting to happen.
So where do most jobs go wrong?
- No compatibility check.
Products are mixed and matched from different manufacturers, without checking if they actually work together. The result? Membranes peel, tiles de-bond, or the whole system cracks under stress. - Wrong membrane for the job.
For example, using a membrane that’s not UV-stable on an external balcony. Or applying a membrane with low flexibility on a suspended timber floor that moves over time. - Poor surface preparation.
If the substrate is wet, contaminated, or too porous — the membrane won’t bond. And no, more coats won’t fix that. - No allowance for curing time or site conditions.
Membranes need to cure in certain conditions — temperature, humidity, airflow — and if that’s ignored, you’re back to square one. - No communication with other trades.
A tiler, plumber, or cabinet installer may cut into or damage waterproofing layers if they don’t know what’s there or why it matters. - Incorrect application.
One of the most common — and preventable — mistakes. Failing to read or follow the Product Data Sheet (PDS) and Technical Data Sheet (TDS) leads to improper installation. This includes not achieving the correct Wet Film Thickness (WFT) or Dry Film Thickness (DFT), or not checking these during application. Just slapping on more product doesn’t guarantee performance — and can even cause failures.
And here’s the part homeowners often don’t hear:
Once tiles are laid and bathrooms are fitted out, it’s nearly impossible to spot waterproofing failures until the damage is done — mouldy walls, swollen cabinetry, leaking balconies, or worse, structural rot. Fixing it means demolition, disruption, and dollars.
Designing your waterproofing system properly — with the help of a checklist like C13A — is how you avoid this mess altogether. It helps you make intentional decisions about materials, curing time, compatibility, and install methods.
Skipping the instructions might leave you with an extra screw when you’re building a bookshelf — no big deal. But waterproofing isn’t like that. If you don’t follow the PDS and TDS, apply the right thickness, or prep the surface properly, you’re not just voiding warranties…
🛠️ You’re setting yourself up for a full bathroom rebuild.
Read the instructions. Apply the system properly. Or pay for it later — in mould, rot, and repair bills.
Breaking Down the Checklist: Section by Section
Let’s walk through what the C13A Waterproofing Design Checklist actually covers — and why each part matters. We’ll start with the foundation: General Considerations.
3.1 Section 1: General Considerations (Walls and Floors)
This section focuses on the basics — the materials you’re waterproofing over. It might seem simple, but this is where a lot of jobs quietly go off the rails. The checklist prompts you to confirm what kind of wall and floor substrates are being used, and whether they’re suitable for wet areas before any waterproofing starts.
Let’s break it down:
Walls: Don’t Stick Waterproofing to the Wrong Substrate
- Only use wet area-rated sheeting. Fibre cement (FC) sheeting must be rated for wet areas and be at least 6mm thick for standard tiling, or 9mm if your tiles weigh over 32kg/m².
- Plasterboard? Handle with care. Yes, you can use water-resistant plasterboard in wet areas, but only when installed correctly (10mm min. thickness, 600mm max. stud spacing, and mechanical fixings). Never use it behind heavy tiles or where direct water exposure is likely.
- Direct-fixing to masonry? Big no. Sheeting must be battened out to allow airflow — direct-fixing traps moisture and encourages mould or de-lamination.
- Sheet fixing must be spot on. The checklist outlines specific screw centres, joint clearances, and even cautions against using stud adhesive, which can interfere with movement and bonding.
Floors: Don’t Just Slap Membranes on Timber
- All timber floors must be waterproofed. AS3740:2021 is clear on this — no exceptions.
- Particleboard? You can use it internally, but it must be over-sheeted with fibre cement before waterproofing. For external areas, it’s not allowed at all (per AS4654.2).
- Sheet layout and bonding matter. You’ll need to consider whether sheets should be laid in stacked or staggered bonds depending on the type of membrane (bonded or unbonded) and system used.
- Deflection gaps and adhesive use. Floor sheets should be gapped 3mm for compressive movement and glued down with notched trowel application — not whatever the chippie grabbed out of the ute.
- Mechanical fixings must meet spec. Fastener spacing, edge distance, and layout all affect how the sheeting moves under load — which directly affects how long your membrane lasts.
3.2 Section 2: Surface Conditions
Before any waterproofing membrane goes down, the first question to ask isn’t what you’re using — it’s what you’re applying it to. This section of the checklist is all about understanding the condition of the surface (or substrate) that’s being waterproofed.
And trust me — skipping this step is like painting over a damp, flaking wall and expecting it to last.
Porous vs Non-Porous Substrates
- Porous substrates (like concrete, screeds, fibre cement sheeting) absorb moisture. These usually need priming before membrane application.
- Non-porous substrates (like metals or some dense tiles) don’t absorb anything — and require specific primers to get a proper bond.
The checklist forces you to identify (some would say "pushes you outside your comfort zone" 😉) which surfaces are porous or non-porous — because applying the wrong primer (or skipping it altogether) leads to de-lamination and total membrane failure.
Moisture Content
This one’s non-negotiable.
Before waterproofing, substrates must be dry enough to allow the membrane to adhere and cure correctly. That means:
- Using a moisture meter to test screeds and concrete.
- Not just going by feel or colour — moisture can be hidden below the surface.
- Respecting curing times (e.g., 28 days for concrete, 7+ days for screeds unless using damp-tolerant primers).
If your builder or waterproofer can’t show you a moisture reading, that’s a red flag.
Moisture and temperature readings are a big deal when it comes to waterproofing. Yet it's rare to see trades using humidity gauges or surface temperature probes before starting work. Not saying all waterproofing trades — just most don't do it.
Contamination & Cleanliness
- Is the surface clean?
- Has it been exposed to dust, oil, release agents, or paint overspray?
- If so, it may need mechanical or chemical treatment first — otherwise, the membrane won’t bond.
You wouldn’t put stickers on a greasy car — so why would you roll on a membrane over a dirty slab?
Condensation & Underside Moisture
In some builds, especially multi-storey homes or ones with tight roof spaces, you can get condensation under roof decks or between floors.
This moisture from the underside can ruin a waterproofing job before it even starts. The checklist includes a reminder to check for signs of condensation and account for it in the system design (e.g., using a negative pressure membrane or better ventilation strategies).
Service Conditions & Movement
The checklist prompts you to think about:
- Whether the area will see heavy foot traffic (requiring an abrasion-resistant membrane),
- If there are flexible or rigid substrates,
- And whether you need root resistance (for planter boxes, green roofs, etc.).
It also asks you to confirm the flexibility class of the membrane — Class I, II, or III — which determines how much movement it can tolerate. (More on that in the next section.)
If you ignore site conditions, even the best membrane can fail. The checklist exists to help you match the membrane to the conditions — not the other way around.
3.3 Section 3: Membrane Selection
Now that you’ve figured out what you’re sticking the membrane to, it’s time to decide which membrane to use. And no — they’re not all the same.
This part of the checklist is where you match the membrane properties to the real-world conditions of your build. It’s not about picking what’s on sale at the trade counter. It’s about choosing the membrane that’s going to do the job, for the long haul, with the surface and conditions you’ve got.
Let’s break it down:
1. Rigid or Flexible?
- Rigid membranes can handle hard, stable surfaces with minimal movement.
- Flexible membranes are for substrates that move — like timber floors, balconies, or suspended slabs.
Flexible membranes are more forgiving, but they also require proper installation to work effectively. Think about movement joints, foot traffic, temperature fluctuations, and what's underneath.
2. What’s the Flexibility Class?
This comes down to the expected movement in the substrate and the bond breaker size required. Membranes are classified under AS4858 into:
- Class I: Low flexibility (10–60% elongation)
- Class II: Medium flexibility (60–299% elongation)
- Class III: High flexibility (>300% elongation)
More movement = higher flexibility class = smaller bond breaker. If you don’t match the membrane to the expected movement, it’ll crack — simple as that.
3. Abrasion Resistance
If you’re waterproofing a trafficable area (like a rooftop deck or balcony), you’ll need a membrane that can stand up to foot traffic, furniture, and weather exposure. Not all membranes are designed to take a beating.
If you use a bathroom-only membrane outside or under pavers, it’s going to fail. Maybe not today, but definitely when it matters most — usually after handover.
4. Root Resistance
If you’re dealing with planter boxes or garden rooftops, your membrane needs to resist root penetration — because plants don’t care about your warranty. This usually means specifying a membrane designed for landscaping applications.
Don’t pick your membrane based on what worked “last time.” Each job is different. Start with the site conditions and design needs — then choose the membrane that meets them.
3.4 Section 4: Curing Time and Conditions
You’ve chosen the right membrane. The surface is clean, dry, and ready to go. You start applying the product… and then it rains. Or it’s 40°C in the sun. Or there’s no airflow and the humidity’s at 90%.
Guess what? That membrane might never cure properly — and if it doesn’t cure properly, it doesn’t work.
This section of the checklist focuses on something many builders and waterproofers don’t pay enough attention to: the conditions required for the membrane to set and perform as intended.
Wet Film Thickness (WFT) and Dry Film Thickness (DFT)
Every liquid membrane has a target thickness that must be achieved:
- WFT: The thickness while the membrane is still wet.
- DFT: The final thickness after it has dried and cured.
If you apply it too thin, it won’t perform.
If you apply it too thick, it may not cure properly — or it could trap moisture, leading to bubbling, blistering, or de-bonding.
👉 This is why it’s essential to read the Product Data Sheet (PDS) and check your membrane thickness as you apply it. Don’t guess. Use a wet film gauge. Check multiple points. Document it if you want to avoid arguments later.
Curing Conditions Matter
The checklist prompts you to consider:
- Airflow: Is the space ventilated enough for the membrane to off-gas and cure?
- Relative humidity: High humidity can delay or block curing altogether.
- Ambient temperature: Most membranes have a safe application range (usually 10°C–35°C). Outside of that, curing slows, fails, or goes sideways entirely.
- Surface temperature: The surface might be hotter or cooler than the air — especially on roofs or balconies. Membranes may flash dry or not dry at all.
Why this is a big deal:
If you don’t control the curing conditions — or worse, ignore them — you might think the membrane is fine… until tiling starts and the surface bubbles, cracks, or detaches. At that point, it’s already too late.
Curing is chemical. It’s science. Membranes aren’t magical — they need the right conditions to harden and bond. Technical Data Sheets, Product Data Sheets and Checklists exists to make sure you’ve thought about all of that before you start rolling.
Its not about "slapping" two rolled coats on with a heavy nap roller that "looks about right". It must meet the WFT and DFT or its useless and your on the hook for bathroom remodelling in the future.
3.5 Section 5: Installation Factors
Not all waterproofing products are created equal when it comes to actual installation. Some are user-friendly. Others… not so much. This part of the checklist forces you to stop and think about how the waterproofing will actually get done on-site — by real humans, under real conditions, with limited time and tools.
Because let’s face it: if your system is too hard to apply, or requires lab-like conditions, it probably won’t get installed the way the brochure says.
Ease of Use
- Is the membrane a one-part product, or do you need to mix two parts together on-site?
- Have you got multiple buckets available to ensure consistent product mix batches?
- How easy is it to spread or roll? Can it be sprayed?
- Does it need specialist tools or trades?
- Is the working time short in hot conditions?
The easier a product is to install, the more likely it’ll be applied properly — especially on busy sites where time is tight and trades are stacked.
Environmental Impact & Safety
- Does it contain solvents or require hazardous waste disposal?
- Is the smell a problem in occupied buildings?
- Does it require special storage conditions or ventilation?
Some membranes are classified as hazardous and may require air extraction, flammable material handling, or additional PPE. These details are all found in the SDS (Safety Data Sheet) and must be reviewed before use.
Toxicity and Ventilation Needs
- Is PPE like respirators or gloves required?
- Will application release VOC fumes that need to be managed?
- Does the site need ventilation fans or limited access during application?
These aren’t just questions for the installer — they affect how the whole site is scheduled and who can work nearby. That’s why this section of the checklist exists: to plan ahead, not troubleshoot on the day.
Complicated doesn’t mean better. Choose a system that suits your build conditions, your trades, and your site limitations — not just the one with the flashiest product name.
We’re big fans of sheet systems like WPA and Schonox (by Sika)— even though they’re a bit more expensive. They guarantee dry film thickness (DFT), act as built-in bond breakers, and save time on site. Plus, many are now peel-and-stick, making installation clean, quick, and efficient.
3.6 Section 6: PPE – Personal Protective Equipment
Waterproofing might not look as dangerous as working at heights or cutting steel, but don’t let that fool you. Many waterproofing systems involve hazardous chemicals, solvents, and dust-generating processes that pose real risks to the installer — and to other people on site.
That’s why this section of the checklist focuses on identifying the right personal protective equipment (PPE) for the job — before work begins.
Dust Control
Some waterproofing systems require surface preparation that generates dust — for example, sanding back primers or grinding screeds. That dust can include:
- Silica (a known health hazard)
- Cement particles
- Resin dust
These aren't just unpleasant — they’re dangerous if inhaled. Installers should be equipped with:
- Dust masks or respirators (e.g. P2 or fit-tested options)
- Proper extraction systems or vacuum attachments
- Eye protection
Vapour Control
Many waterproofing products (especially solvent-based or two-part membranes) give off fumes that can cause dizziness, nausea, or long-term health issues if not ventilated properly.
This checklist prompts you to ask:
- Do we need ventilation fans?
- Should the area be isolated during application?
- Is this product suitable for internal use?
In enclosed bathrooms or balconies on high-rise sites, vapour build-up can become a serious issue without planning.
Hazardous Materials (SWMS Required)
If the system includes hazardous components — like flammable solvents or reactive chemicals — then a Safe Work Method Statement (SWMS) is legally required.
The checklist reminds you to:
- Identify whether a SWMS needs to be created or updated
- Communicate any site-specific risks to other trades
- Confirm if training or supervision is needed for that product
Installers rushing to avoid fumes, dust, or discomfort are more likely to cut corners — and that affects the quality of your waterproofing. PPE isn’t just about compliance — it’s part of a successful install.
3.7 Section 7: Safety
Waterproofing might seem like a small part of the build — but it can create big risks if done carelessly. This section of the checklist is all about ensuring the right safety processes are in place before installation starts. And no, this isn’t just about ticking boxes to keep the site manager happy — it’s about reducing risk for everyone involved, including the homeowner.
Let’s break it down:
Material Handling and Storage
Waterproofing products aren’t always as simple as “store it in the garage.” Many require:
- Dry, cool storage out of direct sunlight
- Separation from flammable materials
- Proper stacking (no leaking drums on top of open buckets!)
- Secure areas to prevent unauthorised access
This is especially important for two-part systems, which can cure in the bucket if mixed and left — or worse, generate heat if stored incorrectly.
The checklist ensures this is considered in advance — not discovered when it’s too late.
SWMS & JSA
If your waterproofing scope includes:
- Solvents
- Roofs or balconies
- Working in confined spaces
- High-risk tools or processes
…then a Safe Work Method Statement (SWMS) and Job Safety Analysis (JSA) are required.
The checklist prompts you to confirm these are in place and site-specific. They must:
- Identify hazards
- Specify control measures
- Be accessible to all workers
- Be reviewed regularly (especially if site conditions change)
Without them, you’re not just risking poor workmanship — you’re also exposing the builder and waterproofing contractor to legal and financial liability.
Services like Builder Assist make creating your SWMS and JSA much easier. Purchase a template then customise it to suit your method of work onsite.
QMP and ITPs – Quality and Safety Go Together
In this section we encourages builders to link safety to quality management by including waterproofing in:
- The Quality Management Plan (QMP)
- The Inspection and Test Plan (ITP)
Why does this matter?
Because having an ITP in place means:
- The work is signed off at key stages (e.g. substrate inspection, membrane application, curing, flood testing)
- Defects are caught early — before they’re tiled over
- There’s a paper trail for compliance and warranty support. If you dont have a compatibiity chain, site records, readings you have no manufacturers product warranty. If there is a system failure and you cannot demonstrate how you complied with manufacturers requirements, your done, the system failure is on you.
3.8 Section 8: Application
Now we’re into the nuts and bolts of actually applying the waterproofing system. This section of the checklist helps you think through what’s involved, what tools and products are required, and how to make sure the system gets applied the right way, not just the easy way.
This isn’t about telling your waterproofer how to do their job — it’s about making sure the method matches the design (carpet matches the curtains), the products are compatible, and you don’t end up with shortcuts that fail under tiles.
One-Part vs Two-Part Products
- One-part membranes are pre-mixed, ready to apply, and generally easier to manage on site. Sikafloor rapid screed is a good example of this (mix with water and apply).
- Two-part systems require mixing resin and hardener, and are often more durable — but they have a limited pot life once combined. WPA200 is a good example of a two part product (mix part A and B, rest, mix again, apply)
The checklist asks you to note this, because once a two-part product is mixed, the clock is ticking. If follow-on trades don’t know this, or if it’s mixed too early, the material can harden before it’s applied — and that’s wasted product and money.
Mixing Requirements
Some membranes require specific:
- Mixing ratios (by weight or volume)
- Tools (e.g. low-speed drills with mixing paddles)
- Clean, dry buckets and controlled batch sizes
Improperly mixed membrane = improperly cured membrane. This section ensures someone has actually read the PDS and knows how to mix it correctly.
Reinforcement and Bond Breakers
Depending on the membrane and substrate movement, you might need:
- Reinforcement fabric in wall-floor junctions
- Bond breakers to allow for movement
- Fillets at corners to prevent sharp internal angles
The checklist forces clarity on:
- Where reinforcement is needed
- What size bond breaker is required (depends on flexibility class: Class 1, 2 or 3)
- Whether you're using sealant, bandage, or a release tape system
Miss any of these, and movement cracks the membrane — end of story.
Cleanup, Compatibility, and Costs
- Type of cleanup: Some systems need solvent clean-up, others are water-based. This affects PPE and disposal planning.
- Compatibility with adhesives and finishes: Tilers need to know what they’re sticking to. Not all adhesives bond to all membranes.
- Cost: Choosing the cheapest membrane but needing four coats to achieve DFT isn’t cost-effective. The checklist helps identify total system cost, not just product cost.
Screed Positioning and Application Sequence
- Is the membrane going above or below the screed?
- Are falls already formed in the slab or screed?
- Are penetrations sealed before the screed goes down?
Incorrect sequencing — like waterproofing before waste locations are set or after the cabinet bases are fixed — can ruin the system and force expensive rework. We hily recommend membrane is installed above the screed. Unless the substrate has falls to waste, below screed membranes hold moisture and will affect the underside of the membrane (chemically react and breakdown the membrane).
Full Immersion or Damp Tolerance
Some areas (like planter boxes, bath hobs, or balconies) are exposed to water for long periods. If your membrane isn’t rated for full immersion or rising damp, it’ll blister or fail.
This section confirms:
- If immersion is part of the design
- Whether the membrane is rated for it
If the application process isn’t clear, documented, and planned for the site conditions, expect delays, defects, or do-overs. This part of the checklist keeps you honest.
3.9 Section 9: Compatibility Chain
This section might sound technical, but it’s actually one of the most important — and most overlooked — parts of waterproofing design.
The compatibility chain is about making sure every single product used in the waterproofing system works together. From the primer to the membrane, sealants, adhesives, tile finishes, and even cleaning products — it all needs to be chemically and mechanically compatible.
If one product breaks the chain? The whole system can fail.
It’s usually not malicious — the real issue is no one’s told them what connector sealant needs to be used. It comes down to communication.
A quick chat between the builder and the trades could prevent a waterproofing failure down the line. It’s not always easy, but it is essential if you want the waterproofing system to work as intended. They just need to use the correct sealant (brand/type) that's compatible.
P.S. We’ve even heard of waterproofers skipping the correct brand of sealant just to save a few bucks — swapping it out for a generic one that’s slightly cheaper. Honestly, we think that’s crazy. If there’s a leak and the membrane manufacturer sends one of their tech reps to site, and they spot the wrong sealant? You’re on the hook. That $30 saving suddenly looks pretty dumb when you’re staring down a full bathroom rip-up with no warranty support.
What's in the Chain?
The compatibility chain includes:
- Substrate
- Substrate primer
- Junction/connector sealant
- Bond breaker
- Membrane Primer
- Waterproofing membrane
- Surface Finish Primer
- Surface Finish Adhesive
- Surface Finish Fillers (grouts, adhesives, sealants)
Each one has to be designed to work with the others, and ideally, they should all come from the same manufacturer — or at least be confirmed by the manufacturer as compatible.
Why? Because when things go wrong, most manufacturers will void warranties if their product was used with another brand’s system — even if you followed all other directions.
The “Frankenstein System”
We’ve seen it before:
- Primer from Brand A,
- Membrane from Brand B (because it was cheaper),
- Silicone from Brand C (because the plumber brought it),
- And grout from wherever the tiler shops.
No one's cross-checked anything.
No one’s asked for a TDS. No one told anyone else anything, so they assumed what they have would be fine to use.
And no one’s realised that Brand B’s membrane won’t bond to Brand A’s primer — until water’s pooling behind the tiles.
Result? A waterproofing failure that’s not covered by any warranty. Everyone points fingers. The owner pays.
🔗 The rule is simple: If it touches another part of the system — it must be compatible.
Manufacturer PDS & TDS: Your Best Friend
The checklist reminds you to:
- Get the Product Data Sheets (PDS) and Technical Data Sheets (TDS) for each product
- Confirm compatibility in writing or published documentation
- Choose a single manufacturer system where possible
That way, if something does go wrong, you’re backed by documentation — and not caught in a blame game.
Mixing the wrong compounds doesn’t just mean it won’t work — it means it might actively fail. The chain must be designed the installed in the correct method.
The compatibility chain is your protection against invisible, expensive mistakes.
3.10 Sections 10–14: Applying the Compatibility Chain Across All Areas
Sections 10 to 14 of the C13A checklist break the project down into three key waterproofing zones: internal wet areas, external above-ground areas, and below-ground areas. While the process stays the same — assess, design, match, document — the products used and performance requirements change depending on where you are in the build.
These are all different environments that require tailored waterproofing responses.
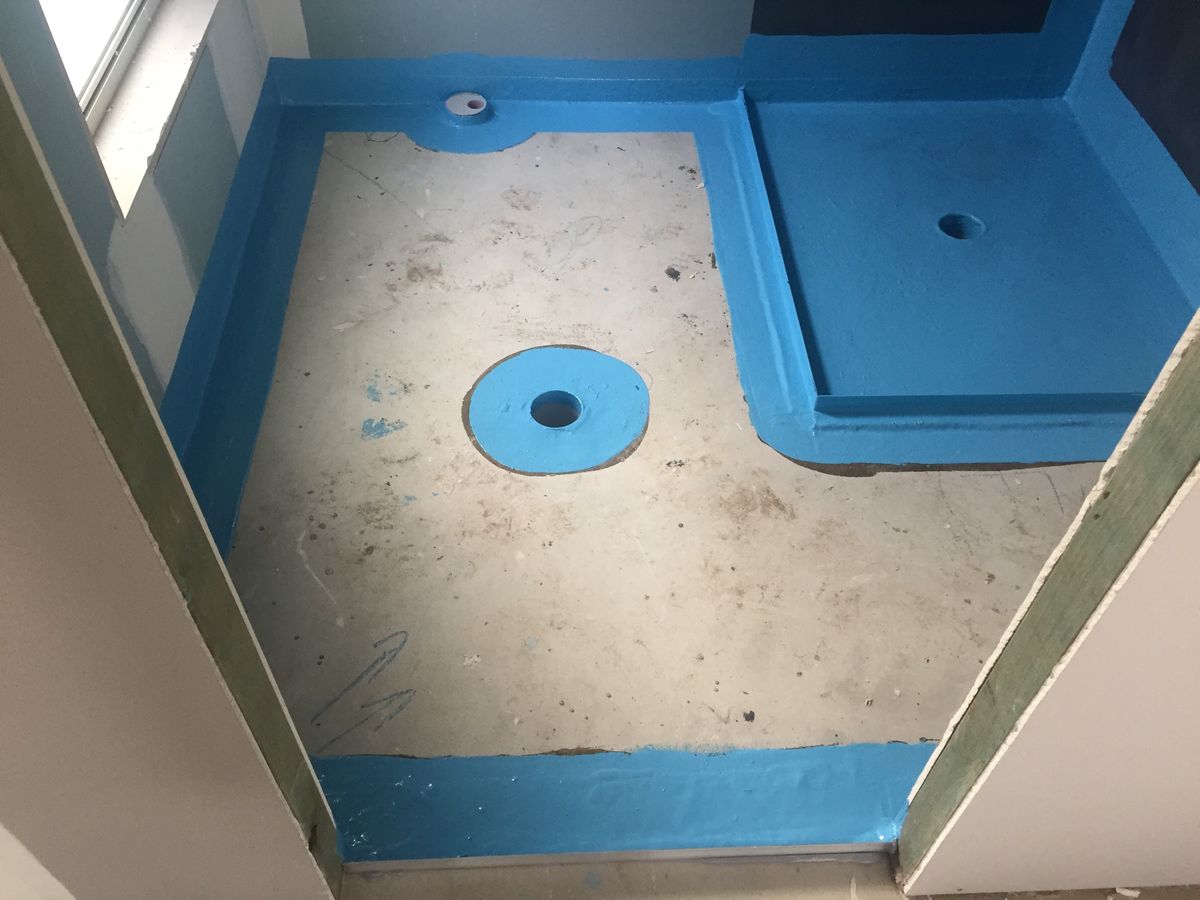
🛁 Internal Areas (Bathrooms, Laundries, Ensuites)
This is the most common waterproofing zone — and often where the most shortcuts happen. Internal wet areas need:
- A membrane compatible with tile adhesives and sealants.
- Attention to bond breakers at wall/floor junctions.
- Correct primer and sheeting systems behind it all (FC sheeting, wet area plasterboard, etc.).
- Sufficient moisture testing and ventilation to ensure curing.
💡 Tip: Not all bathroom membranes are suitable for floors and walls. Read the TDS.
☀️ External Areas (Balconies, Roof Decks, Planters)
External zones are exposed to:
- UV, temperature swings, and foot traffic.
- Wind-driven rain, ponding water, and full immersion conditions.
This means the membrane must be:
- UV stable and trafficable (or protected by finishes).
- Compatible with exterior adhesives and coatings.
- Installed over appropriate substrates (no particleboard!).
- Part of a system that manages drainage, movement, and outfalls.
💡 Tip: External applications are where under-designed membranes often fail fast — especially when the wrong falls or finishes are used.
⛏️ Below Ground Areas (Basements, Retaining Walls, Lift Pits)
Here, you're dealing with:
- Hydrostatic pressure (from soil and water pushing against the wall/floor),
- Rising damp, and
- Negative pressure (moisture moving from the outside in).
The system needs to:
- Include negative pressure membranes or Type A/B systems.
- Be backed up by drainage systems (like ag pipes, risers, or scuppers).
- Be resistant to soil movement, backfill damage, and immersion.
💡 Tip: These systems often fail because they're treated like a bathroom — they’re not. You need specialist membranes here.
Why Homeowners Should Care
If you’ve made it this far, you might be thinking: “This sounds like a builder’s job, not mine.” But here’s the truth — if you’re the homeowner, it’s your bathroom, your balcony, and your future repair bill if something goes wrong.
That’s why understanding and using the C13A Waterproofing Design Checklist is one of the most practical ways you can protect your investment and avoid becoming yet another waterproofing horror story.
Let’s break down why it matters to you, not just your builder.
💸 Waterproofing Failures Are Incredibly Expensive
Fixing a waterproofing defect can cost six to ten times more than doing it right the first time. A basic internal waterproofing failure could run $6,000 to $10,000+ — and that’s just for one area.
And the worst part? It’s often not covered by standard insurance. Or your builder may be long gone by the time it fails.
🧱 It’s a Hidden Defect — Until It’s Too Late
You can’t “see” a waterproofing failure until:
- The bathroom tiles start lifting,
- The paint starts bubbling,
- The skirting boards start warping, or
- Water starts dripping into the floor cavity.
By then, it’s not just a patch job — it’s demolition and reconstruction. That’s why the checklist exists: to get it right before any of that happens.
📋 It’s Not Your Job to Waterproof — But It Is Your Job to Ask
As the homeowner, you’re not expected to apply membranes or read technical data sheets — but you can ask smart questions:
- Has a waterproofing design checklist been completed?
- Are all products compatible and from the same manufacturer?
- What type of membrane is being used in each zone?
- Has the curing time and site condition been accounted for?
If your builder or waterproofer can’t answer those questions clearly — that’s your cue to dig deeper. And the C13A checklist gives you a framework for doing exactly that.
📑 It Helps You Hold the Builder Accountable
Builders love documentation — until it turns into accountability.
By having a completed checklist:
- You’ve got a record of what was used, why, and where.
- You can prove that the right questions were (or weren’t) asked.
- If something fails later, you’ve got evidence — not just a guess.
The C13A checklist helps you do that, without needing a trade licence.
Conclusion: Plan It Properly, Waterproof It Once
Waterproofing isn’t glamorous. It doesn’t sparkle like stone benchtops or sell display homes like "Hamptons Style Facades" or multi-coloured recessed LED lighting synced to your Sonos bass track.
But it is one of the most important parts of your build — and one of the most common sources of costly, frustrating defects in new homes.
The C13A Waterproofing Design Checklist aims to help stop that from happening by putting process in place (part of a quality management system).
It gives builders, waterproofers, and homeowners a shared tool to:
- Make informed decisions before work begins,
- Avoid product incompatibility and hidden errors,
- Document what was done and why,
- And ultimately, build bathrooms, balconies, and basements that last.
If you’re a homeowner building your forever home, a builder trying to tighten up your QA, or a tradie who’s seen too many membrane failures blamed on the wrong person — this checklist is for you.
Use it. Share it. Ask for it.
Because waterproofing should never be a mystery or an afterthought. It should be designed, documented, and done right the first time.
How was that?
Waterproofing isn’t that hard. If you actually read and follow the instructions, you’re already ahead of 98% of people who don’t.
Now that you’ve read the article, test your knowledge with our second quiz below.
Why two quizzes? Well, waterproofing is the number one defect in residential construction—so we figured two quizzes are better than one.
But don’t worry, we’re not done with waterproofing yet. Make sure you check out C13B for everything you need to know about internal and external waterproofing installation.
Frequently Asked Questions (FAQ)
1. What’s the difference between waterproof and water-resistant?
Waterproof means no water gets through — ever. Water-resistant means the material can handle some moisture, but not full immersion or pooling water. In waterproofing systems, both are used in combination depending on where they’re installed.

We recently (April 2025) added a fancy new AI bot to make glossary searches faster for you.
2. Do all wet areas in a house need waterproofing?
Yes. Bathrooms, ensuites, laundries, and sometimes powder rooms must be waterproofed under AS3740:2021. If it’s a wet area, it needs protection.
3. What is a compatibility chain, and why does it matter?
It’s the set of products (primer, membrane, sealant, tile adhesive, etc.) that must work together as a system. If you mix brands or use products that aren’t compatible, the membrane can fail — and no warranty will cover it.
4. How can I tell if the waterproofing was done properly?
Ask to see the completed C13A checklist, the product data sheets, and photos taken during application. You can also engage an independent inspector for a flood test or to check Wet Film Thickness (WFT) during install.
5. Can one type of waterproofing membrane be used everywhere?
No. Internal, external, and below-ground areas each require different membranes based on exposure, pressure, and wear. A membrane that works in a bathroom may fail on a balcony or retaining wall.
6. What happens if waterproofing fails after handover?
You may be left footing the repair bill — especially if the work wasn’t done to standard or wasn’t properly documented. Some structural warranties apply, but most only cover catastrophic failure, not tile lifting or leaks behind vanities.
7. Is waterproofing covered in the standard building contract?
Usually yes — but the details (product choice, system used, documentation) are often vague or assumed. Builders and trades are supposed to work to AS4740 and AS4654.2 inluding using/filling out correct documentation. The reality is you'll probably only ever see a form 43, form 30 or form 12 (in QLD). A membrane and an overlay inspection is also required.
8. Who should complete the C13A checklist?
Ideally, the builder in consultation with the waterproofing contractor. It should be completed before work starts and signed off by the person supervising the job — and yes, you can ask to see it.
9. What’s the most common cause of waterproofing failure?
Improper substrate preparation, incorrect curing conditions, incorrect wet and dry fil thickness, no compatibility chain documentation, no checking relative humidity, surface humidity and surface temperatures and incompatible product selection. In other words — cutting corners. The checklist is designed to stop that from happening.
10. How do I get a copy of the C13A checklist?
Download it directly from our site here (insert link - signup and login required to access). Use it as part of your build documentation to protect your home and your budget.
Further Reading
Yes im shy on site photos lately. Ill be restocking soon along with video content.


Member discussion