A drained, ventilated gap behind your cladding helps walls dry out and resist rot and mould. That's all a rainscreen is. Here's how it works, why the most common Australian wall already uses the idea, and when it's worth asking your builder for one.
What a rainscreen is
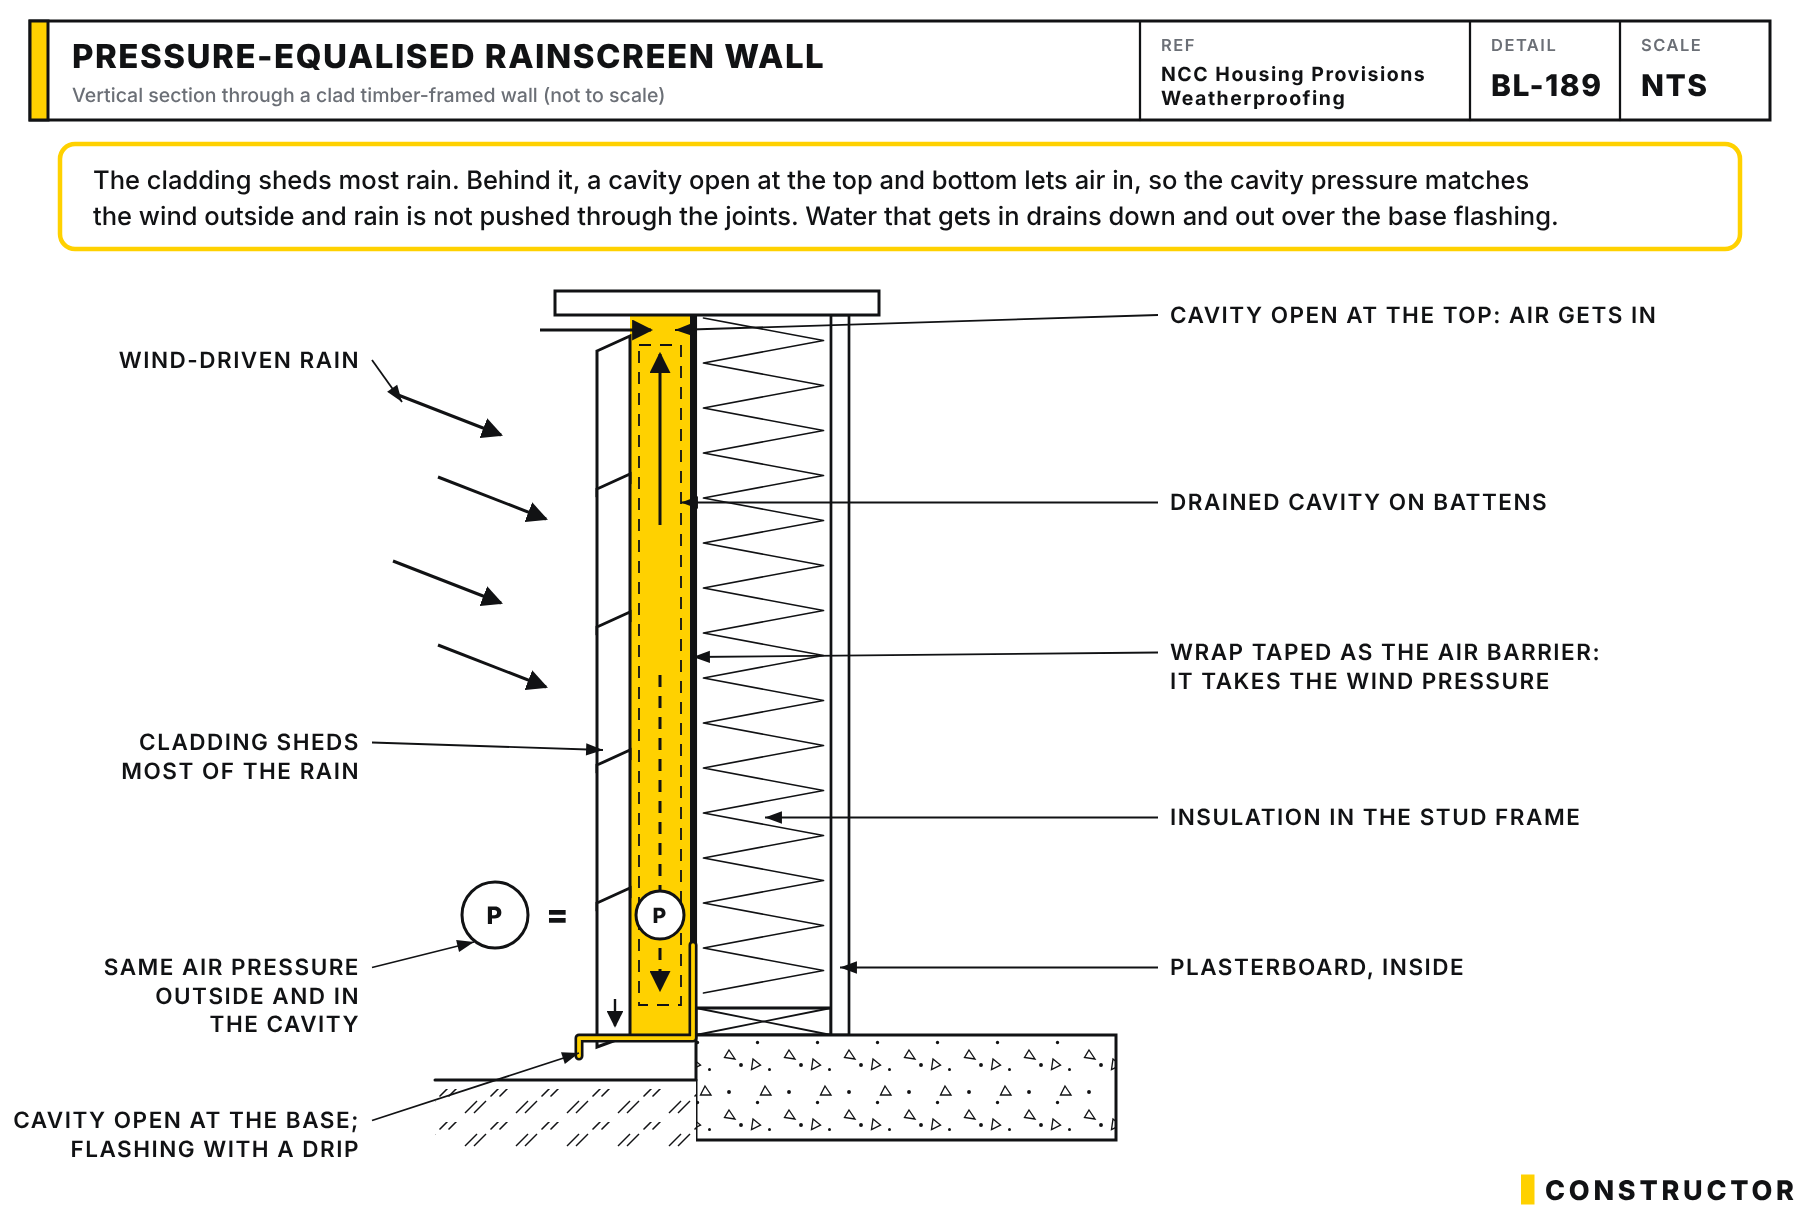
A rainscreen wall has three parts:
- The cladding. Brick, fibre cement, weatherboard, metal or composite panels. It's the first line of defence against rain, wind and sun, but no cladding is completely watertight.
- A gap behind the cladding. Water that gets past the cladding runs down the back of it and drains out the bottom through weep holes or a vented base. Air moving through the gap helps the wall dry out.
- A water-resistive barrier on the frame. The wall wrap (pliable membrane) over the studs stops any water that does cross the gap from reaching the frame, while still letting water vapour out of the wall.
The principle is simple: assume some water will get past the cladding, and give it a way out and a way to dry.
Brick veneer already does this
Here's what the old version of this post got wrong. The most common Australian wall, brick veneer, already works on the rainscreen principle. There's a cavity between the bricks and the timber or steel frame, with flashings and weep holes at the bottom to drain any water that gets through the brickwork. That's a drained and ventilated cavity.
Where the question really matters is lightweight cladding: fibre cement sheet, weatherboards, metal and composite panels. These are often fixed straight to the frame over the wall wrap, with no gap. When water gets behind them, through a failed joint, a poorly flashed window or a crack, it has nowhere to go. It sits against the wrap and framing and can lead to rot, corrosion and mould.
The fix is a cavity batten system: vertical battens fixed over the wall wrap, with the cladding fixed to the battens. That creates a drained, ventilated gap behind the cladding. In Queensland, that typically means fibre cement or weatherboard cladding on cavity battens over a vapour-permeable wall wrap. Several cladding manufacturers offer cavity systems with their own battens, flashings and details.
The benefits
- Drainage. Water that gets behind the cladding has a clear path out.
- Drying. Air movement in the gap helps the cladding and wall wrap dry after rain.
- More forgiving walls. Small leaks at joints, windows and penetrations are less likely to turn into rot or mould inside the wall.
- Less heat transfer from the cladding. A ventilated gap can reduce how much heat the sun-baked cladding passes to the frame, although insulation and wall wrap do most of the work.
- Longer cladding and paint life. Cladding that can dry from both sides tends to perform better.
To be clear on energy: the gap itself isn't insulation. Energy savings come from the insulation in the wall, airtightness and the overall design. Don't buy a cavity system on the promise of big power bill savings.
Why isn't it standard on lightweight-clad homes?
- Cost. Battens, extra flashings and the labour to install them add to the wall cost, and wall thickness increases, which affects window and door reveals.
- Habit. Direct-fixed cladding is what many builders and trades know, and it's allowed when installed to the manufacturer's details.
- Nobody asks. Most homeowners don't know the option exists, so it's rarely offered.
I'd rather builders priced it transparently, explained the benefit and let the client decide.
What it costs
The cost depends on the cladding, the system, the wall area and the detailing around windows and doors. Ask your builder to price it as a separate line item so you can see the difference. Compared with the cost of repairing rotten framing behind a leaking wall, it's one of the cheaper insurance policies on a lightweight-clad home.
Questions to ask your builder
- Is the cladding direct-fixed or on cavity battens? If direct-fixed, what would a cavity batten system cost?
- Which system is it? Ask for the manufacturer's installation details for the cladding, battens, flashings and window and door junctions.
- What wall wrap is used? It should be a vapour-permeable membrane suitable for the wall and climate, installed with laps, tapes and flashings to the manufacturer's instructions.
- How do windows and doors get flashed? Most leaks start here.
- How is the bottom of the cavity drained and protected? Ask about vermin and insect screening at the base and top.
- Which insulation and cladding combination complies with the NCC for this home? Ask your designer, particularly for bushfire-prone sites and fire separation near boundaries.
- How does the extra wall thickness affect the design? Window reveals, eaves, setbacks and architraves may need to change.
Use the Enclosed stage checklist to check the wall wrap, flashings and cladding before they're covered up.
C11 - Enclosed Stage Inspection Checklist
$119.00 AUD
Last updated 28 Oct 2026 · Revision 6 · Free updates for life
Checklist Type: Major (Enclosed Stage)
Form Factor: Fillable, print-ready PDF (A4, 42 pages)
When to use: Enclosed (lock-up) stage: brickwork and external cladding
A 152-point enclosed stage checklist for brick veneer and fibre cement, weatherboard or foam cladding. Check the cavity, ties, flashings, windows and lintels before the linings hide them.
The bottom line
If you're building in brick veneer, check the cavity, flashings and weep holes are done right, and you're already using the rainscreen principle. If you're using lightweight cladding, ask for a cavity batten system. It's one of the cheapest ways to make walls more forgiving of leaks.