

Introduction – Why Termite Barriers Matter
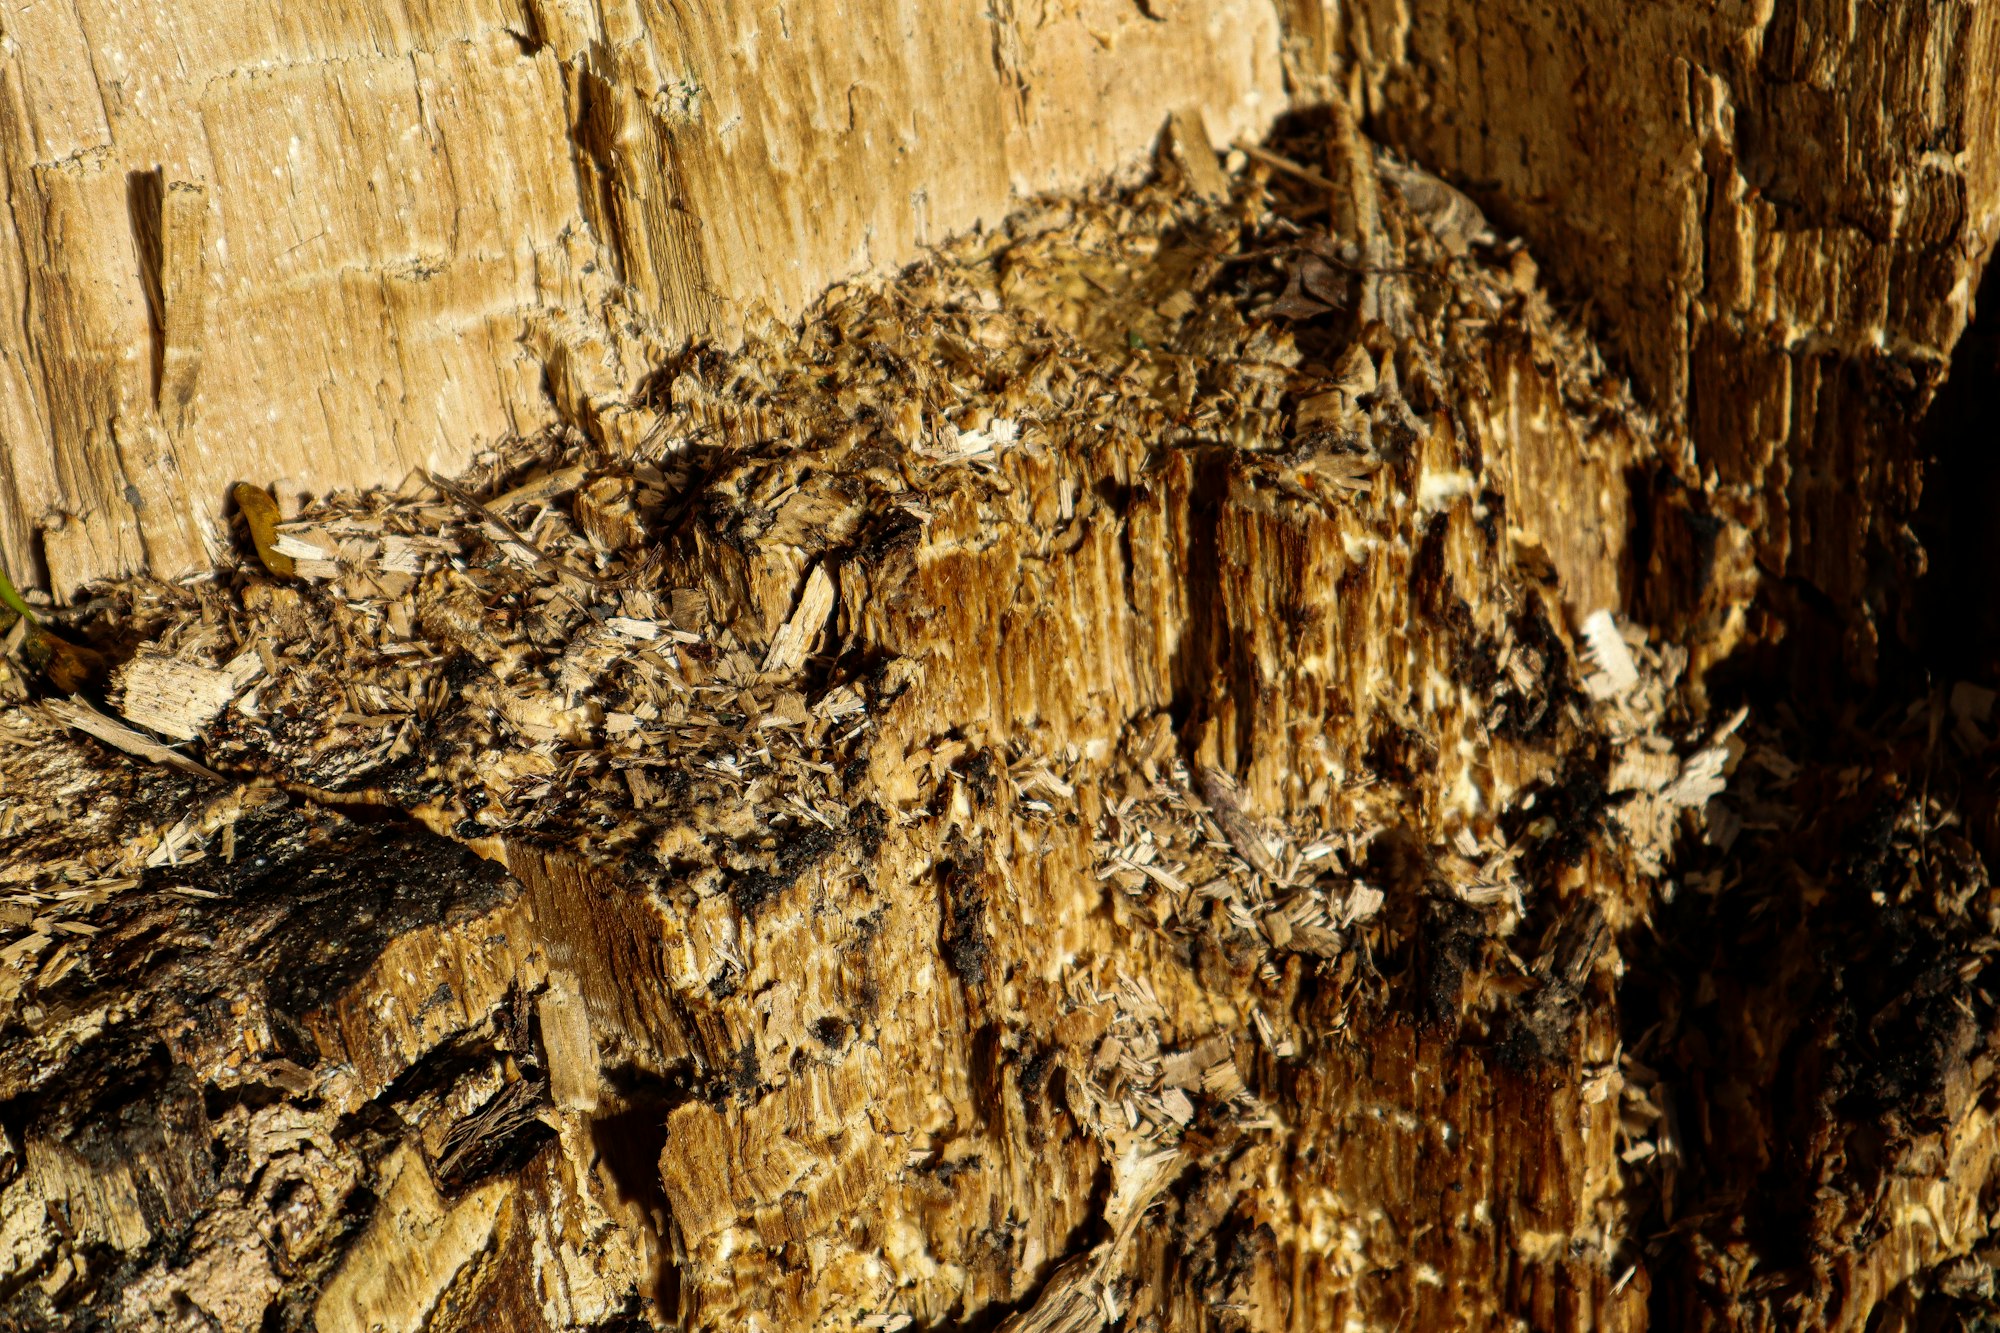
Termites lead the list when it comes to disaster-related damage to Australian homes—outranking fires, floods, and storms combined.
In fact, these tiny insects cause annual damage in the billions across the country. Every year, between 130,000 to 180,000 Australian homes are attacked, and the resulting repair costs can exceed $1 billion.
If you're an Australian homeowner—or thinking of becoming one—you need to know about termite barriers. In this post we break it all down for you, including:
- What termite barriers are and why they matter.
- The different types available.
- How they fit into the construction or retrofit process.
- Maintenance best practices, warranty considerations, and why they’re like insurance for your home.
Approximately 1 in 5 Australian homes suffer termite damage—often going undetected until it’s too late. Termite barriers are your first line of defence in protecting your home.
👉️ Here's how we'll walk you through the topic, one easy-to-follow step at a time:
- What is a termite barrier? – Simple concepts explained, backed by real numbers.
- Types of barriers – Physical, chemical, hybrid, and how each works in an Aussie context.
- Where and why each is used – Whether you're building new or renovating.
- Pros & cons comparison – A clear side-by-side.
- Installation & maintenance tips – How to keep the barrier effective over time.
- Barrier as insurance – A framing that makes the value crystal clear.
- Wrap-up – Your next steps as a homeowner.
Section 2: What Is a Termite Barrier (Basic Concepts)
Defining a Termite Barrier
A termite barrier is a protective system installed around or under your home to prevent subterranean termites from entering and damaging your structure. It either blocks termites physically or kills or repels them chemically—before they reach your timber or framing.
Think of it like a moat around a castle—but instead of water, you use mesh, stone, chemicals, or treated pipes to keep invaders out.
How Termite Barriers Work
- Physical barriers physically block termites’ paths. This includes stainless steel mesh, crushed stone/granite layers, termite shields, membranes, and sealants. These methods either close off entry routes or force termites into visible areas for easy detection.
- Chemical barriers are termiticides applied into the soil surrounding the structure, forming a toxic zone that kills termites on contact or interferes with colony behaviour.
Generally, physical barriers are installed during construction; chemical barriers are more flexible and can be applied to existing homes.
Key Physical Barrier Types
- Stainless Steel Mesh and Particle Barriers
‣ Mesh that termites can’t chew or squeeze through—often placed around slab edges and plumbing penetrations.
‣ Particle barriers use materials like graded granite or glass, sized and shaped so termites cannot tunnel through. These are long-lasting and chemical-free. - Termite Shields and Membranes
‣ Termite shields are metal or PVC caps fitted between foundation and wood framing—making termite movement visible.
‣ Membranes are elastomeric materials that serve multiple roles—waterproofing, vapour barriers, and termite exclusion—used in concrete slabs, walls, and flashings. - Sealants
Flexible, caulking-style products designed to seal around penetrations and joints, maintaining the barrier even as structures settle.
Key Chemical Barrier Types
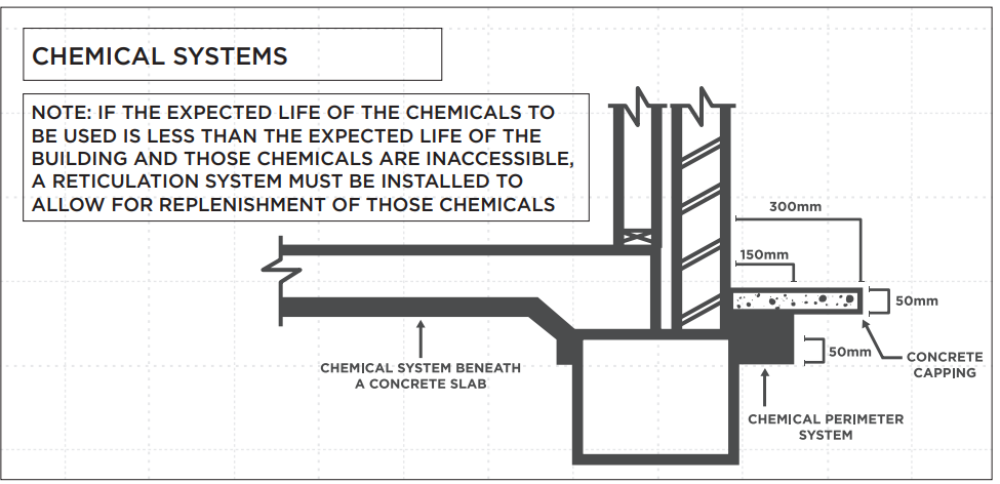
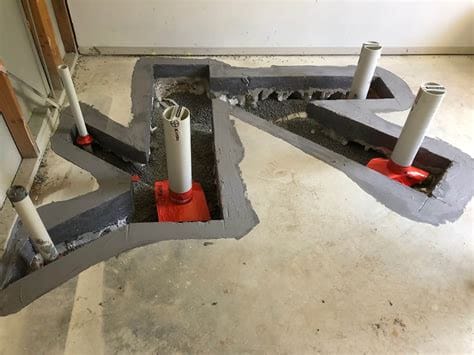
- Soil Treatment (Perimeter Soil Spray)
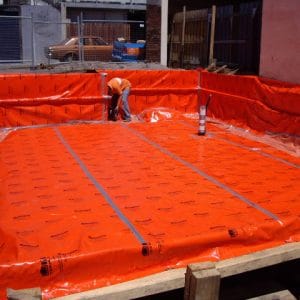
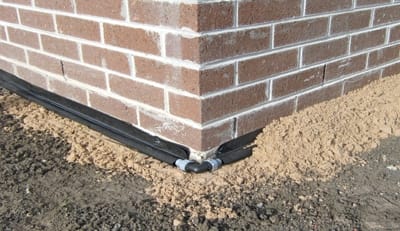
A trench is dug around the foundation and filled with termiticide-treated soil (often fipronil or imidacloprid). Becomes a protective zone surrounding your home. - Reticulation Systems
Underground pipes are laid in the soil during a pre-construction or retrofit phase. These are refillable networks for delivering termiticide without having to disturb the ground again. - Baiting Systems
Not active barriers in the traditional sense—they rely on termite foraging. Stations are buried around the house containing slow-acting bait that termites take back to the colony, eventually eliminating it.
🤔 Barrier Logic in Everyday Terms You Can Understand
- Physical barrier = "You can’t get in."
- Chemical barrier = "If you try to get in, something will kill you—or you’ll unknowingly spread it to the rest of your colony."
- Baiting system = "Come in, eat this… and you’ll take it back to your friends and family—and they’ll all get sick."
Imagine building your home without a lock on the door. That’s what a missing or breached termite barrier is like.
Australian Standards Construction Context
In Australia, many of these barrier types align with Australian Standards—such as AS 3660—for termite management in new and existing buildings.
During new builds, physical barriers are often mandatory under the National Construct). In renovations, chemical treatments or reticulation systems are more common due to their flexibility.
Section 3: Types of Termite Barriers in Australia (Deep Dive)
In this section, we’ll look deeper into key termite barrier solutions widely used across Australia—highlighting how they function, their strengths, and where each fits best.
1. Physical Barriers
Termimesh (Stainless Steel Mesh) - (Image below)
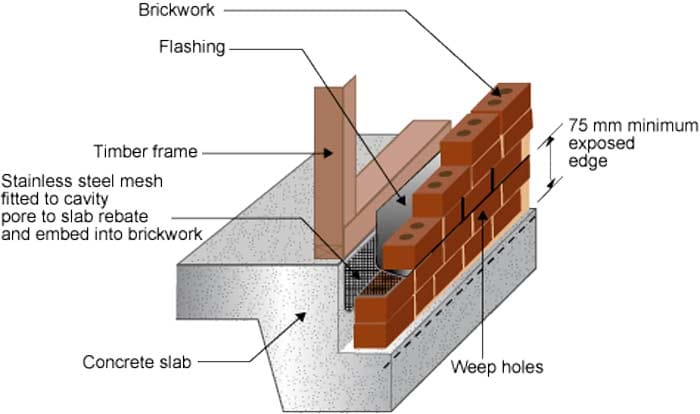
- Constructed from marine-grade stainless steel (TMA725), Termimesh physically blocks termite entry through slab penetrations, brick interfaces, and joints. The mesh is corrosion-resistant, long-lasting, and contains no chemicals.
- It’s a one-time installation built into new homes and is prized for being eco-friendly and maintenance-free.
- Proven in over 30 years of use across 700,000+ Australian homes.
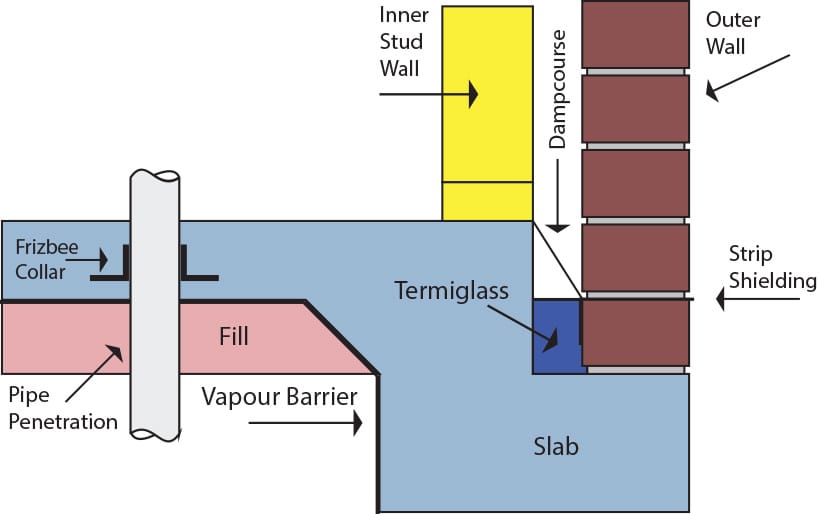
Particle/Glass Barriers (e.g., Termiglass) (Image below)
- Made from specially crushed, recycled glass or other hard minerals sized to prevent termite tunnelling. The shapes and density make them too hard to chew, too heavy to displace, and too small to crawl through.
- Termiglass is chemical-free and environmentally preferable—with over 200,000 successful installations.
Termite Shields & Membranes
- Shields are metal or PVC caps placed between foundations and timber to expose termite paths—making them visible. Commonly seen in older, lightweight frame constructions.
- Membranes combine waterproofing and termite blocking in elastomeric layers that wrap foundations, slab edges, or flashings.
2. Chemical Barriers & Hybrid Systems
Kordon
- A uniquely Australian hybrid—known as “chemical in a non‑soil matrix”—which embeds the termiticide deltamethrin in a fibrous webbing sandwiched between plastic layers.
- Delivers both physical obstruction and chemical repellent/killing action. Supported by a 10-year warranty and designed to last the lifetime of the building (over 50 years).
- Satisfies NCC and AS 3660.1 standards and is recognised by CSIRO, CodeMark, and other regulatory bodies.
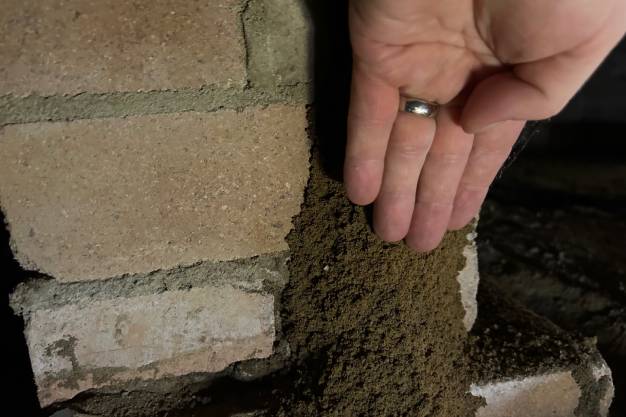
Soil Treatment (Perimeter Chemical Barrier)
- Involves trenching around the slab’s edge and injecting termiticides (e.g., fipronil, imidacloprid) into the soil to create a lethal or repellent zone.
- Ideal for retrofitting existing homes, though the chemical zone typically lasts 8–10 years and requires periodic reapplication.
Reticulation Systems
- Network of underground pipes installed during construction or renovation that allows termiticide to be reapplied without excavation. Offers long-term flexibility and lowers disturbance.
Baiting Systems
- Bait stations placed strategically around the property contain slow-acting termiticide that termites carry back to their colonies, aiming to eliminate the entire colony.
- Often core-drilled through concrete, it’s essentially a termite buffet—just outside your house. You check them regularly and treat as needed
- Useful where barriers aren’t feasible—but require regular monitoring and servicing.
Comparison At-A-Glance
| Barrier Type | How It Works | Installation Context | Advantages | Considerations |
|---|---|---|---|---|
| Termimesh | Physical mesh blocks termites | New builds only | Non-toxic, permanent, low maintenance | Requires precise installation, upfront cost |
| Termiglass | Particle layer exclusion | New builds | Eco-friendly, durable, chemical-free | Needs professional installation |
| Shields/Membranes | Physical flashing/exclusion surfaces | New & some renovations | Visible termite paths, combined functions | Gaps may undermine effectiveness |
| Kordon | Physical + chemical barrier | New builds (incorporated early) | Long lifespan, warranty-backed, compliant | Needs accredited installer, higher initial cost |
| Soil Treatment | Chemical termiticide perimeter | Existing & new builds | Flexible, retrofit-friendly | Requires re-treatment; chemicals involved |
| Reticulation | Refillable pipe system | New & retrofit | Less invasive reapplication, flexible | Needs regular refilling, initial cost |
| Baiting | Attracts termites to lethal bait | Existing homes | Minimal visual impact, colony targeting | Ongoing maintenance, slower to protect |
Most systems require an annual inspection to maintain the system warranty (essentially an insurance policy). Be sure to read the policy thoroughly and check whether only the original installing company can carry out re-inspections, or if any accredited installer can inspect the system to keep your warranty valid.
Section 4: Where and Why Each Type of Termite Barrier Is Used
👉️ New Construction
- Mandatory protection under the Building Code of Australia: The National Construction Code (NCC) and AS 3660.1 require termite management systems in new homes, particularly in termite-prone zones. These systems are often installed during early construction stages, like slab pouring or framing.
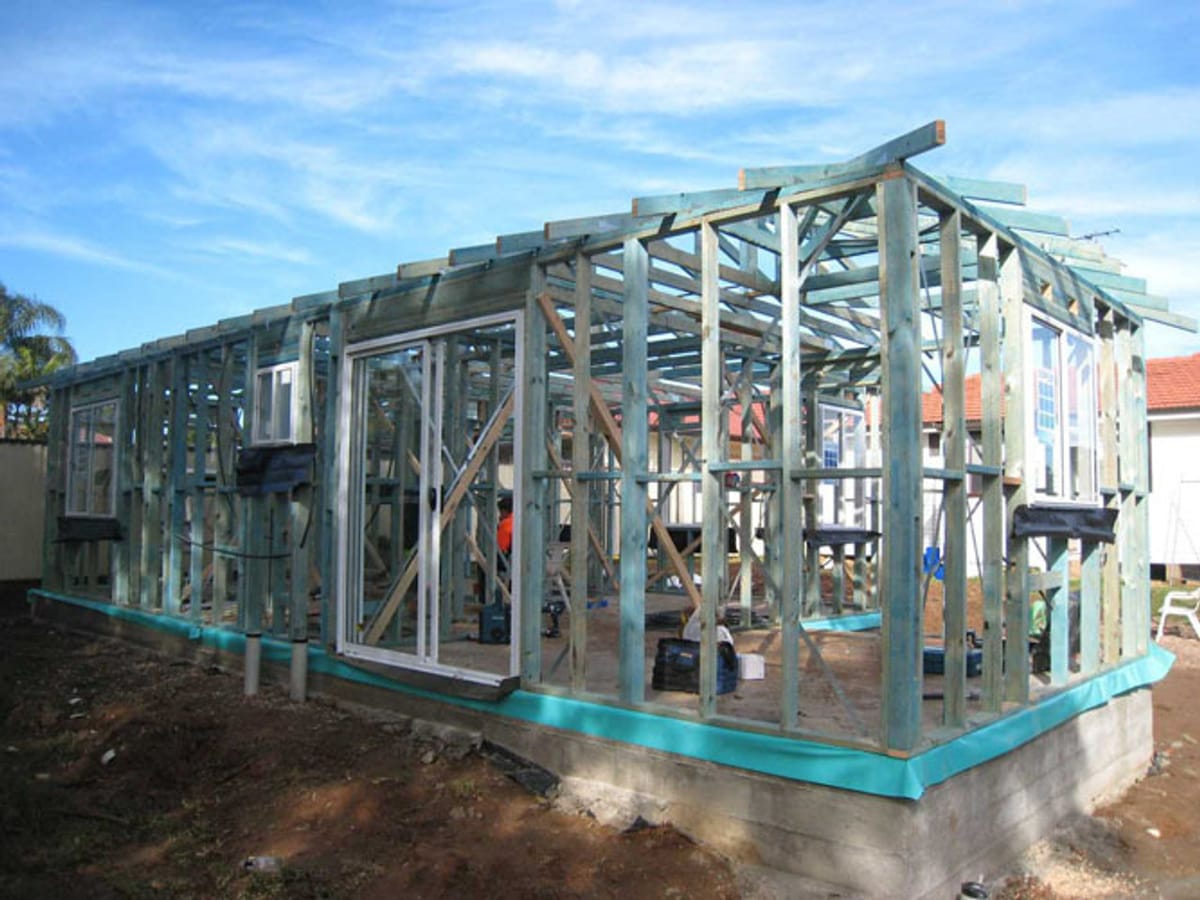
- Physical barriers (e.g., Termimesh, membranes, collars) are typically embedded during slab or foundation construction. These are particularly effective in new builds due to seamless integration with the structure.
- Hybrid systems like Kordon are often specified in new builds. They combine physical obstruction with chemical protection and often come with warranties. Being integrated early ensures optimal performance and compliance.
- Reticulation systems allow for future reapplication of termiticides without excavation. These systems are laid during construction and offer flexibility long-term.
- Why this matters: Pre-construction integration of barriers is cost-effective, non-disruptive, and ensures better compliance and performance.
👉️ Renovations & Existing Homes
- For existing properties, especially those lacking pre-installed barriers, soil chemical treatments (also called treated zones) are the most common solution. A trench is created around the foundation and filled with termiticide-treated soil.
- Reticulation systems can be retrofitted during renovations to allow easy re-treatment without future ground disturbances.
- Baiting systems offer a non-invasive alternative for existing homes. Suitable where traditional barriers are impractical or inaccessible, though they require ongoing service and maintenance.
- Combining solutions: In many renovations, chemical barriers are combined with partial physical methods (like sealing penetrations) for improved protection.
👉️ Regional & Climate Considerations
- High-risk areas, such as parts of Queensland and coastal states, demand more robust termite protection. Some zones in North QLD may require both physical and chemical systems.
- Local councils or regulations may prefer certain systems over others. In urban areas with environmental sensitivities, chemical-in-physical systems like Kordon are often preferred.
Why Some Systems Work Better in Certain Situations
| Scenario | Common Choice | Why It Works Best |
|---|---|---|
| New Build | Physical / Hybrid / Reticulation | Seamless installation, compliance, long lifespan |
| Renovation / Existing Home | Chemical Soil / Baiting / Reticulation | Flexible, minimal disturbance, retrofit-friendly |
| High-Risk / Regulatory Areas | Hybrid + Physical | Strong, visible, chemical support, meets strict regulations |
- For new builds, installing robust (lawyers love this term), long-lasting systems up-front maximises protection and value.
- In existing homes, flexibility and minimising structural disruption are key; hence, treatments or baiting are more practical.
- In high-risk or regulated areas, contractors may combine physical and chemical approaches both for compliance and maximum efficacy.
Section 5: Best Practices for Installation & Maintenance
Keeping your termite barrier effective isn't as simple as installing it once and forgetting about it.
To keep your home protected—whether it’s a new build or an existing structure—there are required steps every homeowner should follow. Let’s dig take a look.
1. Use Accredited Installers & Proper Documentation
- Why it matters: Specialist systems (like Kordon, Termimesh, Termiglass) require certified installers to ensure full compliance, warranty validity, and adherence to Australian standards.
- What to do: Always ask for proof of installer accreditation and, upon completion, request official documentation—like certificates, durable notices, or stickers—clearly outlining what’s installed and how it complies with AS 3660 and N requirements. This forms a solid base for future maintenance and resale value.

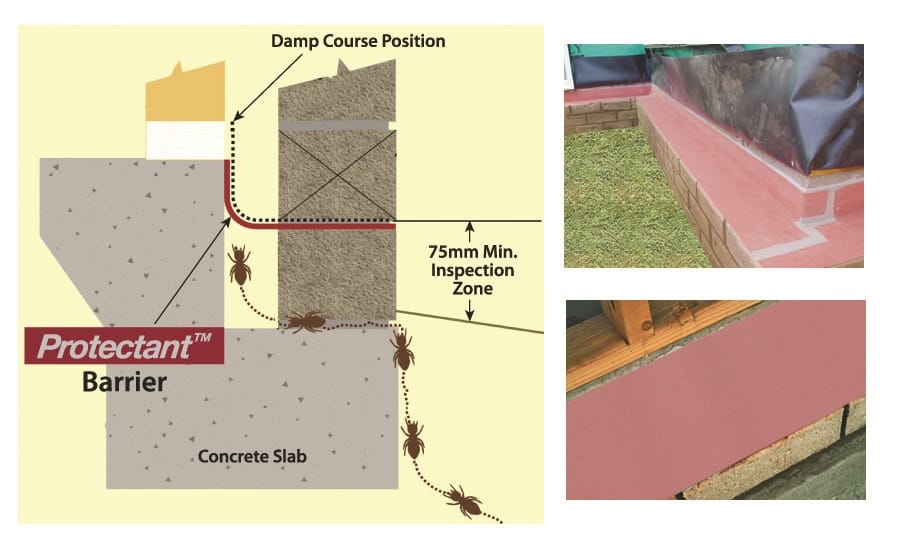
2. Maintain the Inspection Zone—Don’t “Bridge” the Barrier
- Physical barriers rely on a clear inspection gap (typically 75 mm) so termites must expose themselves to enter, making them visible during checks.
- Common mistakes: Mulch, garden beds, or timber piled against slabs can create a bridge, bypassing vital protection. Even minor landscaping jobs can unintentionally void the system.
- Your action: Keep soil, plants, and combustible materials at least 75 mm clear of foundation walls and exposed barrier edges. Avoid making direct contact with these zones.
3. Schedule Regular Inspections—Annually (or More, if Needed)
- Regular professional inspections are essential to verify the barrier remains intact and fully functional.
- Recommended frequency:
- Standard risk areas: At least once a year.
- High-risk zones or previous termite issues: Every 6 months may be prudent.
- Why inspection matters: It helps detect breach points, cracks, or system degradation early—before termites breach or invade.
4. Maintain Chemical Systems Appropriately
For systems like reticulation pipes or soil treatments:
- Refill or recharge as per manufacturer schedule—often every 8–10 years for perimeter soil treatments.
- Inspect distribution systems for blockages, leaks, or reduced effectiveness (e.g. clogged emitters in reticulation systems).
- Keep maintenance records—this prevents warranty lapses and serves as proof of due diligence.

5. Homeowner Vigilance: Avoid Landscaping Mistakes
- Avoid piling mulch, firewood, or compost next to home foundations—it can hide termite activity and bypass barriers.
- Don't position garden beds against your house/termite inspection zone. It makes things that much harder to manage over time.
- Check indoor and outdoor areas regularly—look for mud tubes, hollow-tapping timber, and termite wings.
- Moisture control: Fix leaks promptly, ensure functional gutters/downpipes (connected securely to drainge points), and maintain proper drainage—termites love damp environments
🏁 6. Keep All Maintenance and Inspection Records
- Document every inspection, repair, refill, and mention breaches or replacements.
- Take pictures and make notes, dates and times, what people say to you (who, what, when).
- Ensure “durable notices” are in place—these are weatherproof labels or plaques showing what barrier is installed, installation date, installer details, and maintenance obligations. AEPMA best practices emphasise record retention for future homeowners.
- Durable notices are normally located in the Meter box and under the kitchen sink.

Section 6: Termite Barrier as Insurance—How Prevention Beats a Payout
Why Termite Barriers Are Better Than Insurance
Let’s face it—termite damage in Australia is rampant, silent, and devastating. Yet, shockingly, most home insurance policies won’t cover it. That’s because insurance providers view termite infestations as preventable maintenance issues, not sudden disasters like fire or storm damage.
Think of termite barriers as preventive insurance for your home. Unlike a traditional policy that might help when something goes wrong, a termite barrier is a proactive step that helps prevent damage in the first place—and just like real insurance, it only works when you honour its "terms."
Standard Home Insurance Often Falls Short
- Termites are usually excluded: Most standard home-buildings insurance labels termite damage under “vermin” or “gradual damage,” leaving homeowners to shoulder the costs alone.
- Claims get rejected easily: Even when termite damage is discovered during repairs or insurance claims, insurers may void the entire policy if poor maintenance or building defects are identified
- Specialist termite insurance is limited: There are niche policies and pest-control warranties available, but they often only cover detection or re-treatment—not structural repair costs. Annual inspections or documentation may still be required to keep coverage valid.
Making the Barrier = Insurance
| Insurance Terms | Termite Barrier Equivalent |
|---|---|
| Premiums | Ongoing inspections & proper barrier maintenance |
| Policy exclusions | Barrier breaches (e.g., landscaping, drilling through the inspection zone) |
| Claim denial due to negligence | Damage from a barrier you've breached—result voids warranty |
| No coverage without compliance | Barrier fails without upkeep—much like a policy lapsing |
This happens a lot to new home owners: If you install a termite barrier and then ignore inspections or landscape over the inspection zone, you're effectively "cancelling" your barrier—just as skipping insurance payments would void a policy. Repairs—even minor ones—can cost thousands of dollars more without preventative protection.

The Real Value of a Termite Barrier
- Cost vs repair: With average termite repair bills in Australia often exceeding $10,000, installing a barrier (especially once-only systems like mesh or Kordon) can save tens of thousands and preserve your home’s integrity.
- Insurance conditions mirrored: Insurers sometimes require evidence of annual termite inspections to uphold policies. Similarly, your barrier vendor will almost always require maintenance and inspection to keep any warranties alive.@GIO
- Long-term peace of mind: Especially for new builds, using high-quality barrier systems—like Termimesh, Termiglass, or Kordon—provides decades-long protection, more like a built-in ‘insurance policy’ for your home.
Section 7: Conclusion – Securing Your Home’s Future with Termite Barriers
By now, you’ve taken a comprehensive journey through the world of termite barriers—from understanding how they work to knowing what types exist and why they matter in the Australian home context. Here’s why everything you’ve learned matters for the long haul.
A Defensive Shield That Saves You Money
Imagine building your dream home and then losing tens of thousands of dollars in structural timber replacement because of a termite invasion. It’s not just hypothetical—this happens to thousands of Aussie homeowners every year. A well-designed termite barrier, installed correctly, is your frontline investment. It’s not an optional bolt-on—it’s a foundational safeguard.
What Makes This Protection Work Over Time
- Built for the Long Haul
Whether you choose physical systems like stainless mesh or Termiglass, or hybrids like Kordon, these barriers are made to last decades or potentially the lifetime of the home. As long as they remain intact and un-compromised, and regularly inspected, they continue protecting, almost silently. - Compliance is Your Backbone
Many barrier systems are built to meet or exceed the National Construction Code and AS 3660 standards in Australia. Installing them during the building phase isn’t just easier—it ensures seamless performance and your peace of mind. - Maintenance Keeps It Alive
Just like insurance, a termite barrier only works if you uphold your side of the deal. That means annual inspections, preserving the inspection gap (typically 75 mm), and avoiding landscaping or renovations that “bridge” the barrier. According to home protection experts, even minor maintenance errors can void the barrier’s warranty or greatly reduce its effectiveness. - Prevention Beats Pay-Outs
Let’s be honest—insurance rarely covers termite damage, so when infestations strike, repairs can spiral into the thousands with little help from your insurer. A termite barrier, combined with proper upkeep, can save you from that hardship—protecting both your home’s structure and its financial value.
👋 FAQS
1. Are termite barriers really necessary?
Absolutely. Termites silently destroy more homes in Australia than fires, floods, or storms, and most insurance policies won't help with those repair costs. Installing a barrier is one of the smartest long-term protections you can invest in.
2. What kinds of barriers are there, and how long do they last?
- Physical barriers (like stainless steel mesh or crushed granite) can last indefinitely if maintained.
- Chemical barriers, such as treated soil or reticulation systems, typically last 5–10 years before needing a refill or refresh.
3. Can I install a barrier on an existing home?
Yes. While new builds can integrate physical or hybrid systems easily, existing homes commonly use chemical treatments, reticulation systems, or bait stations to retrofit protection.
4. How do I know the type of barrier I choose will meet Australian building standards?
Look for compliance with AS 3660.1 (the Australian Building Standard for termite management). Many systems—including Termimesh and Kordon—meet or exceed these requirements and are often specified in the National Construction Code (NCC).
5. What maintenance does a termite barrier need?
- Annual inspections by a licensed inspector are essential.
- Avoid “bridging” the barrier with soil, mulch, or landscaping that touches the foundation.
- Keep records of inspections and maintenance to preserve any warranty or coverage.
6. If I install a barrier, does that mean I’m fully covered if termites get in?
Barriers greatly reduce risk—but they’re not foolproof. Regular inspections and avoiding accidental breaches are just as important. Combining a good barrier with upkeep is your best shield.
7. Will a termite barrier void my insurance?
No. Insurance policies generally exclude termite damage. Having a barrier doesn’t void anything—it actually protects your home in ways that insurance doesn’t.
8. Are termite barriers safe for my family and pets?
Yes. Modern systems—especially physical barriers like Termimesh—are chemical-free. Even with chemical treated soil, products are designed for safety once properly installed and dried.
9. Do I need documentation after installation?
Definitely. Installers should leave you with a durable notice (often placed on the meter box), treatment certificates, and records of installation details. Keep these safe—they're vital for maintenance, warranty, or future home buyers.
10. What’s the most cost-effective way to protect my home?
Think of a barrier as a long-term, passive "insurance" policy. While upfront costs vary, when compared to the thousands of dollars you might spend on termite repairs, barriers offer excellent value—especially if installed and maintained correctly.
Further Reading


Member discussion