

Introduction – Why the Fixing Stage Is Make-or-Break
Building a house is exciting, but all the jargon can feel like alphabet soup—“fixing stage” included. If your walls are being lined with plasterboard, the kitchen cabinets and vanities are being fixed into place, and the eaves are going up, you’ve officially hit the fixing stage.
Here’s why the fixing stage matters:
- It locks in everything you’ll see and touch. Plasterboard hides the frame, cabinets cover service routes, and paint seals it all—mistakes now stay with you.
- It builds on the frame stage. Crooked studs equal crooked plasterboard; out-of-plumb door openings turn into doors that swing open on their own. Australian Standard tolerances allow only 4 mm deviation for Level 4 plasterboard, so the frame has to be on point before gyprock fixing starts (why the frame inspection is so important).
- Design decisions still echo here. Missed a “glancing light” window clash? You’ll see every joint shadow forever. Shifting windows after the build kicks off costs real money, so knowing the pitfalls early pays off.
That’s where the C12 Fixing Stage Inspection Checklist comes in. It’s a step-by-step guide written for non-builders, mixing physical checks with design notes so you understand why things should be done a certain way.
Where the Fixing Stage Fits in a Standard Contract Stages
In construction terms, the fixing stage is when the frame of your home gets its interior linings and functional components including:
- Gyprock/Plasterboard Installation: The walls and ceilings are lined with plasterboard (also called drywall or gyprock).
- Joinery & Cabinetry: Kitchen, bathroom vanities, and built-in robes are installed.
- Eaves & Soffits: The underside of your roof overhang is sealed and finished.
- Tiling: Wet areas (bathrooms, laundry) get their waterproofing and tiles.
- Door & Window Fixing: Architraves and skirting boards go on, and doors are hung
Where does it fit among the five contract stages?
It’s stage 4 of the 5 standard progress claims (see the emojied sections detailed below with corresponding blog post)—outlined in most regulated building contracts such as the HIA, QMBA, or your state’s equivalent.

QBCC New Home Contract excerpt on Progress Payments
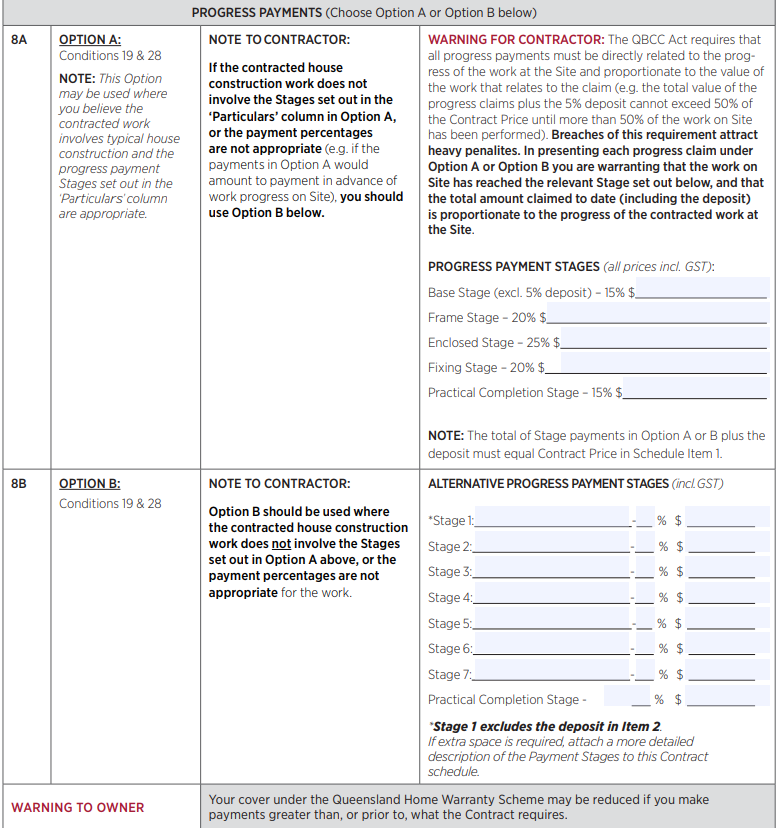
Some context around progress claims and payments

Log in to the members area to access the checklists discussed in each post.
1️⃣ Base / Slab Stage:
Concrete slab or bearers & joists go down.

2️⃣ Frame Stage:
Timber or steel frame and roof trusses installed/built/erected.

3️⃣ Enclosed / Lock-Up Stage:
Roof on, windows in, external doors locked. Weather (and people) shouldn't get inside.

4️⃣ Fixing Stage:
Our focus today. Internal linings, cornices, doors, skirtings, cabinets, tiles, eaves… a big chunk of the contract works and why the progress claim is one of the largest.
5️⃣ Practical Completion / Handover
Final paint, appliances installed, house cleaned. You grab the keys.
Why does the fixing stage matter more than the others?
- It’s typically the second-biggest progress claim. Most standard contracts list the fixing stage at around 20% of the contract price—second only to the enclosed stage, which is usually about 25%.
- Defects can get hidden. Once plaster, paint and joinery go in, you can’t see framing, service routes or moisture barriers without ripping things apart.
- It sets the “feel” of your home. Architraves and Skirtings, Doors, tiles and joinery (vanity units, cabinets and benchtops) - all aesthetic, visual items you will look at and interact with everyday.
In short, the fixing stage is your last real chance to catch quality issues before they’re sealed in (literally) and before your leverage—progress payments—shrinks to almost zero (the final progress claim, the practical completion stage is 15% of the total contract value).
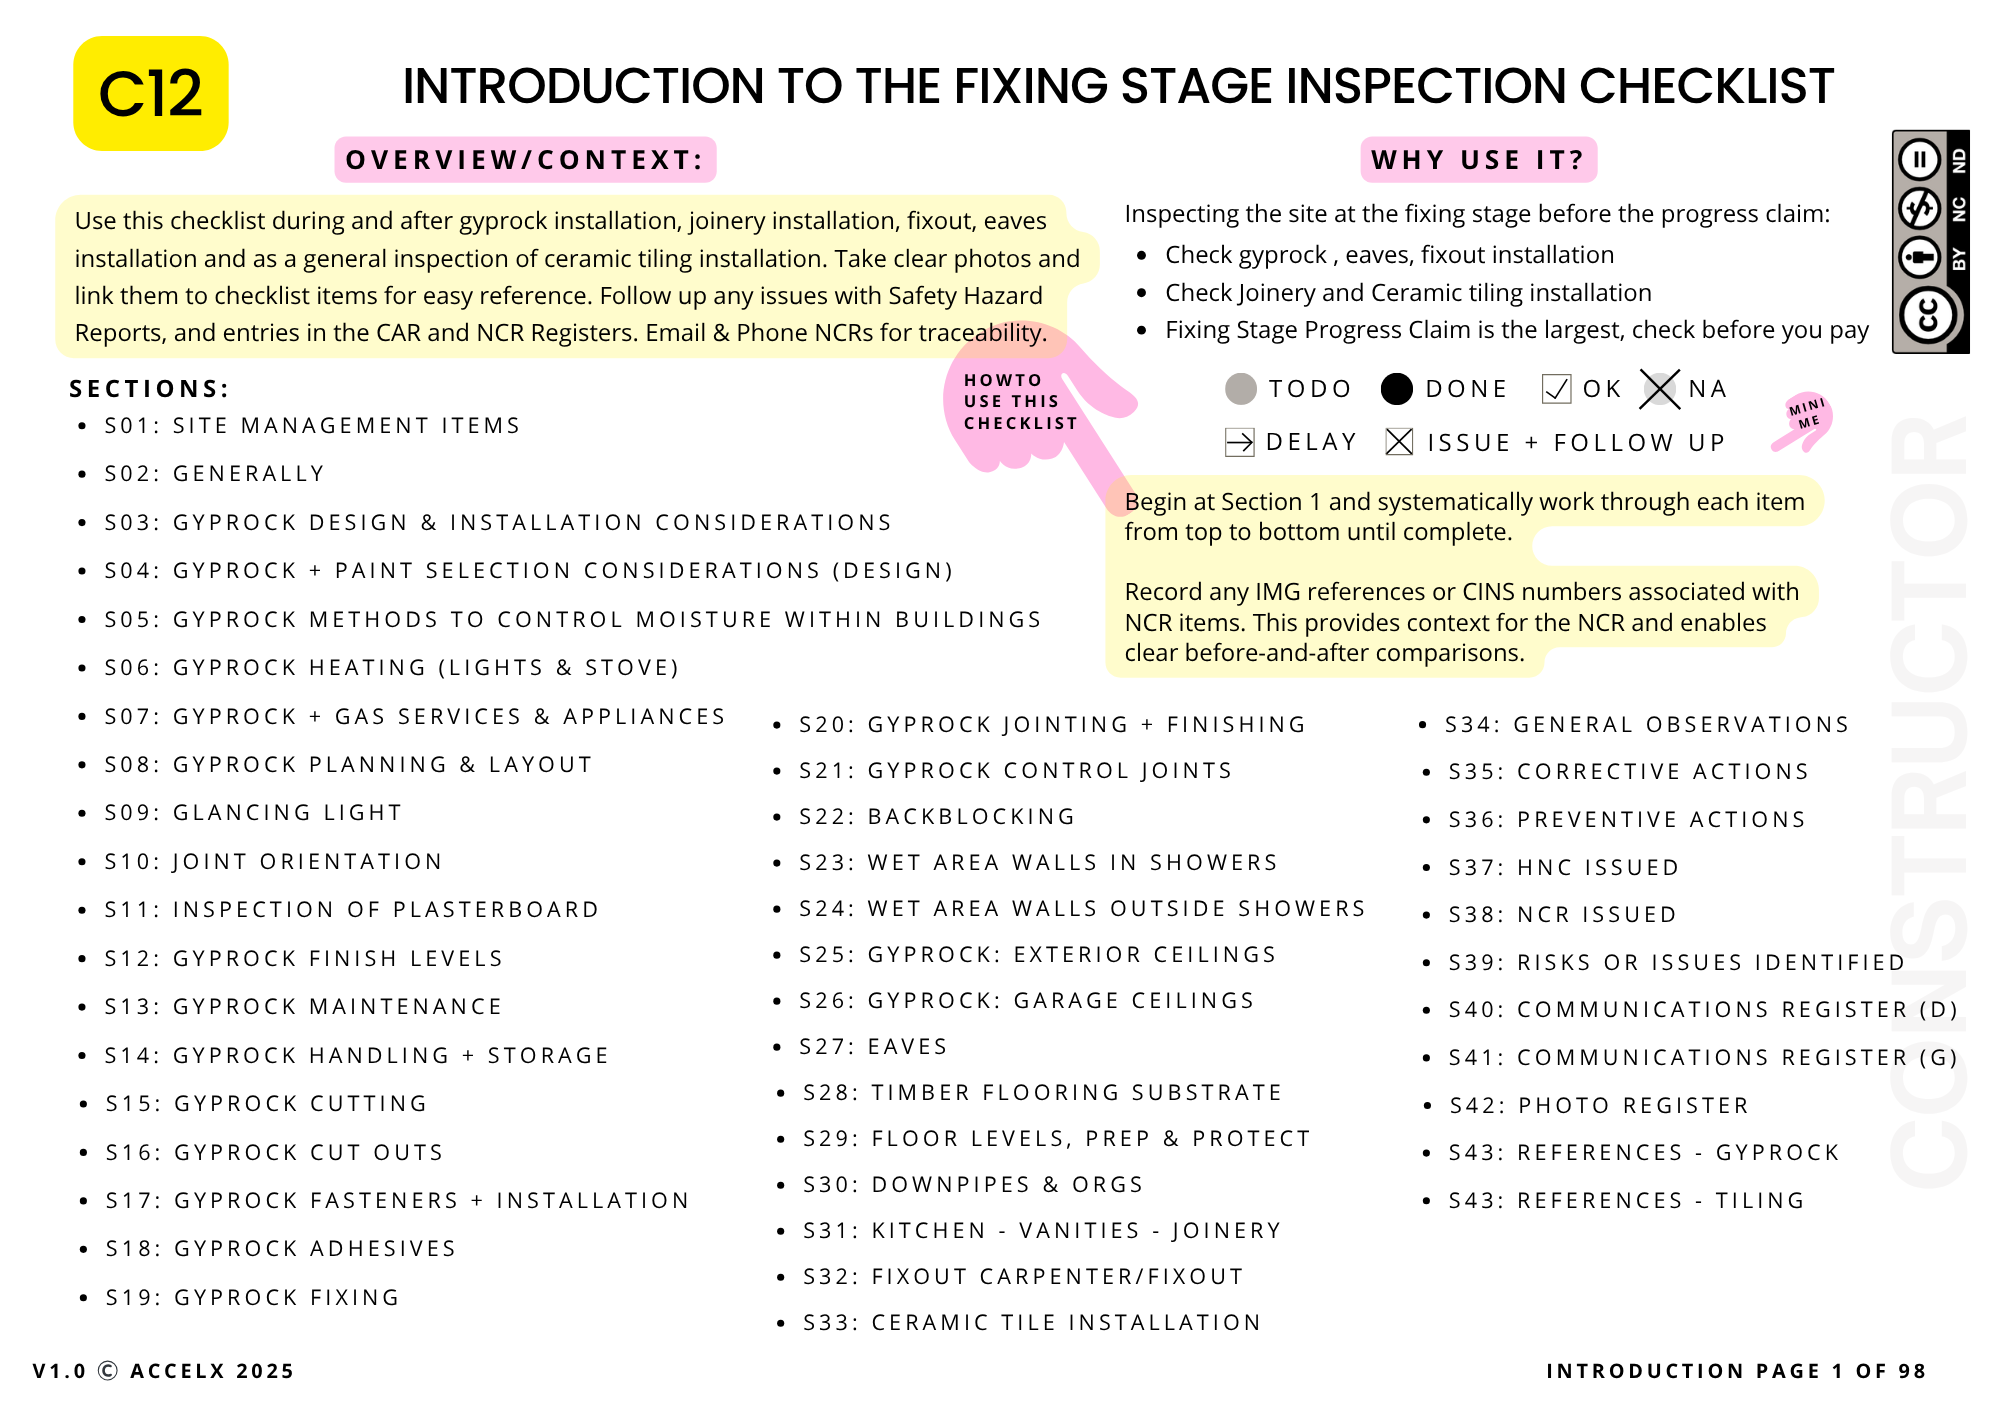
The C12 Fixing Stage Checklist
In short, the C12 Fixing Stage Checklist is a homeowner-friendly mash-up of the National Construction Code, Australian Standards, and manufacturers installation guidelines along with our own quality inspection items for each element within the stage.
We've distilled all that into a single, easy-to-scan PDF so you don’t need to juggle three standards and a folder of brochures on site. Once again, its a chonker, but don't think you have to attack this checklist all in one sitting or site visit.

Chonky is our checklists - by design, this is why
Here’s how it’s put together:
- 44 bite-sized sections. They follow the order you naturally walk the house—starting outside with site tidiness, then moving through plasterboard, wet areas, eaves, flooring, joinery, fix-out and tiling.
- Traffic-light columns. Beside every line you tick OK, Delay, or Issue + Follow-Up. It’s a quick visual cue when you revisit the list later.
- Bold red items = deal-breakers. Anything printed in bold red font is there because it can cost you serious money or void a warranty—think back-blocking on ceilings, moisture-resistant board in bathrooms, or down-light clearance from insulation (creates an insurance issue).
- Photo and NCR prompts. Each page reminds you to snap a pic the moment you spot an issue and jot the image reference next to the item. If the builder pushes back, you’ve got time-stamped evidence ready to roll into a Non-Conformance Report (NCR).
What Gets Checked – The Big-Picture Overview
Crack open the C12 PDF and you’ll see 44 bite-sized sections, but they really funnel into five main inspection buckets (not the best analogy). I should have said five main inspection areas. There you go, i've said it.
1. Gyprock (Plasterboard & Paint)
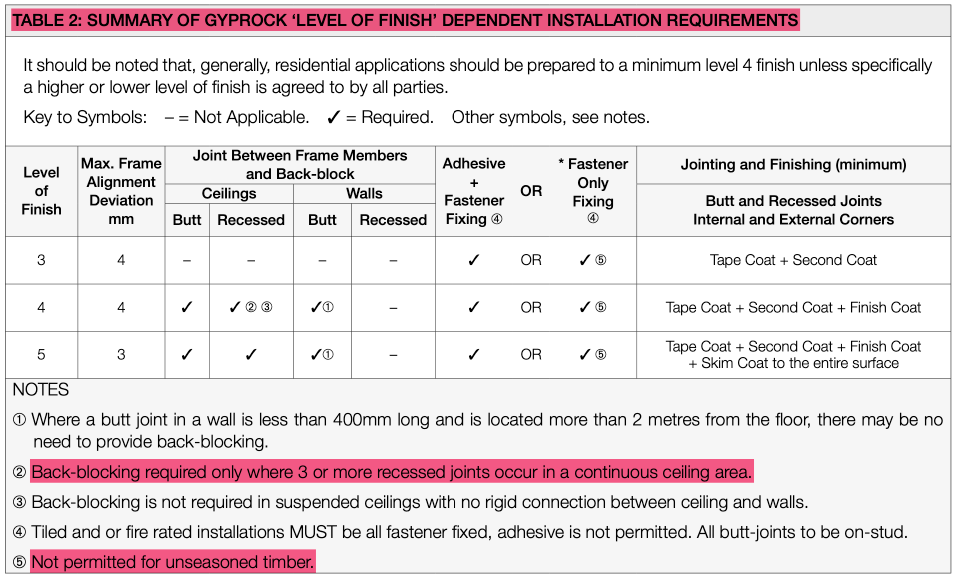
This is where walls and ceilings earn their keep. Section 4 drills home why the standard Class 4 finish needs the right framing and board installation and joint finishing—skip it and “glancing-light” can be an issue. Sections 8, 9, 11 and 12 then tackle sheet layout, joint orientation, back-blocking, and finish levels so every surface stays flat, and is ready for the painters magic (yes, all painters are magical-it used to be from the VOC's but paint technology has improved greatly).
2. Eaves
Section 27 zeroes in on the lining that sit outside under your roof overhang. Poor fixings or the wrong framing spacing here and sheets sag, joints split, and storm-driven rain finds its way inside.
3. Downpipes
Section 30 checks that downpipes are installed correctly, properly connected to stormwater to prevent subsidence issues later on. Honestly, who would of thought there were so many thing you could check with the humble downpipe? All the way with INTJ, no stone left upturned.
4. Joinery & Fix-Out Carpentry
Sections 31 and 32 are all about doors, skirtings, architraves and cabinets—the finishing touches you’ll see (and slam) every day. The checklist calls for even reveals, plumb cupboard carcasses, hinges that align and skirtings that actually meet the wall.
5. Ceramic Tile Installation
Section 33 is a general inspection of ceramic tiling installation. The next checklist we publish will do a deep dive into design, and installation of ceramic tiles.
In this section we look for substrate flatness, tile lippage, grout line consistency, detailing and finishing. We're looking at the general appearance/aesthetics of the tile installation and compliance with standards (AS3958.1).
In the next section I’ll walk you through the ten must-check items that give you the most bang for your inspection buck.
📝 The 10 Must-Check Items—Mapped to the C12 Checklist
Below are the ten highest-stakes checks, each labelled with the exact C12 section number. On inspection day I tick these first, snap photos, and raise an Issue + Follow-Up on the spot if anything’s off.
- S04 — Paint Selection & Class 4 Finish
Why it matters: Class 4 is the default level of finish in Aussie homes. It relies on the right sealer, joint compound and two solid top-coats. Cheap primer or the wrong sheen exaggerates every screw pop the moment sunlight skims the wall. - S08 — Sheet Orientation & Layout
Why it matters: Horizontal sheets on walls and joints running with the light on ceilings help hide seams and prevent cracks. - S11 – S12 — Finish Level Verification
Why it matters: Level 4 suits most rooms; Level 5 (full skim) is essential on raked ceilings or feature walls hit by “glancing light.” Level 5 must be detailed in specifications and contract documentation to ensure all trades are aware of the areas requiring this standard, materials are supplied to allow installation to meet the standard and trades are paid to finish to this standard. - S22 — Back-Blocking
Why it matters: Hidden plasterboard strips glued behind ceiling butt-joints stop cracks as the house flexes. Some crews omit them to save time.
Quick check: Peer through a down-light hole or into the ceiling space (through the man hole). You should see 200 mm-wide plasterboard “straps” glued across each butt-joint. - S27 — Eaves Materials
Why it matters: Under-roof linings cop wind, moisture and heat. Non vented eaves can create plasterboard issues overt time. Roof ventilation is a method of assisting with plasterboard performance as is vented eaves sheeting. Sufficient vents should be installed to allow for cross ventilation of the roof space. - S28 — Timber Floor Substrate Preparation
Why it matters: If sheet flooring isn’t flat and bone-dry before carpet of flooring is laid, you’ll battle squeaks and surface irregularities.
Quick check: Roll a marble across the floor; it shouldn’t race to one corner. Moisture meter readings should sit below the manufacturer’s limit (often ≤ 14 %). Nails and screws should be driven sub surface and sheet joints checked and planned to ensure flatness. - S30 — Downpipes & Stormwater Connection
Why it matters: Downpipes must be connected into the stormwater system and not discharging to the ground where water can cause differential soil movements (heave, shrink/swell). Depending on the soil type on your site (clay loves to swell) determines how much your soil will move with or without the presence of the wet stuff. - S31 — Joinery Installation Checks
Why it matters: Crooked cabinets and uneven door reveals scream “cheap build” and are painful to fix once benchtops and splashbacks are fitted.
Quick check: Pop a spirit level on benchtops and doors; door reveals should be a consistent 2–3 mm from top to bottom. - S32 — Fix-Out Carpentry
Why it matters: Skirtings, architraves and mouldings frame every room. Mis-cut mitres, unglued mitres, poor scribing or bruised moulding profiles (fixout carpenters nails through rounded moulding profiles make the painters job much harder than it needs to be).
Quick check: Run a finger along mitres—no daylight should show. Nail heads must be punched or driven below surface (correct nail gauge and pressure used during fixout is essential), not proud of the surface. - S33 — Ceramic Tile Installation Quality
Why it matters: Lippage (height differences), poor falls to wastes, edge finishing, and pinholes in grout leave you with puddles and chipped toes. Non arrised or polished porcelain edged are just dangerous. No sharp corners should exist. Strangely, I used to pay careful attention to all porcelain tile corners as they look super dangerous shoud someone slip over in the wet area close to one.
How to Use the Checklist Without Getting Lost
Now that you know what to inspect, let’s cover how to do it efficiently—even if you’ve never set foot on a building site. Follow a set process so nothing slips through the cracks. Read the checklist before you head to site, decide (flag) what you’ll look at and what you won’t.
Step 1 – Get your tools sorted before you leave home
- Tablet or phone with the checklist pre-loaded. Mark-ups are easier if you can scribble directly on the PDF.
- Torch for cupboards, roof spaces and plasterboard checks (shadows and no wired lights make inspections harder to complete).
- Tape measure, metal rulers are handy (its a small stright edge) and a larger spirit level or straight edge with small spirit level (1.8m is a good size), a small carpenters steel square is also handy for checking external corners.
- CINS numbering, and painters tape or Sticky labels. Perfect for flagging defects the supervisor can’t “unsee” and adding context to images (a number in an images relates to a checklist item, description and notes).
- Trades and builders love to pull masking tape off once the client leaves. the only way to make sure this doesn't drive you nuts is to have contextualised images. Yes, our CINS numbering is simple but you never see this used on building sites (contextualised images).
- I don’t think this level of detail fits into most builders’ “bust-ass” or “haul-ass” building programs—or their so-called “quality management systems,” if you can call them that.
- Trades and builders love to pull masking tape off once the client leaves. the only way to make sure this doesn't drive you nuts is to have contextualised images. Yes, our CINS numbering is simple but you never see this used on building sites (contextualised images).
Oh, the CINS of your builder.
Step 2 – Walk in the order the checklist is written
Start at S01 and move down the list. If a trade is in your way, tick Delay and circle back before you leave or on the next site visit. Remember to create calendar entries, follow ups and actions before leaving site. Its too easy o get distracted once your out of the zone.
Step 3 – Prioritise bold black items
Anything bolded in the PDF is more important. Pay particular attention to these items.
Step 4 – Use the traffic lights
- OK means done and dusted.
- Delay means “can’t verify yet; revisit.”
- Issue + Follow-Up means you’ve found a defect. Tick it, then…
Step 5 – Snap, tag, move on
Take a clear photo of the problem with something for scale (a tape or your hand). Name the image S27-IMG003.jpg (taken from you phone/photos image details) or similar so you can match it to the checklist later. Jot that file name next to the line item. If your really swanky use an audit app like Site Report Pro.
Step 6 – Raise an NCR on the spot
If you’ve ticked Issue + Follow-Up, flip to the NCR page at the back, jot a one-liner (“S31 – base cabinets out of level 6 mm”) and attach your photo (or label the NCR in your app of choice). Builders act faster when the paperwork hits their inbox before they drive away.
What Happens After the Fixing Stage?
Once the fix-out is finished, the painters work their magic. A fresh coat of light-reflecting paint makes rooms that once felt “small” suddenly look larger—even though the walls haven’t moved an inch, your depth perception will. Next come the fit-offs: plumbers and sparkies install taps, power points, lights, and shower screens. Then your build rolls into the final lap—Practical Completion (PC). Here’s what to expect:
- Fit-Off Frenzy
Electricians, plumbers and shower screen installers descend to install light fittings, taps, appliances, door furniture and shower screens/mirrors/robes. A quick daily walk-around with your phone prevents “mystery damage” debates later. Take photos when onsite for context, its easy to forget and don't trust your memory (its not your friend and will lead you astray using its friend, your emotions to cloud your clarity and ability to recall precisely.). - Final Clean & QA
Once fit-off is complete, the builder organises a builders’ clean and performs an internal quality audit. This is their chance to catch paint misses, silicone gaps and alignment issues. - Practical Completion Inspection
You’re invited for the “PC walkthrough” (sometimes called PCI). Bring your C12 checklist, highlight pen and a phone charger (you’ll use the torch a lot). Anything still outstanding goes onto the PC defect list, which must be fixed before handover.- It’s important to remember that the PCI inspection is a key contract stage—don’t rush it. Booking the removalists or pushing for hand-over just to “get the build over the line” is tempting, but this isn’t the moment to squeak things through. Once the house is handed over, getting PCI items fixed becomes far harder. Make sure every line on the PCI sheet is completed, checked, and signed off before hand-over.
- Touch-Up & Defect Rectification
The builder’s trades come back to patch and paint the fixes you flagged during the PCI walk-through. If a fix drags, remind the supervisor that payment is still sitting in your account. - Handover
When both you and the builder are happy, you sign the PCI Form and sometimes a handover form, pay the final invoice (often by bank cheque still), and then you'll receive the keys plus statutory warranty documents. From that day, a six-year structural warranty and a six-month maintenance period kick in (Queensland time frames; other states vary slightly). - 6 Months Maintenance
Keep every document—your inspection checklists, photos, NCRs, emails, conversation notes, final defect list and invoices—in a single folder or cloud drive. When you start the six-month maintenance process, you’ll likely deal with someone new who follows different procedures and has zero background on your build. Having all the “receipts” (paperwork and photos) ready will make those conversations faster, clearer and far less stressful.
Conclusion – Leverage, Peace of Mind, and a Better-Built Home
The fixing stage is the moment your house goes from “building site” to “almost home”—and that’s exactly why it’s important.
Fresh paint, shiny hinges, and tidy skirtings can lull anyone into signing off on the second-largest progress claim too early. The C12 Fixing Stage Checklist cuts through the gloss. It shows you what matters and where to look. If you’re unsure what to check, this checklist gives you a solid starting point.
Walk the checklist in order, tag photos, raise NCRs on the spot, and hold that progress payment until every “Delay” and “Issue + Follow-Up” is closed out.
FAQS – Quick Answers to Common Fixing-Stage Questions
Q1. Do I still need a professional building inspector if I use the C12 checklist?
A: The checklist is homeowner-friendly, but a licensed inspector brings experience and a trained eye—especially useful on your first build or if you can’t attend site often. Many owners complete their own walk-through, then pay an inspector for a second sweep before signing the claim. The tricky part is spotting where the work falls short of the required standard, and that knack only comes with experience.
Our position on building inspectors is simple: they should be used on every building site and must be independent of the builder.
We also believe that an informed customer—someone who knows what to look for—will almost always receive better service and higher quality. Once a builder realises you’re observant and paying attention, they tend to lift their game. That’s part of why we created our checklist: to help you understand what to check, keep your builder accountable, and ultimately encourage better outcomes.
This isn’t about giving you ammunition or picking fights. The goal isn’t confrontation—it’s collaboration. It’s about having informed conversations that push for best practice, reduce future maintenance, and ensure homes are built better to last.
We also believe council inspectors should be reinstated across all states to inspect critical stages of construction—slab, frame, roof, waterproofing, and final handover.
Right now, too many builders and trades operate as if no one’s watching—because often, no one is. And when there’s no accountability, corners get cut. It shouldn’t be this way. It’s childish, it’s short-sighted, and frankly, it’s damaging the industry. But this is the reality we’re in: profit over purpose, turnover over ethics.
To be clear, not all builders are like this. There are brilliant tradespeople and excellent builders out there doing things right. But the dodgy ones drag everyone down—including the good ones.
Project builders, in particular, should be leading the industry. They have the resources and scale to innovate, improve standards, and set the benchmark. Instead, many seem focused on racing to the next progress claim—pushing volume instead of pushing quality.

Yes, this is a sad builder because he lost his site diary and now needs to prove his quality management system and can't. Diaries are not quality management systems. They are time management devices.

Q2. Can I legally hold payment if defects aren’t fixed?
A: Yes. Under most HIA and MBA contracts you only have to pay when the relevant stage is completed “in accordance with the contract documents.” If NCRs are open or defects at that stage remain unresolved, the stage isn’t finished and payment can be withheld.
Ideally, clarify this before you sign the contract. Ask your builder:
- “How will defects be resolved during a stage?”
- “What’s the process and time frame from identification to completion?”
- “Who’s involved?”
- “Is there an escalation path if I’m not satisfied?”
Understanding the process up front prevents surprises—and arguments—later.
For more due-diligence questions, check out our C4 “Qualify Your Builder” checklist.

Q3. What’s the difference between Level 4 and Level 5 finishes?
A: Level 4 is two coats over joints—standard for bedrooms and living areas. Level 5 is a full skim across the entire surface, used on feature walls or raked ceilings where “glancing light” highlights surface imperfections.
Q4. How do I spot “glancing light” issues?
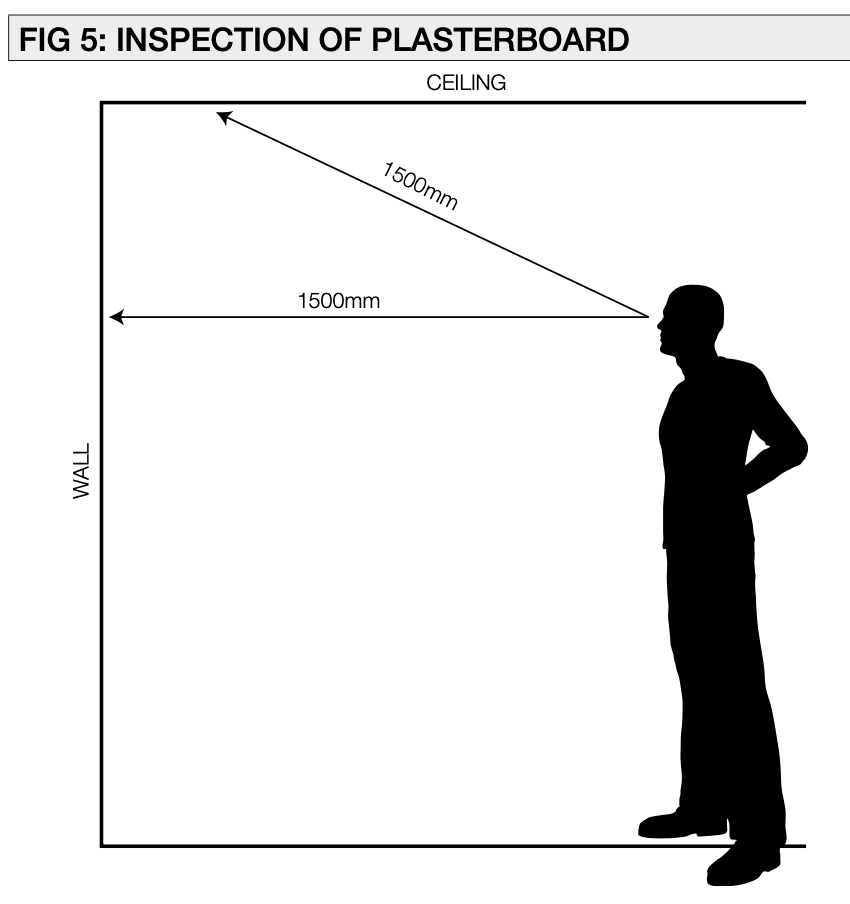
A: Stand close to the wall and shine a torch along its surface. You can also visit late in the day when sunlight hits at a low angle, or open the garage door and look down the adjacent hallway with the door to the house open. Any shadows around screws or joints signal extra sanding—or even a Level 5 skim—may be needed. Remember, Level 4 is the standard finish, and assessments are normally made from a 90-degree viewing position and at defined distances (see image below).
Q5. My builder says back-blocking (S22) isn’t necessary. Is that true?
A: In ceilings longer than 4.8 m, the plasterboard manufacturer’s manuals and AS 2589 both call for back-blocking. Backblocking is required in Level 4 plasterboard ceiling and wall installations (unless a suspended ceiling system is used).
Q6. Can I customise the checklist for my project?
A: Absolutely. Add notes, extra rows, or highlight items unique to your build—stone benchtops, feature timber ceilings, etc. The structure stays the same; you just tailor the detail to suit your projects inclusions.
Q7. The supervisor wants to “walk and talk” without paperwork. Good idea?
A: Friendly chats are great, but always record outcomes in writing—email, NCR, or checklist comments. Memories fade; images and written paper work don't.
Q8. What should I keep after handover in case something fails later?
A: Store your annotated C12, all NCRs, images (with CINS identifiers), the final defect list, emails, and paid invoices in one digital folder. Those documents are gold if a warranty claim arises. In an upcoming post, we’ll walk you through the apps that make capturing and managing NCR items—right through to completion—as easy as they can be.
Further Reading


Member discussion