Have you ever heard the term backblocking and wondered what it meant?
Backblocking is an important process that helps ensure the structural integrity of plasterboard walls. Without it, your walls wouldn’t have the strength and durability needed. Backblocking involves securing plasterboard sheets to wall studs or joists behind the sheets using timber blocks and construction adhesive.
It helps prevent the plasterboard from moving, cracking/peaking or becoming damaged over time.
While it may seem like an extra, unnecessary step, backblocking is required to meet building standards and for good reason. For quality, backblocking is a must when installing plasterboard.
What Is Plasterboard Backblocking?
Backblocking is reinforcing the joints in plasterboard walls and ceilings. It involves securing extra pieces of plasterboard behind the joints to strengthen the structure.
When you install plasterboard, you secure sheets to wall studs or ceiling joists. The joints where two sheets meet can be weak points, so backblocking addresses this by providing extra support. You laminate strips of plasterboard over the joints, then use construction adhesive or cement to adhere them to the wall surface.
Once the backblocks are in place, you can finish the joint compound and paint as usual. The end result is a much more durable wall or ceiling. Backblocking helps prevent issues like cracking at the joints or sagging ceilings over time.
Professional plasterers and builders will commonly use backblocking, especially in high-traffic, load-bearing, or moisture-prone areas of a building. It meets the Australian building standard AS2589 for residential installations. If you’re doing a DIY renovation, backblocking at the butt joints and recessed joints in your walls and ceilings is considered best practise.
When and Where Should Backblocking Be Used?
When installing plasterboard, it's important to consider where and when to use backblocking for extra strength and support.
Where Should Backblocking Be Used?
Backblocking should be used on all butt joints formed between framing members, like studs. It is also required for recessed joints, where the plasterboard sits within the framing. Mid-span joints, where boards meet in the centre of framing, should also be backblocked, even if not structurally necessary, to minimise waste.
According to Australian Standard AS2589, backblocking is recommended:
- Back-blocking is strongly recommended as an added precaution for longitudinal recessed edge plasterboard joints in ceilings
- For butt or end joint walls and ceilings.
- Where mid-span butt or end-joints are not required, but are used to minimise plasterboard wastage, these joints must also be back-blocked.
How Is Backblocking Installed?
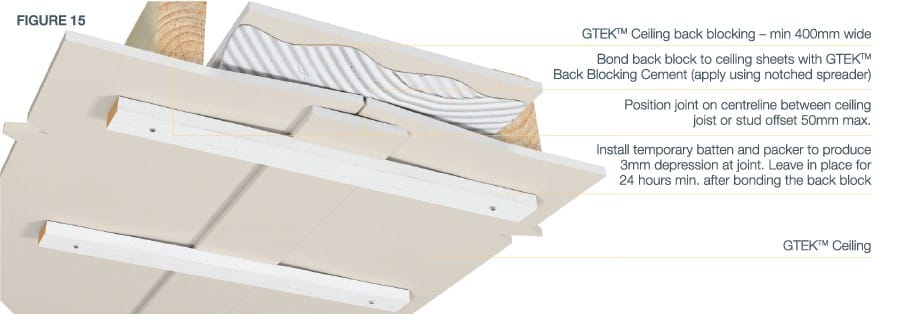
Backblocking involves securing additional pieces of plasterboard behind joints. Strips of plasterboard are fixed to the sides of studs, then backblocks are secured over the joints, either with screws, cement adhesive or both.
The backblocks should sit 5 to 9mm behind the stud face. A jointing compound is then applied over the backblocked area, creating a smooth finish.
Method to install backblocking
Ensure the plasterboard's back is clean, free from dirt and dust. Cut the back-block to the required size, depending on the width of the truss or metal batten. Use a 6-inch taping blade to apply back-block cement along the entire face of the back-block, aiming for a 10mm thick coat.
Using a notched trowel, apply base coat or cornice cement to the backblock to ensure proper adhesion to joint surfaces. Firmly apply the back-blocking strip to the joint's back.
There are various methods for back-blocking ceilings. One approach is to fix all your ceilings first and then climb into the roof space to apply back-blocks. This can be challenging in small pitched roofs. Alternatively, you can apply back-blocks as you fix each ceiling section.
Start by hanging your first ceiling sheet. After finishing the first sheet, apply the back-block, overlapping it onto the existing ceiling. When you hang the next ceiling sheet, it will adhere to the back-block. This method tends to be more convenient.
It is important that you allow the back-blocks to fully dry/set before you commence taping in the joints.
Video
This video provides a partial explanation of backblocking installation. However, it omits crucial steps, such as the installation of a temporary timber batten and a 3mm packer. These are essential for creating a depression in the sheet while the backblocked joint dries.
Why Use Backblocking?
Backblocking adds strength, support and durability to plasterboard linings. It helps prevent cracking at joints and openings, and provides extra stability for fixtures like architraves. For fire-rated or acoustically rated walls, backblocking is essential to maintain performance.
While it requires a little extra time and effort, backblocking will ensure a long-lasting plasterboard installation and help avoid costly call-backs for repairs or re-work.
Conclusion
Backblocking is a crucial step that provides solid backing for plasterboard joints and screw fixings. While it requires a bit of extra effort, the end result is a smooth wall surface and reduced risk of cracking.


