
April home maintenance is about getting water off the roof and away from the house, so it can't sit against the slab. These seven checks follow the April page of your printed calendar and take about an hour. Two extra wall-care checks from the makers' guides sit alongside them.

C18 - 6 Month Maintenance Checklist
$59.00 AUD
Checklist Type: Minor
Form Factor: Fillable, print-ready PDF (A4, 19 pages) with a maintenance calendar and log
When to use: After handover: your first six months and ongoing home maintenance
A 110-point home maintenance checklist with a calendar and log. Plan preventative maintenance, find small problems early and keep your warranties in good order.
✓ Authorship verified on the blockchain · View certificate
This month's checks
These April home maintenance checks come from the gutter, stormwater and external wall sections of our C18 6 Month Maintenance checklist.
1Clean the gutters, downpipes and sumps

Full gutters overflow against the walls and into the eaves. Blocked downpipes and sumps put water where it shouldn't be: beside the slab.
- Pick a dry, calm day. Never do this in wet or windy weather.
- Use a properly set-up ladder on firm, level ground, with someone holding it. Work from the ladder, never from the roof.
- Scoop out leaves with gloves, then flush with a hose and watch each downpipe run.
- Lift the sump and pit grates and clear the debris.
Water lying in the gutter after it's cleared, leaking joints, rust, sagging brackets, or a downpipe that won't flow.
If your home is above single storey, or the gutter sags or leaks. Use a gutter cleaning professional, a roofer or a licensed plumber.
The QBCC Standards and Tolerances Guide (section 8.3) treats gutters that hold more than 10 mm of water as defective, and section 8.4 covers leaking joints.
2Check the roof from the ground with binoculars

A cracked tile, lifted sheet or loose flashing lets water in during the next storm. You can spot most of it without leaving the ground.
- Walk around the house with binoculars on a bright day.
- Look along the ridge capping, valleys, flashings and around pipes and vents.
- Look for cracked, slipped or missing tiles, and lifted sheets or screws.
- Note any branches touching or overhanging the roof.
- Where an upper-roof downpipe empties onto a lower tiled roof, check from an upstairs window that its spreader is in place and lined up with the tile channels.
Gaps in the tiles or sheets, lifted or rusty flashings, broken sealant, or debris built up behind a pipe.
If you see any damage. A roofer repairs and reseals it, or refits a spreader (the tile maker prefers upper roofs to drain straight to the stormwater). Don't walk on the roof yourself.
The QBCC guide (section 7.1) treats roof flashings that leak in the weather the NCC anticipates as defective.
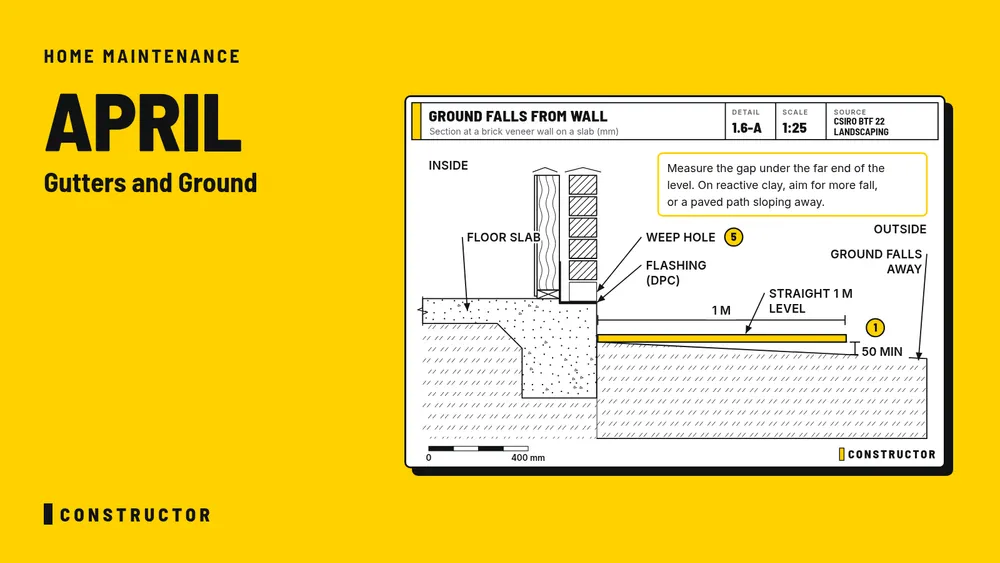
3Check the ground falls away from the house

Water lying against the slab causes soil movement and cracking, and hides termite entry.
- After rain, walk around the house and look for puddles against the walls.
- Lay a long spirit level or a straight piece of timber on the ground, out from the wall.
- Check the ground drops away from the house, not towards it.
- Look for garden beds, edging or paving that trap water against the slab.
- Measure down from the top of the slab: garden beds and turf at least 150 mm below it (100 mm in sandy, well-drained ground), paving that slopes away at least 50 mm.
Puddles beside the footings, soil sloping towards the house, or wet patches that don't dry.
If the ground falls towards the house, or a bed or new paving has crept up. In the defects period, tell your builder in writing. Otherwise, get a landscaper, concreter or licensed plumber to fix the drainage. More on this: Protecting your foundation with better drainage.
The NCC Housing Provisions (clause 3.3.3) require the ground beside a slab-on-ground home to slope away, generally by 50 mm over the first metre, and AS 2870 (clause 5.2.2) sets the ground clearances above.
4Check the weep holes are clear

Weep holes are open joints that drain and air the cavity behind brickwork. Blocked or buried, they trap water. Subfloor vents and the open base of cavity cladding do a similar job.
- Look at the brick course just above the slab, and above windows and doors.
- Check each weep hole is open, with no mortar, sealant, soil or mulch in it, and no mortar sitting on the flashing at its base.
- Clear dirt and cobwebs with a soft brush. If spiders or insects keep nesting, fit a proprietary weep-hole insert rather than filling the hole (Think Brick).
- Check the garden and paving sit well below them.
- Balconies, every 6 months: keep pots and stored items off weep holes and out of the drainage gap along the wall. Check small spitter pipes through the parapet are clear.
- Timber floor over a crawl space: keep subfloor vents uncovered. Damp subfloor air makes floorboards swell, cup and tent.
- Cladding on battens with an air gap behind: keep its open bottom edge clear of soil, mulch, paint and sealant.
Weep holes filled with mortar or sealant, buried under soil or paving, or stained and damp around them.
If they've been filled or the ground has been built up over them. Tell your builder in writing during the defects period. Call a waterproofer for balcony damage, and a builder if the subfloor is wet or water ponds under the house. See What are weepholes?
The NCC Housing Provisions (clause 5.7.5) require weep holes above flashings at no more than 1.2 m centres. Clause 5.7.4 sets how far the damp-proof course must sit above the adjacent ground or paving.
5Check the air-con condensate drains to a pipe

Water dripping onto the ground next to the house can cause local soil swelling (heave) and movement near the footings.
- Run each air-conditioner in cooling mode.
- Find where the condensate line comes out, usually near the outdoor unit or the wall.
- Check it runs into the stormwater or a waste connection, not onto the soil beside the footings. On reactive clay, water there can move the slab.
A pipe dripping onto bare ground beside the slab, a constant wet patch, or water leaking inside from the indoor unit.
If it isn't connected or the indoor unit leaks. Tell your builder or air-conditioning installer, with the photo. Ask your installer to confirm the discharge at the yearly service.
6Check the external walls for cracks, damp or white powder

New cracks can show movement. White powder (efflorescence), stains or damp patches can mean water is getting into the wall or sitting against it.
- Walk around the outside in good light. This is the longest April home maintenance check.
- Look at the walls, especially over windows and doors, near corners and along the lowest brick courses.
- Measure any crack with a crack gauge or ruler, pencil the date beside its ends, and watch it through a full year of weather.
- Look for white powder, mould or water stains, and check what's above them: a gutter, tap, sprinkler, sill, balcony, parapet or flashing.
- Check the slab edge for damp, and inside for musty carpet, stained skirtings or lifting edge tiles.
- Concrete floors: lay a 3 m straightedge across any crack, with a spacer under each end.
- A crack that's getting longer or wider, or doors and windows starting to stick.
- New cracking along the mortar joints of an older brick home. It can mean the steel wall ties are rusting: one maker notes galvanised ties in some homes have corroded within 15 to 20 years.
- Lowest bricks crumbling or powdering (fretting). Redirect the salt source: often a saltwater pool backwash, driveway or balcony run-off, or fertiliser.
- Paint blisters. Cut one open: paint underneath means heat or solvent, bare wall or timber means water is getting in.
- Normal: hairline floor cracks up to about 2 mm, and slightly weathered mortar.
If a crack keeps growing, or damp has no obvious source. Fix the water source first, and don't paint over damp or salts. Tell your builder in writing if a floor crack is wider than 2 mm, the slab dips or humps more than 15 mm under the straightedge, or the slope changes by more than 1 in 100 (in QLD, QBCC can help if the house is under 6.5 years old). A structural engineer diagnoses wall ties or ongoing movement; a rising-damp specialist fixes a low or broken damp-proof course.
The QBCC guide (section 4.2, Table 4.2, from AS 2870) grades wall cracks by width. Category 3 damage or worse is a defect. Category 2 is a defect if it appears within 12 months of completion. For later movement, the VBA treats cracks under 1 mm as normal, watches 1–5 mm cracks for 12 months, and sends cracks over 5 mm to an engineer. QBCC's subsidence fact sheet is looser, treating cracks under 5 mm that fill easily as owner maintenance.
7Brush off white powder and treat stains gently
White powder found during April home maintenance is usually harmless salt, and the wrong cleaning does more harm than the powder. Water lets the salts soak back in, acid leaves permanent brown "acid burn" on brick, and scrubbing damages render.
- Fix whatever is wetting the wall first.
- In dry weather, brush the powder off brick, tiles or grout with a stiff dry brush, and vacuum it up so it doesn't soak into the paving. Repeat when it returns.
- Don't hose it, or use acid, alkaline cleaners, kerosene or oil. If you need more, use a barely damp cloth. On painted render, AS 2311 allows a wipe with diluted white vinegar, then a damp cloth.
- Clean soil splashes off the bottom courses soon, with a soft bronze-bristle or fibre brush and liquid detergent. Never a steel wire brush: its bristles rust.
- Don't scrub stains or pitting on render. Ask the coating maker or a renderer for the cause.
- Never "brighten" brickwork with brick acid yourself. It burns bricks, especially light-coloured, Queensland and WA bricks, and only removes mortar smears anyway.
- Powder that keeps coming back means water is getting in: check copings, sills, flashings, gutters, taps and pipes. On new brickwork, most of it weathers away.
- A hard white film that won't brush off is usually a calcium deposit from mortar or concrete run-off.
- Green, yellow or brown stains on light bricks are usually vanadium, a harmless natural salt. Acid can turn them black.
If it keeps returning (a waterproofer, tiler or roof plumber, or your builder in the defects period), or there's a hard crust or film. A professional brick cleaner tests a small area before any acid or high-pressure wash. More on efflorescence.
AS 3958.1 (Appendix C2.2) says efflorescence on tiling is removed dry, and AS 2311 says not to repaint until the water source is found and blocked.
8Check the movement joints in brick and render
Movement joints are vertical, full-height gaps that let a wall move without cracking. Think Brick names hard material left in them as the most common cause of brick-expansion damage.
- Add them to your April home maintenance wall walk. The gaps are usually filled with flexible sealant over a foam rod.
- Check each is free of mortar, stones and other hard material. Never fill one with mortar or rigid filler.
- In clay brick, the sealant sits well back because the gap slowly closes. If it has squeezed out, trim it flush with a sharp knife.
- On rendered walls, check the joints run right through the render and paint, and check the sealant where render meets brick (the coating maker says every 6 months).
A crack running along a joint that's been rendered or painted over, or sealant that's cracked, split or missing.
If a joint is bridged or the sealant is missing: a builder, bricklayer or renderer.
AS 4773.2 (clause 7.1) requires render and coatings to allow the same movement as the masonry.
9Test the safety switches (RCDs)

A safety switch cuts the power if current leaks to earth, for example through a person. If it's stuck, it won't protect anyone.
- Tell the household the power will go off on some circuits.
- Open the outer door of the switchboard and press the button marked "T" or "Test" on each safety switch.
- Each one should trip straight away. Note which lights and appliances go off.
- Switch it back on.
A switch that doesn't trip, won't reset, or trips again and again on its own.
If any of these happen. A licensed electrician needs to check or replace it. Never remove the switchboard cover.
Queensland's Electrical Safety Office recommends a push-button test every three months, which is why this calendar has it in January, April, July and October.
Where you live changes the timing
Plan your april home maintenance around your climate.
- North (QLD, NT, northern WA, northern NSW). It's the end of the wet. Clear the season's debris from gutters and sumps, and check the drainage held up.
- South (temperate). It's autumn leaf fall. Clear the gutters before the winter rain arrives.
Every month, as well
Add these to your april home maintenance, as every month:
- Test every smoke alarm with the test button.
- Clean the air-con filters while you're using it.
- Check wet areas for mould and run the exhaust fans.
- Walk around: note new cracks, leaks, stains or sticking doors.
- Record what you did in your maintenance log.
The short version
April home maintenance keeps water moving: clean gutters and sumps, check the roof with binoculars, and make sure the ground, weep holes and condensate lines send water away from the slab. Note any wall cracks and watch them, and clean white powder dry.
Next month: May home maintenance.
FAQs
Can I clean my own gutters?
On a single-storey home, from a properly set-up ladder on a dry, calm day, yes. Above single storey, use a professional, and never stand on the roof.
How do I know if a wall crack is serious?
Measure it, date it and watch it. A crack that keeps widening, or comes with sticking doors and windows, needs your builder or a structural engineer.
How long does April home maintenance take?
About an hour on a single-storey home. Allow longer if the gutters are full after the wet season.